

Wood carving transforms ordinary furniture into works of art. As furniture design in 2026 embraces unique, handcrafted elements, mastering advanced wood carving techniques becomes an invaluable skill for artisans and hobbyists alike. This article explores the intricate world of Advanced Wood Carving Techniques for Decorative Furniture Accents: Hand Tools & Power Carvers, guiding you through methods to create stunning, bespoke details that elevate any piece. Whether you prefer the meditative rhythm of traditional hand tools or the efficiency of modern power carvers, these techniques will enable you to infuse your furniture with character and sophisticated beauty.
Key Takeaways
- Diverse Techniques: Explore a range of advanced carving methods, from intricate relief carving to delicate chip carving, for varied aesthetic outcomes.
- Tool Mastery: Understand the specialized uses of both traditional hand tools and modern power carvers for precision and efficiency in decorative work.
- Material Selection: Learn how wood choice impacts carving success and the final appearance of furniture accents.
- Design Integration: Discover how to effectively plan and integrate carved elements to enhance furniture design and structure.
- Finishing Excellence: Recognize the importance of proper finishing to protect and highlight the intricate details of your carvings.
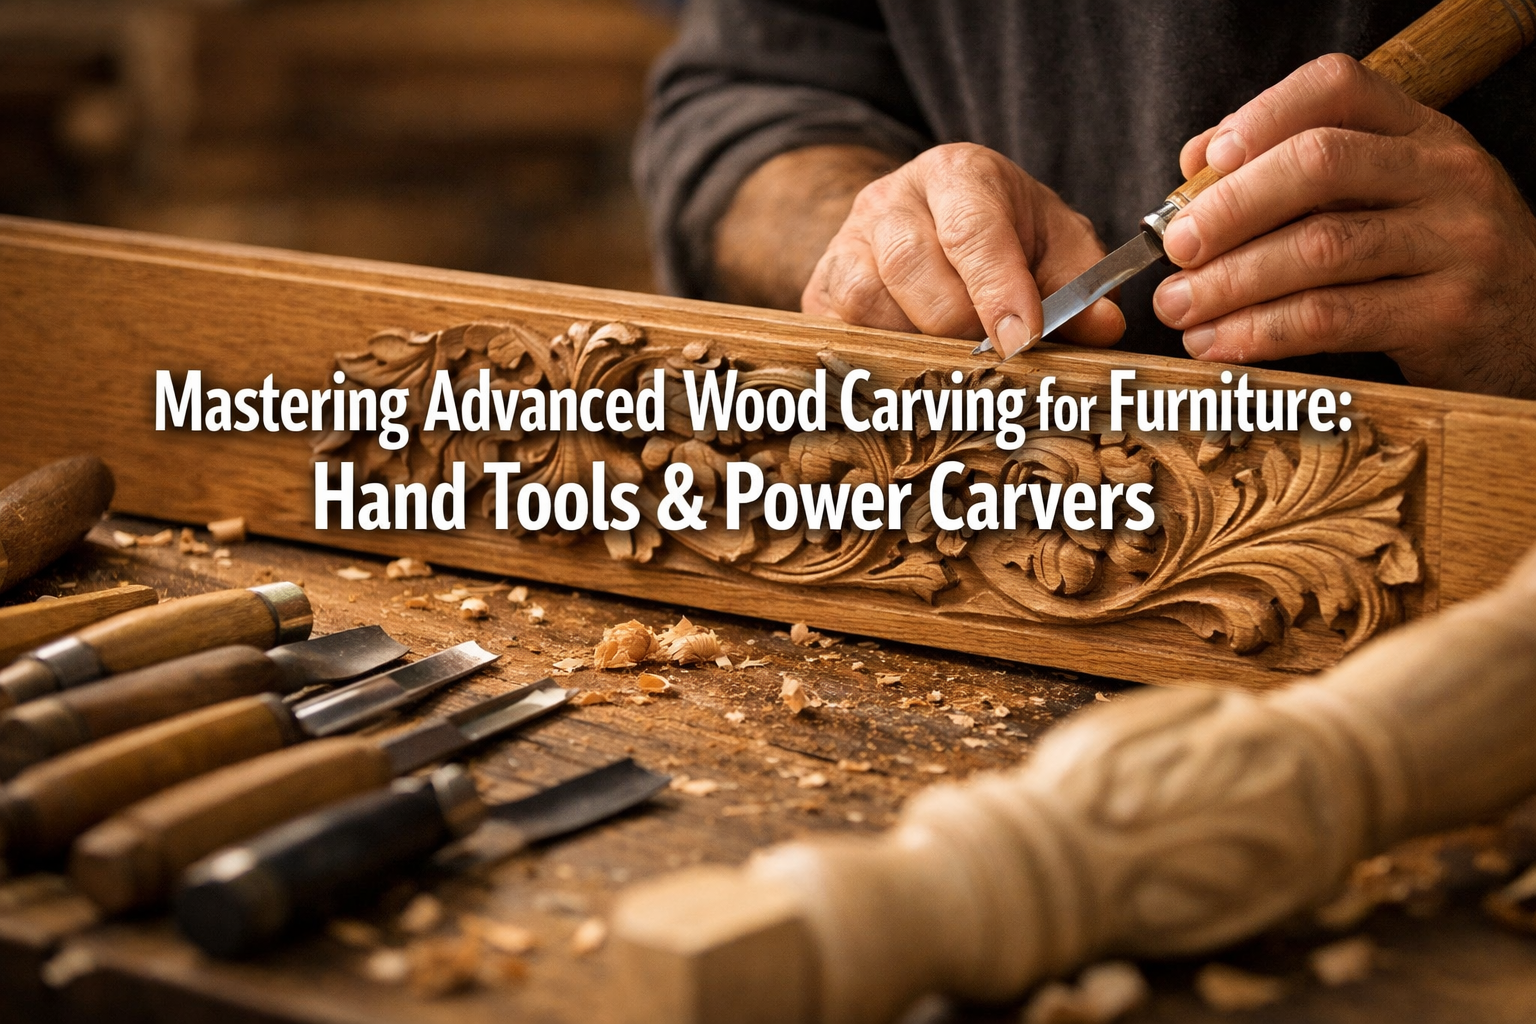
Mastering Traditional Hand Tools for Intricate Furniture Details
{{IMG_SLOT_1}}

The soul of wood carving often resides in the skilled use of hand tools. For centuries, artisans have employed chisels, gouges, and knives to coax exquisite designs from wood. When applying Advanced Wood Carving Techniques for Decorative Furniture Accents: Hand Tools & Power Carvers, hand tools offer unparalleled control, allowing for subtle variations in depth and texture that power tools sometimes struggle to replicate.
Essential Advanced Hand Carving Tools
Moving beyond basic chisels, advanced hand carving requires a specialized arsenal.
- Gouges: These are curved chisels, indispensable for shaping concave and convex surfaces, creating sweeping lines, and scooping out material. They come in various sweeps (the curve of the blade) and widths, categorized by a numbering system (e.g., a #3 gouge has a shallow curve, a #11 is a U-shaped veining gouge).
- V-Gouges: Featuring a V-shaped cutting edge, these are perfect for incising lines, outlining designs, and creating sharp, crisp details. They range from narrow to wide angles, each offering a distinct aesthetic.
- Veining Tools: Extremely narrow, deep gouges used for fine lines, delicate textures, and detailing intricate patterns like hair or leaves.
- Spoon Gouges: With their bent shanks, spoon gouges allow access into deeper recesses and tight curves where straight gouges cannot reach.
- Chip Carving Knives: Small, sharp knives designed specifically for chip carving, a technique that removes small, uniform chips of wood to create geometric patterns.
- Mallets: Essential for driving larger gouges and chisels when more force is required, particularly for deeper relief carvings.
“The true measure of a carver’s skill often lies in their ability to make a single hand tool sing, transforming a block of wood into a living form with grace and precision.”
For achieving truly refined work, proper tool sharpening is paramount. A dull tool is dangerous and frustrating, yielding poor results. Regular sharpening with whetstones and strops ensures crisp cuts and reduces fatigue. Our guide on Hand Tool Mastery for Detail Work: Chisels, Hand Planes, and Rasps for Refined Joinery and Finishing offers further insights into maintaining sharp edges.
Advanced Hand Carving Techniques
Relief Carving: This technique involves carving away the background wood, leaving the design raised above the surface.
- High Relief: Features designs that stand out significantly from the background, sometimes nearly fully three-dimensional. It adds dramatic depth to furniture panels, drawer fronts, or cabinet doors.
- Bas-Relief (Low Relief): The design is only slightly raised, providing subtle texture and visual interest without projecting too far. Ideal for delicate borders or surface embellishments.
- Incised Carving: The design is cut into the surface rather than raised. This is often used for lettering, fine lines, and stylized patterns.
Chip Carving: A decorative technique that removes small, geometric chips of wood using a specialized knife, resulting in intricate patterns typically found on borders, frames, or small boxes. It’s a precise art that relies on consistent angles and depth.
Pierced Carving (Fretwork): This involves completely cutting through the wood to create openwork patterns. Often seen in screen dividers, chair backs, or decorative panels, it requires careful planning and execution to maintain structural integrity. This can also be adapted to create Handcrafted Wooden Wall Art: 3D Layered Panels and Geometric Carvings with Router Techniques, though traditionally done with hand tools.
Selecting the Right Wood
The choice of wood significantly impacts the carving process and the final aesthetic.
| Wood Species | Characteristics | Best For |
|---|---|---|
| Basswood | Soft, fine, even grain; carves easily, takes detail well. | Chip carving, intricate details, beginners. |
| Mahogany | Medium hardness, uniform grain, rich color; stable. | Relief carving, sculptural elements, larger pieces. |
| Walnut | Medium hardness, beautiful dark grain; durable. | High-end furniture accents, intricate patterns, takes polish well. |
| Cherry | Medium hardness, fine grain, beautiful aging color. | Relief carving, delicate details, furniture accents where color matters. |
| Oak | Hard, open grain; challenging for fine details, but durable. | Bold, robust carvings, traditional styles. |
For furniture accents, selecting a wood that complements the main furniture piece is crucial. Wood Species Selection for Visible Joinery: Choosing Materials that Showcase Hand-Cut Joints in Contemporary Designs provides additional insights into material choice.
Power Carving for Efficiency and Precision in 2026
{{IMG_SLOT_2}}
While hand tools offer a traditional meditative experience, modern power carvers have revolutionized Advanced Wood Carving Techniques for Decorative Furniture Accents: Hand Tools & Power Carvers, offering increased speed, efficiency, and a different kind of precision. These tools are particularly beneficial for removing larger amounts of material, texturing surfaces, and achieving highly consistent results.
Types of Power Carving Tools
Rotary Tools (Die Grinders/Dremel-style tools):
- Description: High-speed tools with interchangeable bits (burrs, sanding drums, polishing wheels).
- Application: Excellent for fine details, undercutting, smoothing, texturing, and accessing tight areas. Carbide or tungsten burrs are aggressive for shaping, while diamond burrs are ideal for very hard woods or stone.
- Considerations: Requires a steady hand and practice to avoid accidental damage due to high RPMs.
Micro-Motor Carvers:
- Description: Similar to rotary tools but with even higher RPMs and finer control, often used by jewelers and dentists.
- Application: Unmatched for extremely delicate work, minute details, and polishing intricate surfaces.
- Considerations: Can be more expensive; requires very precise hand-eye coordination.
Reciprocating Carvers (Flex Shaft Carvers):
- Description: These tools move a chisel or gouge bit back and forth rapidly, mimicking the action of a hand mallet, but with much greater speed and less effort. Often powered by electricity or compressed air.
- Application: Ideal for roughing out large areas, carving deep relief, and achieving consistent textures. Less fatiguing for extensive carving.
- Considerations: Generates more vibration than rotary tools; bit selection is crucial for different wood types and cuts.
Angle Grinders with Carving Discs:
- Description: Powerful, high-torque tools fitted with specialized wood carving discs (e.g., Lancelot, Arbortech).
- Application: Best for rapid material removal, aggressive shaping, and creating deep sculptural forms in larger furniture components like legs, posts, or substantial decorative panels.
- Considerations: Requires extreme caution and proper safety gear due to high power and potential for kickback. Not for fine detail work.
Power Carving Techniques for Furniture Accents
- Roughing Out: Using aggressive burrs or carving discs on angle grinders to quickly remove bulk material and establish the general form of the carving.
- Shaping and Refining: Progressing to finer burrs on rotary or micro-motor tools, or using reciprocating carvers with medium gouges, to define contours and smooth surfaces.
- Texturing: Employing specific burrs (e.g., flame burrs, ball burrs) or specialized texturing bits to add visual interest, create grain effects, or simulate natural textures like bark or fabric folds.
- Undercutting: Using fine burrs on rotary tools to create shadows and depth by carving beneath raised elements, making them appear more prominent and detached from the background.
- Detailing: Utilizing micro-motor carvers or very fine rotary bits for intricate lines, small patterns, and delicate features that bring the carving to life.
Safety First ⚠️
Power carving tools, especially angle grinders, can be dangerous if not handled properly. Always:
- Wear appropriate personal protective equipment (PPE): safety glasses or a face shield, dust mask (especially with fine dust), and hearing protection.
- Secure your workpiece firmly with clamps or a carving vise.
- Read and understand the manufacturer’s instructions for each tool.
- Maintain a firm grip and always be aware of the bit’s direction of rotation or reciprocation.
For more on general woodworking safety and tool use, our article on Precision Woodworking Tools: Top 5 Picks for Your Shop offers relevant advice.
Integrating Carved Accents and Finishing Touches
{{IMG_SLOT_3}}
Successfully applying Advanced Wood Carving Techniques for Decorative Furniture Accents: Hand Tools & Power Carvers goes beyond just the carving itself. It involves thoughtful design integration and meticulous finishing to ensure the carved elements enhance the furniture piece as a whole.
Design Integration
Before picking up a tool, careful planning is essential.
- Sketching and Templates: Develop your design through sketches. For repetitive elements or intricate patterns, creating templates or stencils can ensure consistency. Transferring designs accurately onto the wood surface is critical.
- Proportion and Scale: Ensure the carved accent is proportionate to the furniture piece. A large, intricate carving might overpower a delicate furniture design, while a too-small detail could get lost.
- Contextual Harmony: The style of the carving should complement the overall aesthetic of the furniture. A rustic, deep relief carving might clash with a sleek, modern piece, for instance. Consider the Warm Minimalism in Woodworking: Balancing Clean Design with Textured Natural Materials aesthetic for a contemporary approach.
- Structural Considerations: Carving too deeply or in critical structural areas can weaken a furniture component. Always design with the wood’s strength in mind.
- Joint Integration: If carvings are near or across joints, plan how the carving will interact with the joinery. Sometimes, carving after assembly is best, while other times, individual components are carved first. For visible joinery, our guide on Hand Tool Joinery for Visible Wood Joints: Dovetails, Mortise and Tenon, and Box Joints as Design Features in Furniture and Small Projects can offer inspiration.
Finishing Carved Furniture Accents
Finishing is where the carved details truly come to life. The right finish protects the wood, highlights the intricate work, and enhances its beauty.

Cleaning and Sanding:
- Dust Removal: Thoroughly remove all dust and debris from the carving, using brushes, compressed air, or a vacuum.
- Light Sanding: For carved areas, sanding should be minimal and extremely gentle. Use fine-grit sandpaper (220 grit or higher) or sanding sponges, following the contours of the carving. Avoid over-sanding crisp edges or fine details. For very intricate areas, a small detail sander or even a soft brush with abrasive paste might be more appropriate.
Staining (Optional):
- Purpose: Stains can deepen the wood’s color, equalize tone, and accentuate grain patterns.
- Application: Apply stain evenly, wiping off excess promptly. For carvings, use a smaller brush to get into crevices. Be aware that carvings absorb stain differently than flat surfaces, potentially appearing darker in recesses.
- Consideration: Some carvers prefer a natural look to highlight the texture, foregoing stain entirely.
Applying a Protective Finish:
- Oil Finishes (e.g., Tung Oil, Linseed Oil): Penetrate the wood, offering a natural look and feel. They enhance the grain and provide moderate protection. Apply multiple thin coats, wiping off excess. Oils are excellent for carved pieces as they don’t build up a thick film that can obscure details.
- Varnish or Polyurethane: Provide a harder, more durable protective layer. Apply thin coats with a soft brush, ensuring even coverage without pooling in carved areas. Satin or matte finishes often look more natural on carvings than high-gloss.
- Wax Finishes: Can be applied over oil or directly to bare wood for a soft luster and added protection. Buffing wax into carvings enhances their feel.
Techniques for Highlighting Carvings
- Antiquing/Glazing: Applying a darker glaze or antiquing wax, then wiping it off the raised surfaces, leaves residue in the recesses, enhancing depth and definition.
- Controlled Sheen: Varying the sheen of the finish – perhaps a higher gloss on the raised parts and a satin in the background – can draw attention to the carving.
- Two-Tone Finishing: In some decorative furniture, a contrasting color might be applied within certain carved elements, though this is a more specialized approach.
Achieving a high-quality finish takes patience and attention to detail. Our comprehensive guide on Wood Finishing Techniques offers a wealth of information to perfect your project’s final presentation.
Conclusion
The journey into Advanced Wood Carving Techniques for Decorative Furniture Accents: Hand Tools & Power Carvers is one of continuous learning, precision, and artistic expression. From the rhythmic cuts of a hand chisel to the rapid shaping by a power carver, each method offers unique advantages for transforming ordinary wood into extraordinary furniture. By understanding specialized tools, mastering intricate techniques, carefully selecting your materials, and applying thoughtful finishing, you can create decorative furniture accents that stand as true testaments to craftsmanship.
Embrace the challenge, hone your skills, and let your creativity flourish. The beautiful, bespoke furniture you create will not only be functional but will also tell a story through its exquisitely carved details, making each piece a cherished heirloom for years to come in 2026 and beyond.
Actionable Next Steps:
- Invest in Quality Tools: Acquire a few specialized hand gouges or a basic power carving kit relevant to the techniques you wish to explore.
- Practice on Scraps: Before carving furniture, practice new techniques on scrap pieces of the same wood species.
- Study Masterworks: Examine examples of carved furniture to inspire your designs and understand historical techniques.
- Join a Community: Connect with other carvers online or in person to share knowledge and gain feedback.
References
- Dorsett, C. (2018). Woodcarving Basics & Beyond. Fox Chapel Publishing.
- Butz, P. (2020). Carving Realistic Faces with Power. Fox Chapel Publishing.
- Jackson, A. (2015). The Encyclopedia of Wood: A Tree-by-Tree Guide to the World’s Most Popular Wood. Quarto Publishing Group USA.
