
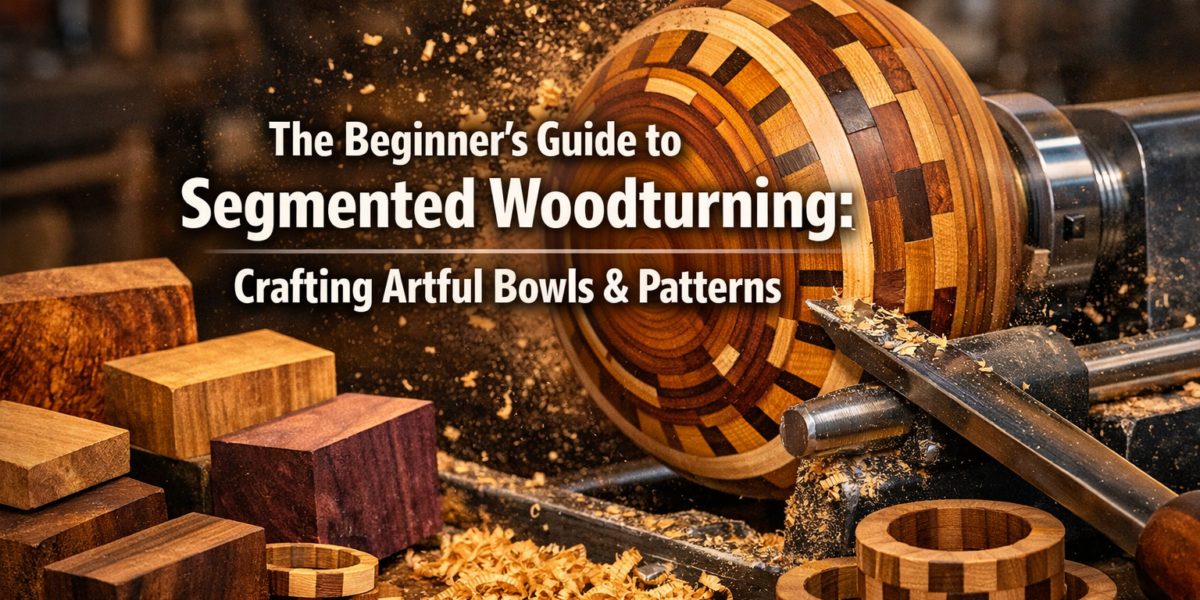

In 2024, a stunning segmented woodturned vase created by Malcolm Zander sold for over $10,000, underscoring the immense value and artistic potential of this intricate craft. While such masterpieces may seem daunting, the journey into segmented woodturning is remarkably accessible, offering an incredibly rewarding path for woodworkers looking to elevate their skills and create breathtaking pieces. This guide, “The Beginner’s Guide to Segmented Woodturning: Creating Intricate Patterns and Bowls on the Lathe,” aims to demystify this fascinating art form, empowering you to transform individual wood pieces into cohesive, visually complex designs that capture attention and imagination.
Segmented woodturning involves precisely cutting many small pieces of wood, often wedges, and gluing them together into rings or other forms. These assembled blocks are then mounted on a lathe and turned, revealing stunning patterns and symmetrical designs. It’s a craft that combines geometry, woodworking precision, and the art of turning, allowing for virtually limitless creative expression.

Key Takeaways
- Precision is paramount: Accurate cutting and careful gluing of wood segments are crucial for successful segmented turnings.
- Design possibilities are vast: Segmented woodturning allows for intricate patterns and multi-wood designs impossible with solid wood.
- Essential tools are common: Many tools are shared with traditional woodturning, with a few specialized additions for segment preparation.
- Safety first: Always prioritize safety, especially when operating power tools and the lathe.
- Patience yields rewards: The process can be time-consuming, but the intricate results are incredibly satisfying.
Understanding the Fundamentals of Segmented Woodturning: Creating Intricate Patterns and Bowls on the Lathe
Segmented woodturning stands apart from traditional spindle or faceplate turning, which typically starts with a solid block of wood. Instead, it begins with planning and assembly. Imagine building a puzzle where each piece contributes to a larger, symmetrical design that only fully emerges as you shape it on the lathe. This approach offers unparalleled control over patterns, allowing you to incorporate contrasting wood species, vibrant colors, and geometric precision into your turned objects.
The core principle involves constructing a blank from numerous smaller wood segments. These segments are often cut at specific angles, glued into rings, and then stacked to form a hollow cylinder or bowl shape. Once the glue has cured, this assembled blank is mounted on the lathe and turned down to reveal the desired form and the integrated, captivating patterns. This method not only allows for intricate designs but also makes efficient use of smaller, often exotic, wood scraps that might otherwise go to waste. For those already familiar with general woodturning, segmented turning builds upon existing lathe skills, adding a new dimension of creativity. If you’re just starting your woodturning journey, a good resource for foundational skills is “Introduction to Wood Turning for Beginners: Mastering Basic Lathe Operations”.
Essential Tools and Materials
Before embarking on your first segmented project, it’s vital to gather the necessary tools. Many are staples in any woodworker’s shop, while others are more specific to segmented turning.
Tools:
- Wood Lathe: The heart of any turning operation. Ensure it’s sturdy and capable of handling the size of your intended projects.
- Lathe Chisels/Gouges: A good set of sharp turning tools, especially bowl gouges and scrapers, is crucial.
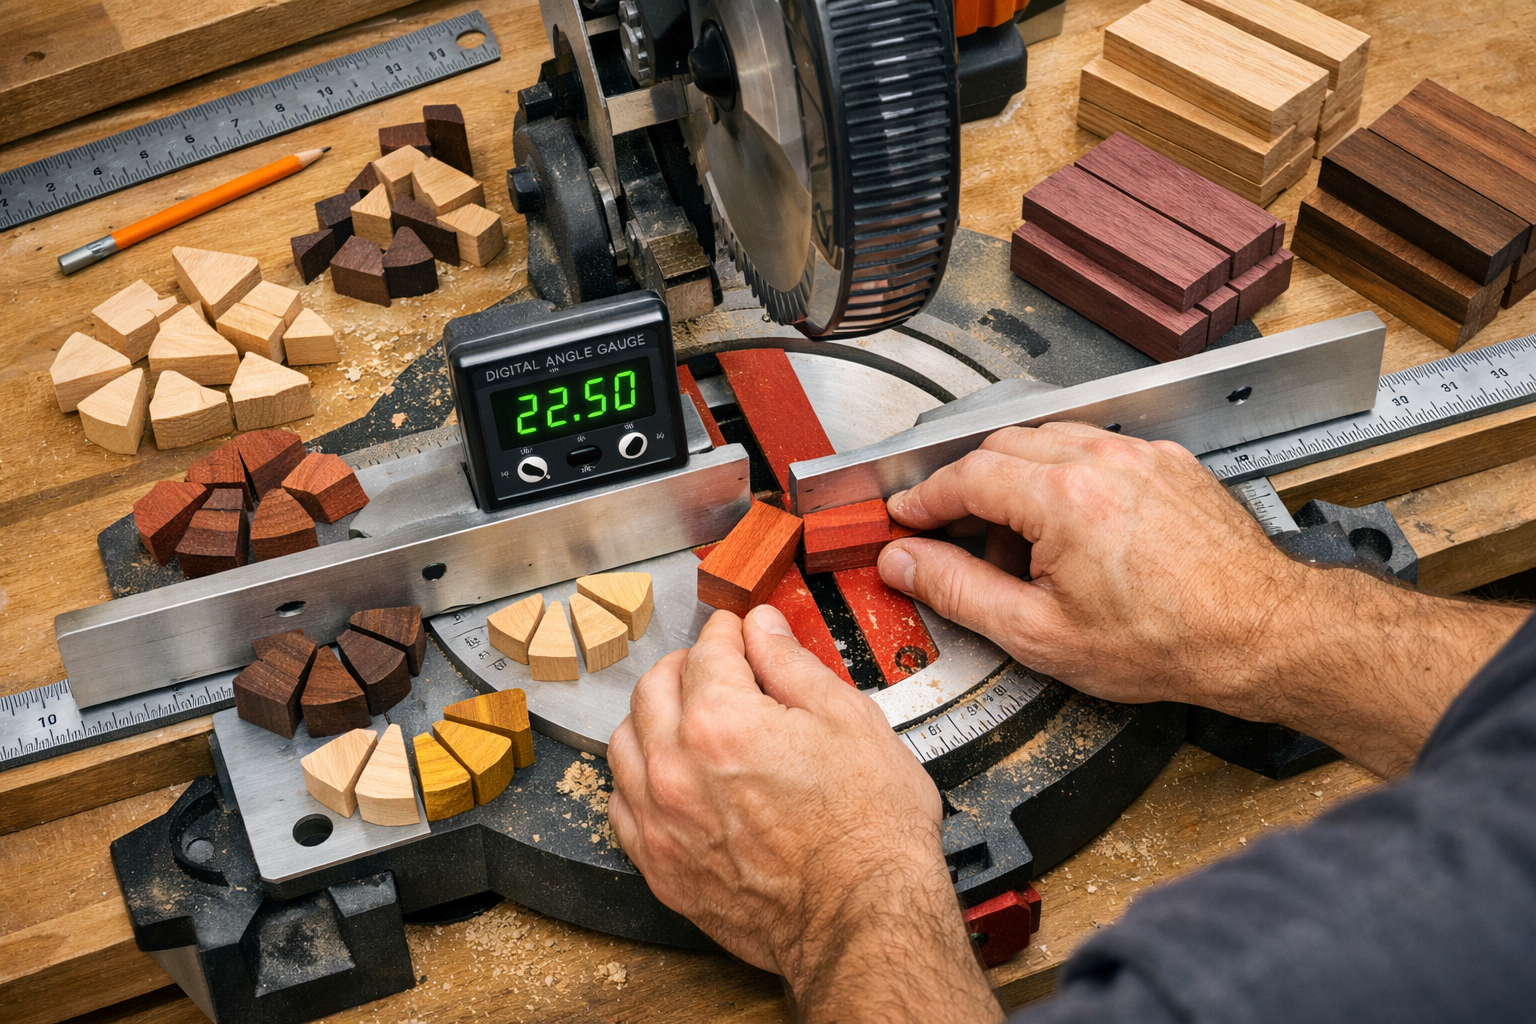
- Miter Saw or Table Saw with Sled: For precise, repeatable angle cuts on your segments. Accuracy here is non-negotiable.
- Measuring Tools: Rulers, calipers, and a digital angle finder are indispensable for precision.
- Clamps: Plenty of quick clamps and band clamps for holding segments during gluing.
- Sanding Supplies: Various grits of sandpaper for shaping and finishing.
- Dust Collection System: Essential for safety and a clean workspace, especially with fine sawdust. Consider “Building a DIY Smart Workshop Dust Collection System” for inspiration.
- Safety Gear: Eye protection, hearing protection, and a dust mask are non-negotiable.
Materials:
- Wood: Choose contrasting colors and grain patterns for visual impact. Hardwoods like maple, walnut, cherry, and padauk are popular choices due to their stability and distinct appearances. Smaller pieces and even shop scraps can be utilized, aligning with principles of “turning shop scraps into design features”.
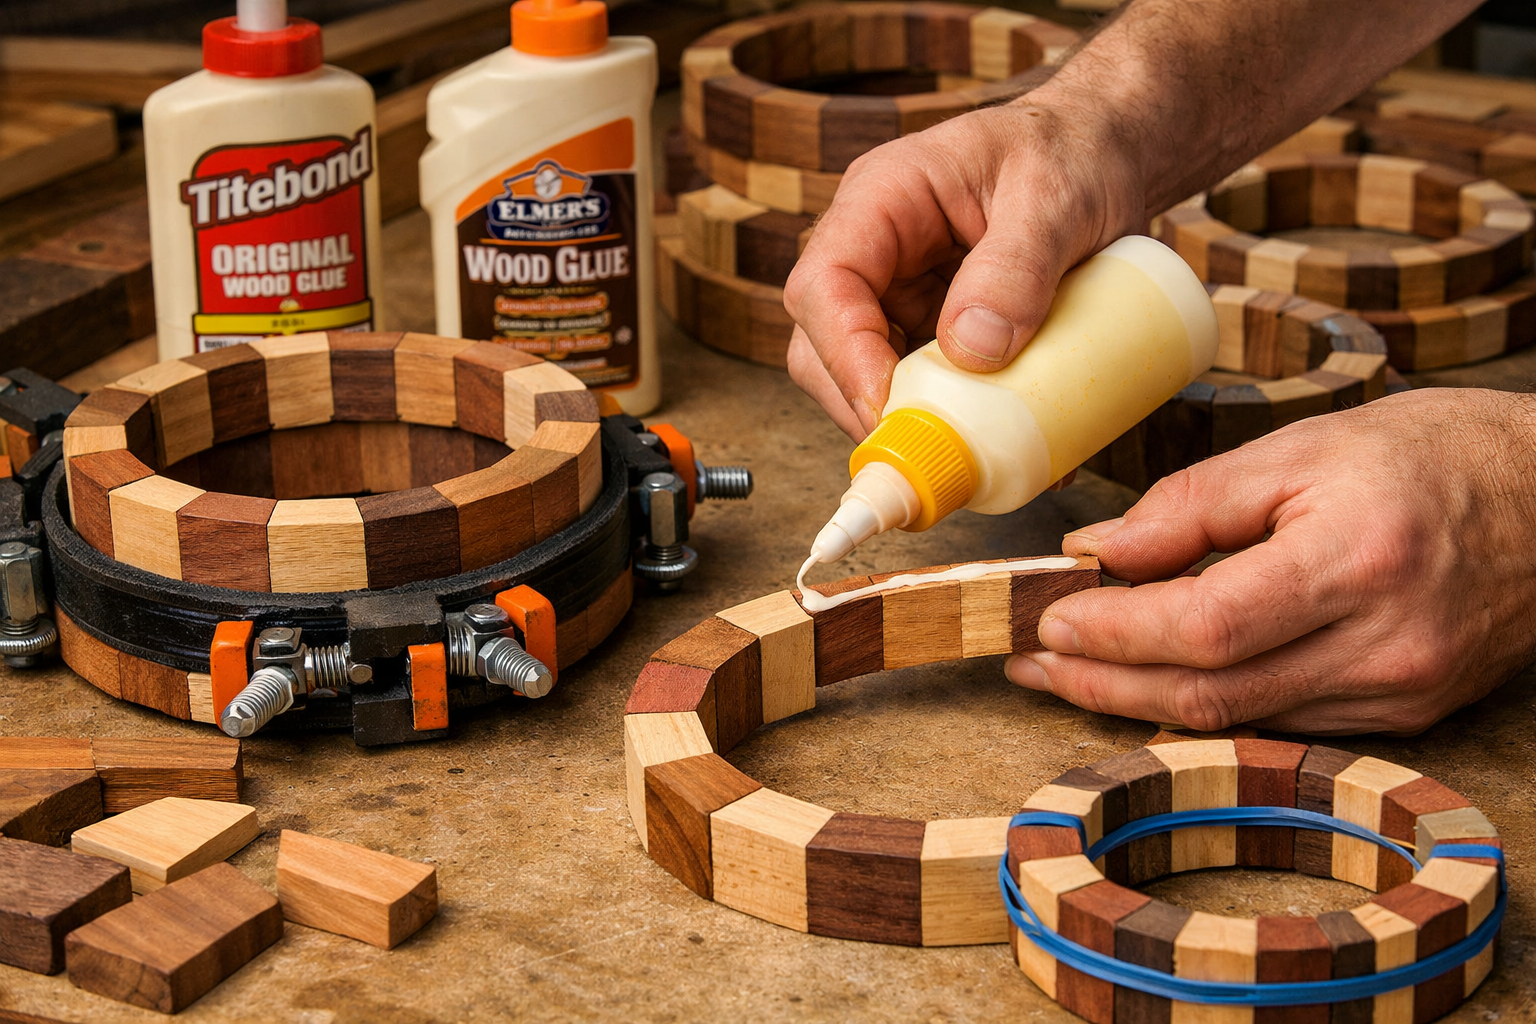
- Wood Glue: High-quality wood glue (PVA glue) is essential for strong, durable bonds. “The Ultimate Guide to Wood Glue: Choosing the Right Adhesive” offers detailed insights.
- Finishing Products: Oils, waxes, or lacquers to protect and enhance your finished piece.

Designing Your First Segmented Project: From Concept to Cut
The beauty of segmented woodturning lies in the design freedom it offers. Unlike turning a solid block where patterns are dictated by the wood’s natural grain, here you create the pattern. “The Beginner’s Guide to Segmented Woodturning: Creating Intricate Patterns and Bowls on the Lathe” emphasizes that careful planning is the cornerstone of success.
Step 1: Conceptualizing Your Design
Start by sketching ideas. Simple designs are best for beginners. A single-ring bowl with contrasting woods is an excellent starting point. Consider:
- Number of Segments per Ring: This determines the angle for each cut. For example, 12 segments mean each cut needs to be 360 degrees / 12 segments / 2 (for both sides of the segment) = 15 degrees.
- Wood Species and Colors: Plan how different woods will interact. Light and dark contrasts are very effective.
- Overall Shape: Bowl, vase, or platter? Consider the final profile you want to achieve.
- Ring Dimensions: The inside and outside diameter of each ring, and its thickness.
Many free online calculators and software tools can help with these calculations, simplifying the math for you.
Step 2: Accurate Segment Cutting
Precision in cutting is the most critical step. Even a tiny error in angle or length will compound across multiple segments, leading to gaps or misalignment.
- Prepare Your Stock: Mill your chosen wood to a consistent thickness and width. Ensure the edges are square.
- Set Your Angle: Use a miter saw or a table saw with a precise sled. Double-check your angle with a digital angle finder. For an 18-segment ring, for example, each segment would have two 10-degree cuts (360 / 18 / 2 = 10).
- Cut Segments: Cut one segment, then immediately check its angle and length before mass-producing. Cut extra segments as spares.
“The magic of segmented woodturning isn’t just in the turning, but in the meticulous preparation that brings the disparate pieces together into a harmonious whole.”
Step 3: Gluing and Assembly Techniques
With your segments cut, the next step is assembly. This is where your precise cuts pay off.
- Dry Fit: Always dry-fit your segments into a ring to check for gaps. If there are gaps, your angles are off. Adjust your saw setup and recut.
- Gluing Rings: Apply a thin, even coat of wood glue to the mating surfaces of each segment. Too much glue can lead to squeeze-out and uneven surfaces; too little can result in weak joints.
- Clamping: Use band clamps or a series of quick clamps to bring the segments together, ensuring even pressure. Wipe away excess squeeze-out immediately with a damp cloth. Let the glue cure fully according to the manufacturer’s instructions, typically 24 hours.
- Stacking Rings: Once individual rings are dry, flatten both faces of each ring (using a disc sander or router sled) to ensure perfect contact when stacking. Glue the rings together, offsetting the segment joints if desired for a staggered pattern. Ensure vertical alignment as you glue.
The Turning Process: Bringing Your Segmented Masterpiece to Life
Once your segmented blank is assembled and fully cured, the real transformation begins on the lathe. This stage is where “The Beginner’s Guide to Segmented Woodturning: Creating Intricate Patterns and Bowls on the Lathe” truly shows how art emerges from precision.

Step 1: Mounting the Blank
Securely mounting your blank is paramount for safety and success.
- Waste Block: Often, a sacrificial waste block is glued to the base of your segmented blank. This allows you to screw a faceplate to the waste block without damaging your project.
- Faceplate: Attach the faceplate firmly to the waste block with screws. Ensure the screws are long enough to hold securely but not so long they enter your actual segmented piece.
- Mount on Lathe: Mount the faceplate and blank onto the headstock of your lathe, ensuring it runs true and is balanced.
Step 2: Initial Shaping and Outer Form
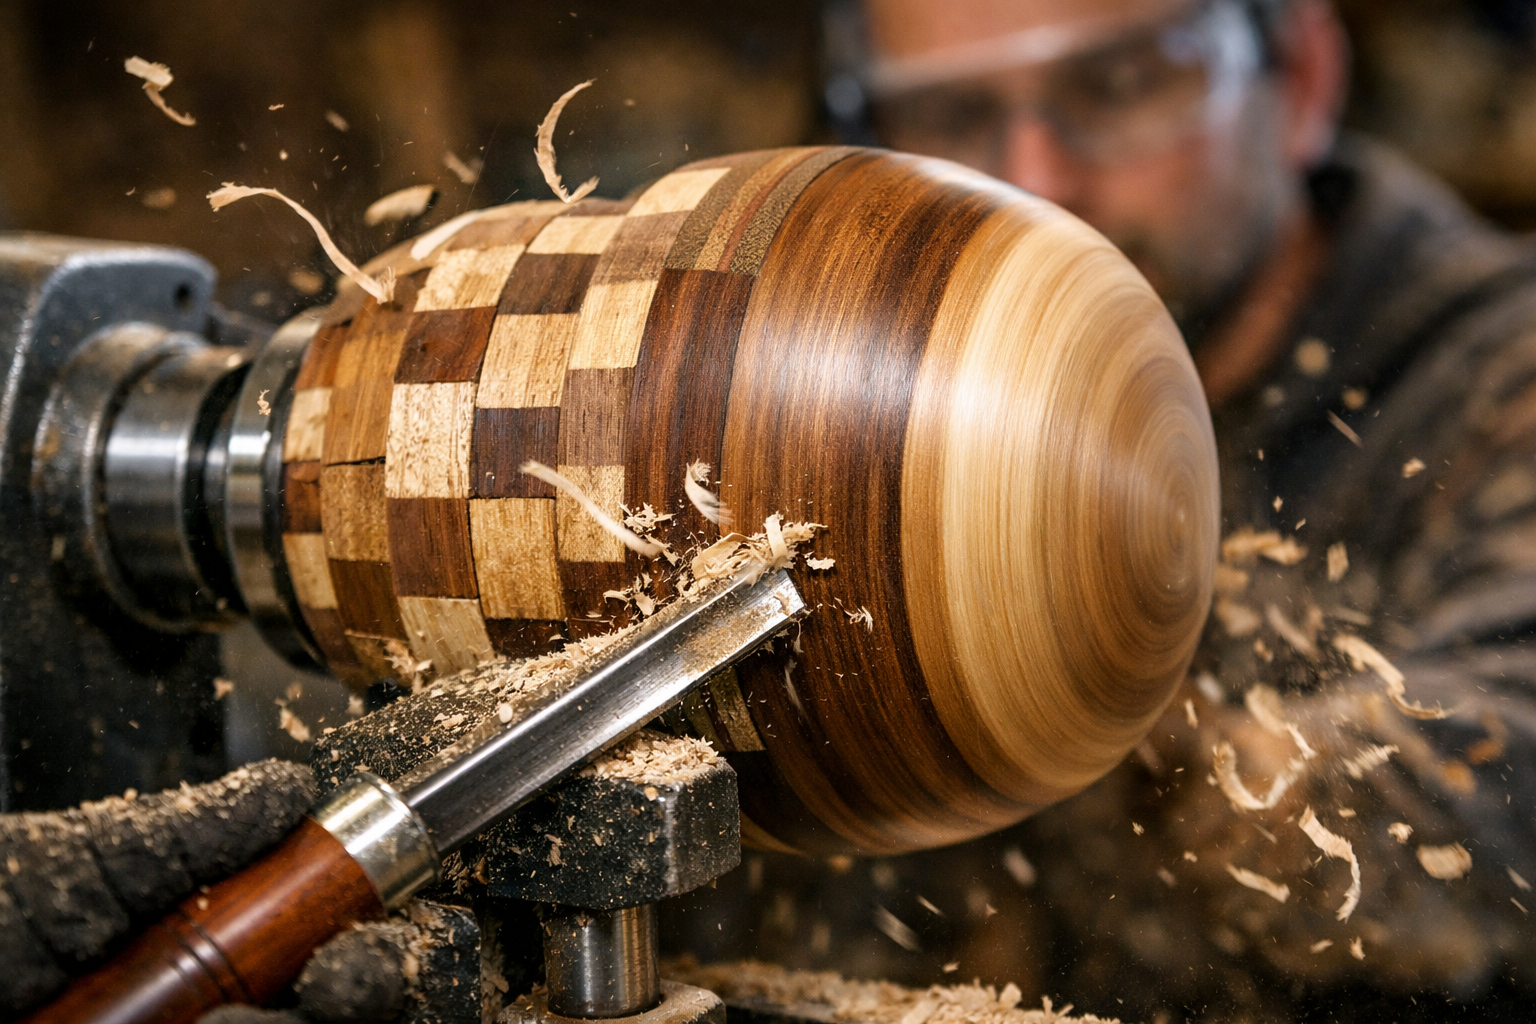
Start with the slowest speed setting on your lathe and gradually increase it as the blank becomes more balanced.
- True Up the Exterior: Begin by carefully rounding the outside of the blank. Use a roughing gouge or a large bowl gouge, taking light cuts. Work from the largest diameter towards the faceplate.
- Shape the Foot and Exterior Profile: Gradually refine the exterior shape of your bowl or vase. Pay attention to the overall profile and how the segmented pattern presents itself.
- Tenon/Recess: If you plan to reverse the piece later for interior turning, create a tenon (a raised lip) or a recess (a groove) on the bottom of your piece for secure chucking.
Step 3: Hollowing the Interior
Once the exterior is shaped, it’s time to hollow out the interior, revealing the full depth of your segmented design.
- Establish Rim: Carefully turn the rim of your piece to its final thickness and shape.
- Hollow from Rim In: Using a bowl gouge or hollowing tool, begin removing material from the center of the piece, working outwards towards the rim. Take light, controlled cuts to avoid tear-out, especially when crossing glue lines.
- Wall Thickness: Continuously check your wall thickness using calipers or by feeling the vibration with your hand. Aim for an even thickness for strength and aesthetics.
Step 4: Sanding and Finishing
The final steps transform your turned piece from a rough shape into a smooth, lustrous object.
- Sanding on the Lathe: With the lathe spinning at a slow speed, begin sanding with progressively finer grits of sandpaper (e.g., 120, 180, 220, 320, 400). Sand both the interior and exterior. Clean off dust between grits.
- Off-Lathe Sanding: For very fine details or hard-to-reach areas, remove the piece from the lathe and hand-sand.
- Remove Waste Block: Once sanding is complete, carefully part off the waste block from the base of your project. Finish sand the bottom of the piece.
- Apply Finish: Choose a finish that complements your wood and desired aesthetic. Oil finishes penetrate the wood, enhancing its natural beauty, while lacquers or varnishes provide a protective layer. For guidance on finishes, explore resources like “Danish Oil vs. Linseed: The Ultimate Wood Finishing Guide” or “Oak Wood Finishing Techniques”. Apply evenly and allow to cure fully.
Advanced Considerations and Further Exploration
As you gain experience with “The Beginner’s Guide to Segmented Woodturning: Creating Intricate Patterns and Bowls on the Lathe,” you’ll discover a world of advanced techniques to explore.
Incorporating Inlays and Exotic Woods
Beyond simple contrasting segments, you can introduce intricate inlays, such as thin strips of highly contrasting wood or even other materials, into your rings. This adds another layer of detail and visual interest. Experiment with highly figured or exotic woods, but be mindful of their working properties and potential for irritation. Remember to source woods sustainably; for more information, see “Sustainable Wood Sourcing for the Modern Woodworker”.
Mastering Complex Geometries
Moving beyond simple rings, advanced segmented turning involves creating blanks with non-circular segments, curved segments, or even incorporating “stave” construction where segments are glued edge-to-edge rather than face-to-face. This opens the door to creating sculptural forms and optical illusions within your turned pieces. Consider exploring projects that utilize shop scraps for these smaller, more complex segments.
Safety Best Practices
No matter your skill level, safety should always be your top priority.
- Sharp Tools: Always use sharp turning tools. Dull tools are more likely to catch and cause accidents.
- Proper Speed: Match your lathe speed to the size and balance of your workpiece. Start slow and increase gradually.
- Secure Mounting: Double-check that your piece is securely mounted before starting the lathe.
- Body Position: Stand to the side of the rotating workpiece, out of the line of fire should anything fail.
- Eye and Hearing Protection: Always wear appropriate personal protective equipment.
- Dust Control: Use a dust mask or respirator, especially when sanding, to protect your lungs from fine wood dust.
Segmented woodturning is a journey of continuous learning and artistic discovery. Each project presents new challenges and opportunities to refine your skills.
Conclusion
“The Beginner’s Guide to Segmented Woodturning: Creating Intricate Patterns and Bowls on the Lathe” is more than just a technique; it’s a gateway to artistic expression within woodworking. By meticulously planning, precisely cutting, and carefully assembling individual pieces of wood, you can create turned objects that boast stunning, complex patterns impossible with traditional turning methods. The satisfaction of seeing a beautiful design emerge from dozens of small, humble segments is truly unparalleled.
As you embark on your segmented woodturning journey in 2026, remember that patience, precision, and a commitment to safety are your most valuable tools. Start with simple designs, focus on mastering each step, and gradually challenge yourself with more intricate patterns and forms. The world of segmented woodturning is vast and rewarding, offering endless possibilities for creativity and craftsmanship. Happy turning!

Next Steps:
- Practice Precision Cuts: Dedicate time to perfect your miter saw or table saw angle settings and ensure repeatable accuracy.
- Start Small: Begin with a simple 12-segment, single-ring bowl to build confidence.
- Experiment with Woods: Explore different wood species to understand how their colors and grains interact in segmented patterns.
- Join a Community: Connect with other segmented woodturners online or in local clubs to share knowledge and gain inspiration.
