
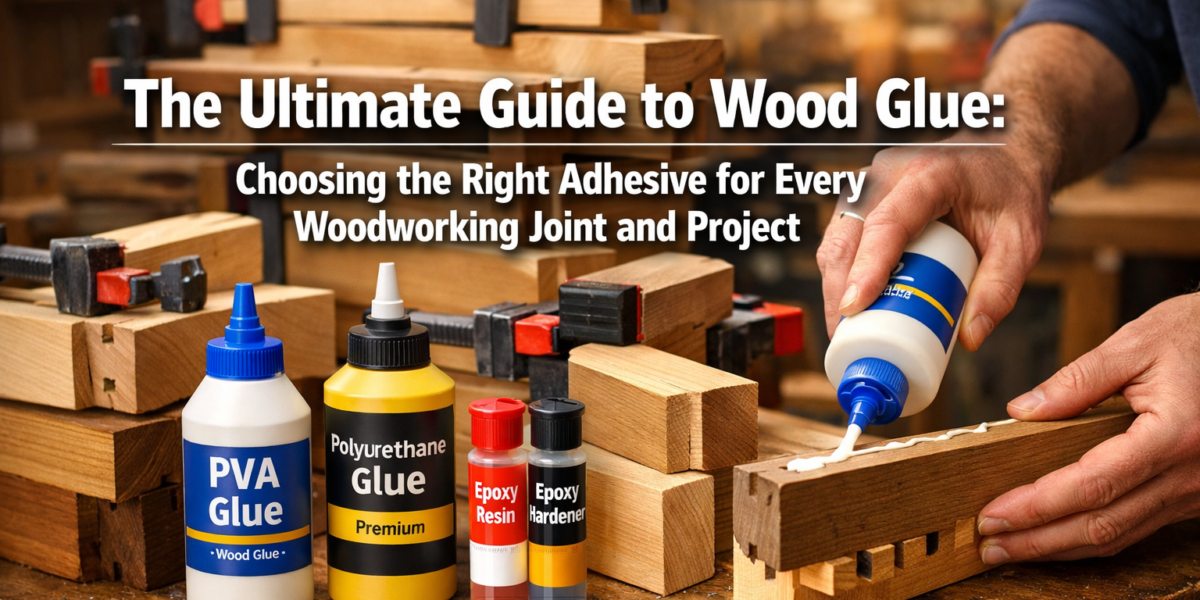

The structural integrity of a wooden joint is often attributed to precise cuts and expert joinery techniques. However, a less celebrated, yet equally critical, component often determines the true strength and longevity of a woodworking project: the adhesive. Over 60% of a properly executed wood joint’s strength comes from the glue itself, making the selection and application of the right adhesive paramount to success. This guide, “The Ultimate Guide to Wood Glue: Choosing the Right Adhesive for Every Woodworking Joint and Project,” will delve into the nuanced world of wood adhesives, equipping you with the knowledge to select the perfect glue for any scenario in 2026.
Key Takeaways
- No Single “Best” Glue: Different woodworking projects and joints demand specific glue properties (water resistance, open time, strength, flexibility).
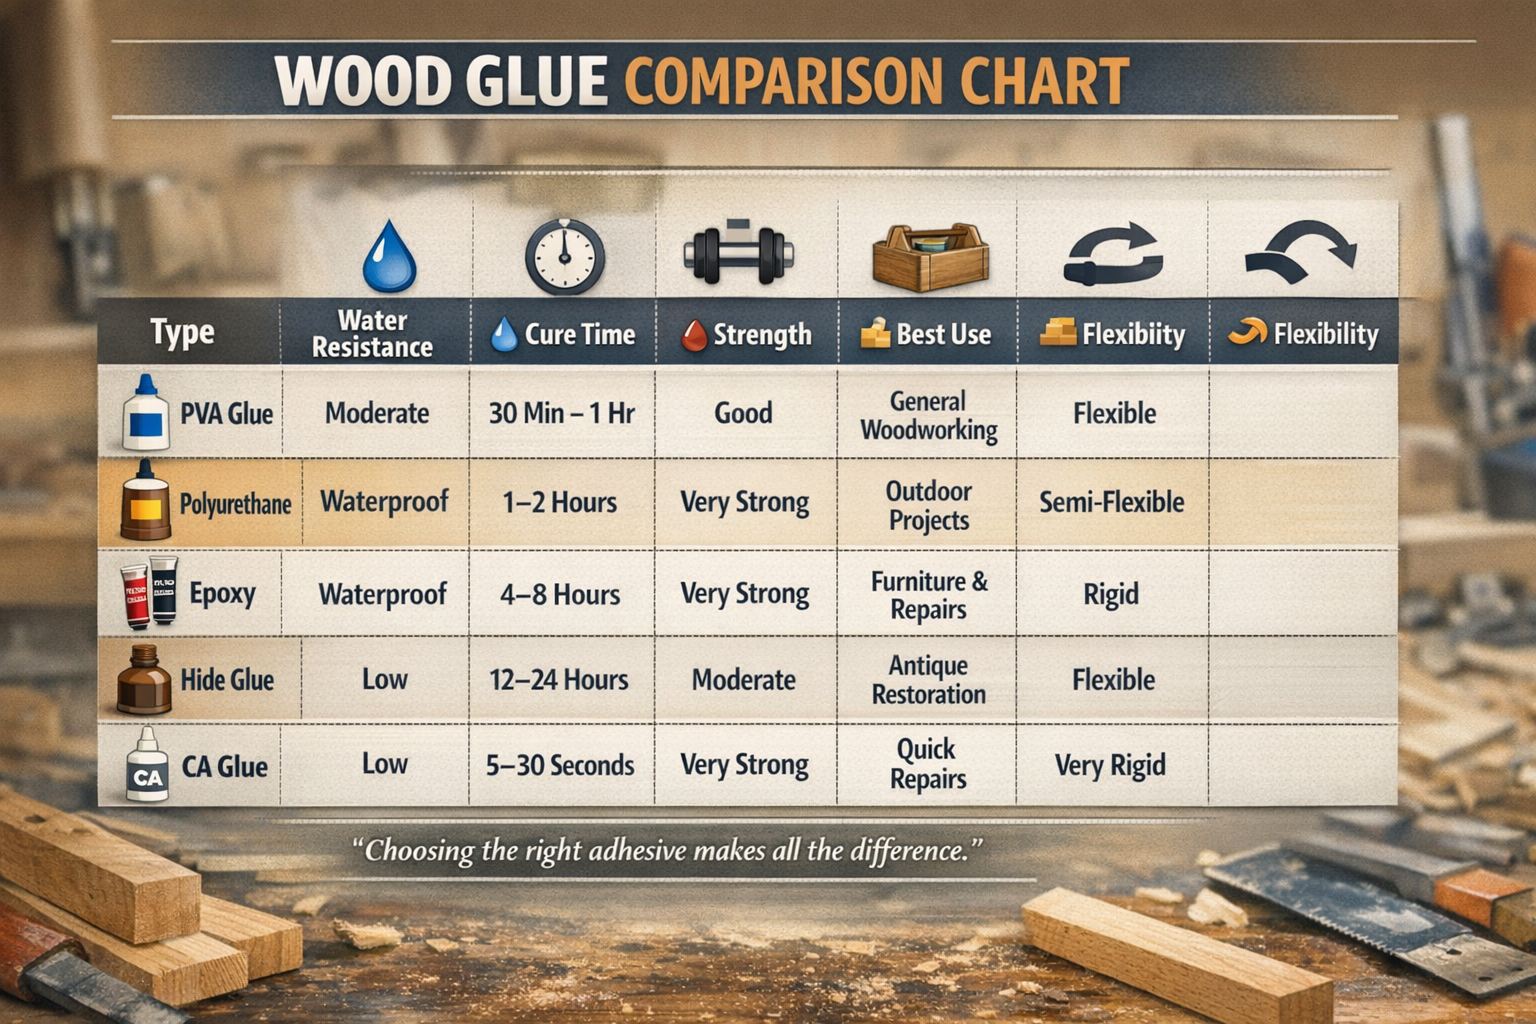
- Common Types & Uses: PVA glues are versatile for general interior work, polyurethane for outdoor/waterproof needs, hide glue for traditional and reversible applications, and epoxy for gap-filling and extreme strength.
- Proper Application is Crucial: “Less is more” is a myth; sufficient glue coverage, even clamping pressure, and adequate cure time are essential for strong bonds.
- Environmental Factors Matter: Temperature, humidity, and project exposure (indoor/outdoor) significantly influence glue performance and selection.
- Joint Type Dictates Choice: Simple butt joints require high-strength, gap-filling glues, while complex joinery benefits from glues with longer open times.
Understanding the Fundamentals: Different Types of Wood Glue
Selecting the correct wood glue is not a one-size-fits-all decision. Each type of adhesive offers unique properties tailored to different applications, environmental conditions, and desired outcomes. Mastering “The Ultimate Guide to Wood Glue: Choosing the Right Adhesive for Every Woodworking Joint and Project” begins with a thorough understanding of these fundamental distinctions.


PVA (Polyvinyl Acetate) Glues: The Workhorse of Woodworking
PVA glues are the most common and widely used adhesives in woodworking shops today. They are water-based, non-toxic, and easy to clean up.
- Yellow Wood Glues (Aliphatic Resin Glues): These are standard workshop glues (e.g., Titebond Original). They dry quickly, offer strong bonds, and sand well. Ideal for interior furniture, cabinets, and general assembly.
- Waterproof PVA Glues (Type II & III): Often labeled “water-resistant” (Type II, e.g., Titebond II) or “waterproof” (Type III, e.g., Titebond III), these are excellent for outdoor furniture, cutting boards, or projects exposed to moisture. They offer good open time and clean up with water.
Pros: Affordable, easy to use, strong bonds, quick drying (yellow glue), good water resistance (Type II/III). Cons: Limited gap-filling, can creep under stress, not suitable for extreme outdoor exposure unless specified as Type III. Best For: General joinery, laminating, assembly of interior and some exterior projects. For intricate hand tool joinery for visible wood joints: dovetails, mortise and tenon, and box joints, PVA glues offer reliable strength.
Polyurethane Glues: The Moisture-Curing Marvel
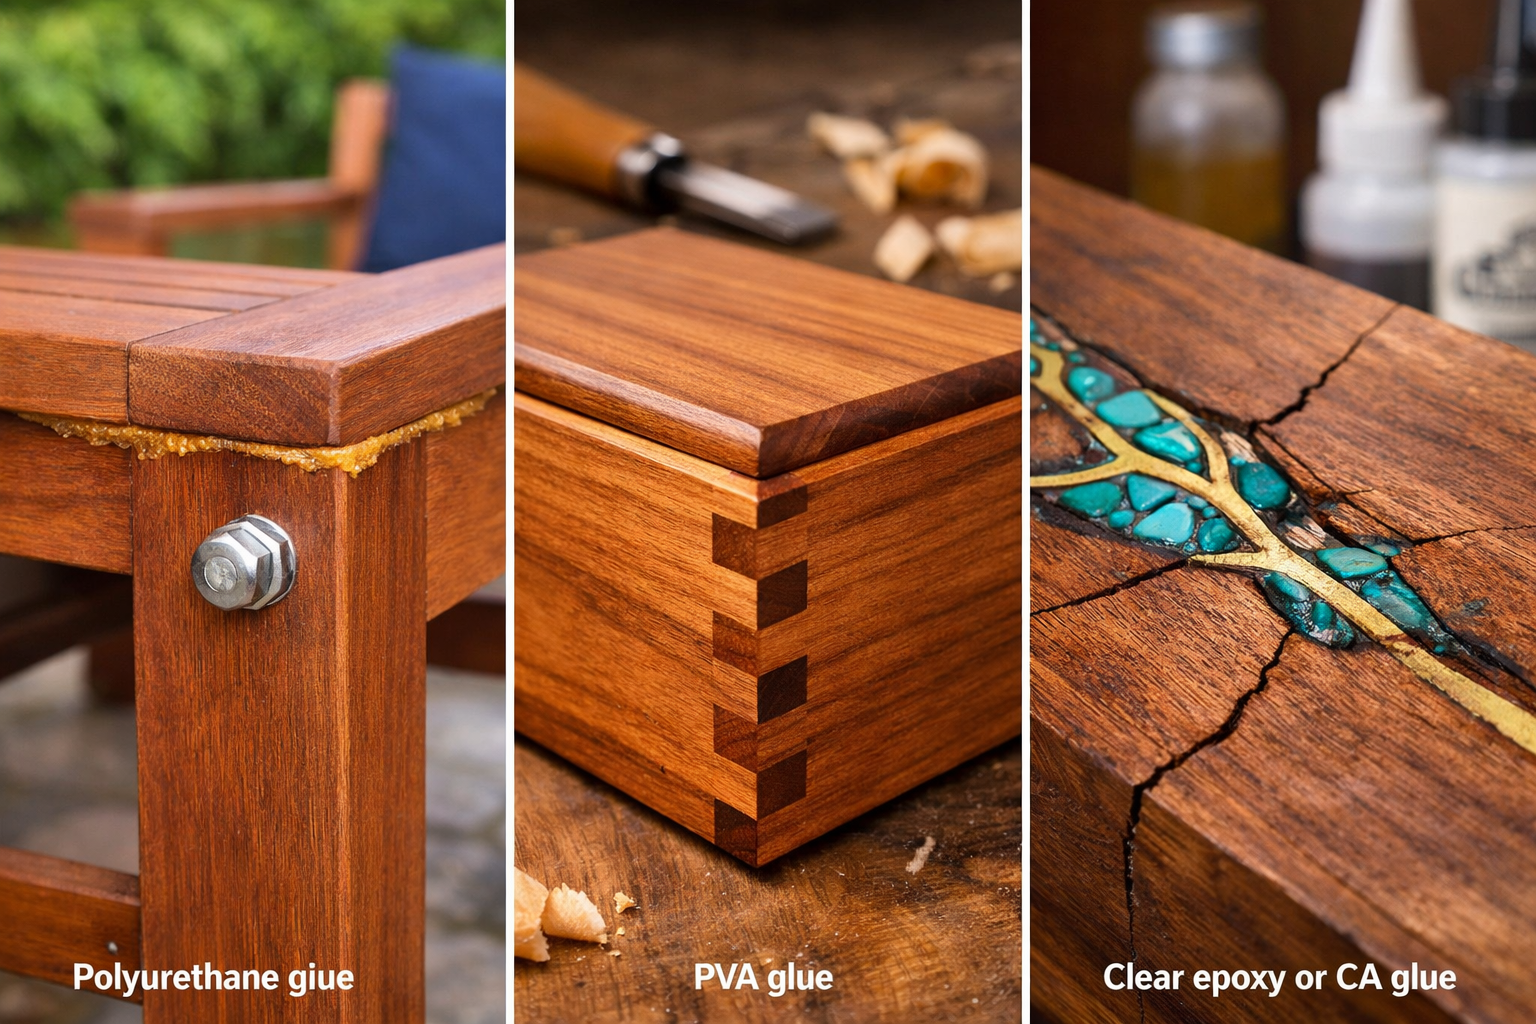
Polyurethane glues react with moisture in the air or wood to cure, forming incredibly strong and waterproof bonds. Brands like Gorilla Glue are popular examples.
- Key Characteristic: Expands slightly as it cures, helping to fill small gaps. This expansion also means it can foam and squeeze out, requiring careful cleanup.
- Application: Requires dampening one surface for optimal adhesion and cure.
- Pros: Extremely waterproof, excellent strength, good gap-filling properties, works on a variety of materials beyond wood.
- Cons: Messy cleanup (requires mineral spirits or scraping when dry), short open time, can stain darker woods if not wiped immediately, requires clamping pressure.
- Best For: Outdoor projects (e.g., building Adirondack chairs), marine applications, joining dissimilar materials, projects involving high moisture exposure.
Hide Glue: The Traditional & Reversible Adhesive
Animal hide glue, available in liquid form or as granules requiring heating, is a traditional choice favored by fine furniture makers and restorers.
- Key Characteristic: Its reversibility with heat and moisture makes it ideal for repairs and restoration of antique furniture, allowing for future disassembly without damage. It also “creeps” less than PVA glues.
- Types: Liquid hide glue (ready-to-use) and hot hide glue (granules dissolved in water and heated). Hot hide glue offers a longer open time and sets quicker.
- Pros: Reversible (ideal for future repairs), excellent for veneering and difficult joints where creep is an issue, stains well, compatible with many finishes.
- Cons: Not water-resistant (liquid hide glue has some resistance but not waterproof), short open time (hot hide glue), requires specific preparation (hot hide glue).
- Best For: Fine furniture making, antique restoration (restoring antique wooden furniture), veneering, musical instruments.
Epoxy Resins: The Ultimate Gap-Filler and Structural Powerhouse
Epoxy is a two-part adhesive (resin and hardener) that, when mixed, creates an incredibly strong, rigid, and waterproof bond.
- Key Characteristic: Excellent gap-filling capabilities, making it perfect for repairing damaged wood or joining poorly fitting joints. It cures to a hard plastic-like material.
- Application: Requires precise mixing ratios. Available in various working times.
- Pros: Exceptional strength, completely waterproof, excellent gap-filling, cures rigid, can be tinted or filled with sawdust for color matching.
- Cons: Expensive, longer cure times, requires precise mixing, can be difficult to clean up, not reversible.
- Best For: Structural repairs, marine projects, live edge slab selection and preparation, filling voids, bonding dissimilar materials, projects requiring extreme durability.
CA (Cyanoacrylate) Glues: The Instant Fix
Often known as “super glue,” CA glues offer fast, strong bonds, particularly useful for small repairs, temporarily holding parts, or activating with a spray for near-instant adhesion.
- Key Characteristic: Cures almost instantly when exposed to moisture (even airborne humidity). Available in different viscosities (thin, medium, thick) for various applications.
- Pros: Extremely fast setting, strong bonds on small surfaces, excellent for quick fixes and holding pieces during assembly.
- Cons: Brittle bond (not good for high-stress joints), poor gap-filling (except thicker versions), prone to “blooming” (white residue), skin irritant.
- Best For: Small, non-structural repairs, attaching delicate inlays, securing loose veneer chips, or as a temporary clamp during assembly.
Application Techniques and Best Practices for Strong Joints
Choosing the right glue is only half the battle; proper application ensures the joint achieves its maximum strength. This section of “The Ultimate Guide to Wood Glue: Choosing the Right Adhesive for Every Woodworking Joint and Project” focuses on techniques that lead to durable, long-lasting bonds.

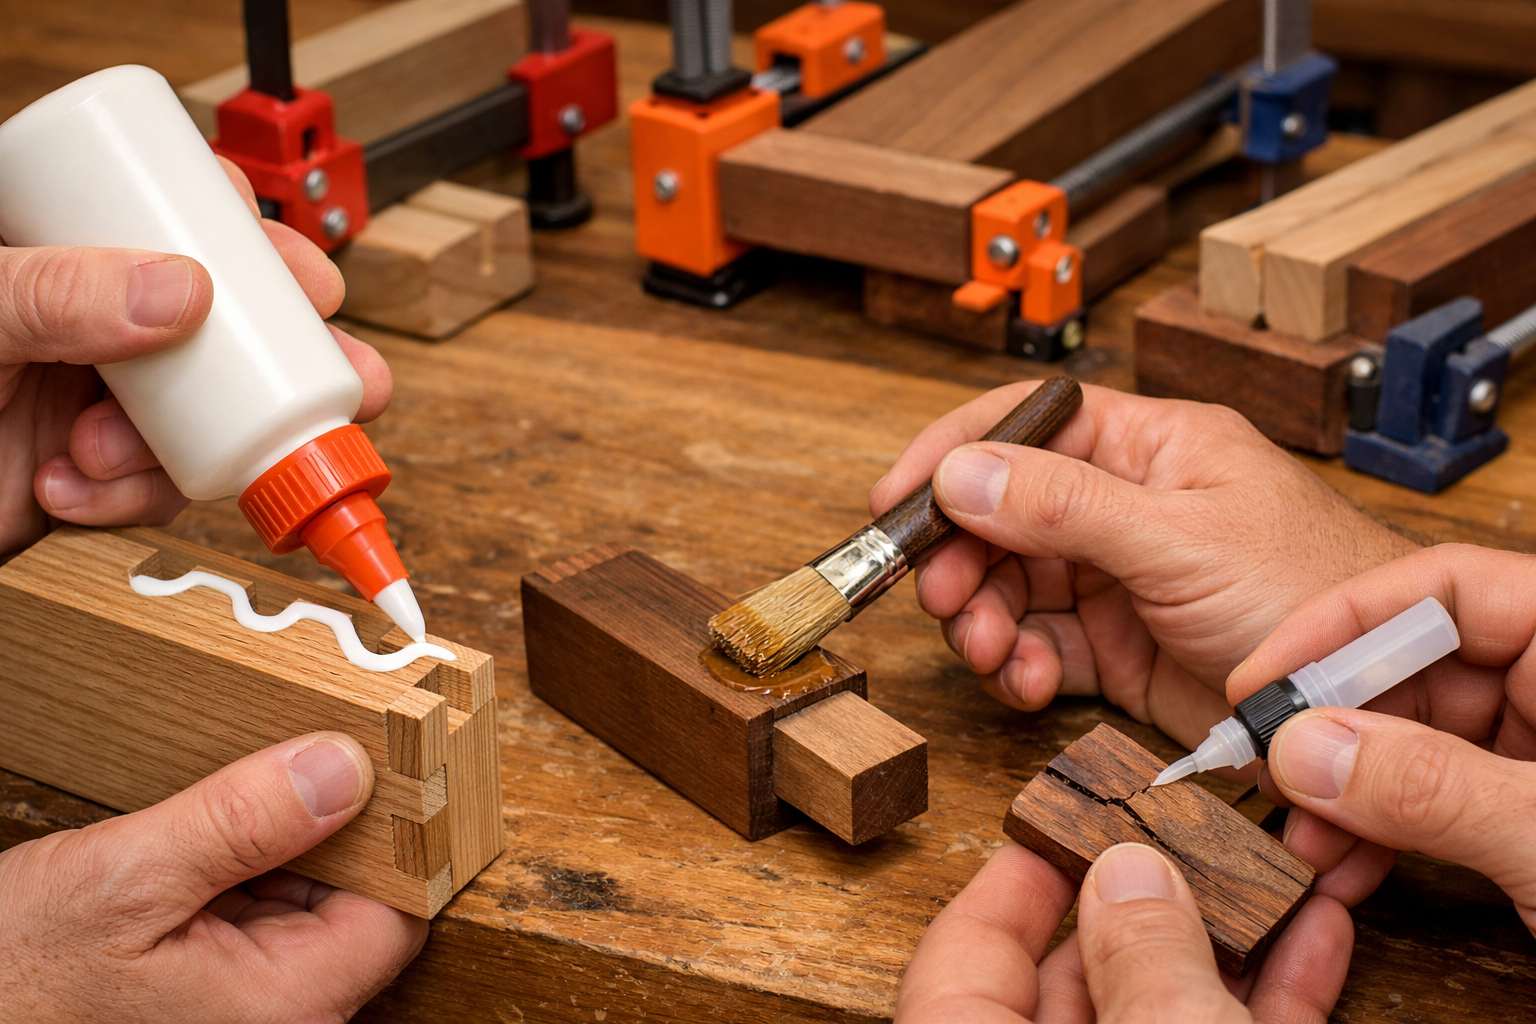
Surface Preparation: The Foundation of a Strong Bond
- Cleanliness: Ensure mating surfaces are free of dust, grease, oil, or old glue. Use a clean cloth or brush.
- Flatness: Joints should be precisely cut and fit without significant gaps. Glue is strong, but it’s not a substitute for good joinery. For techniques like mastering dovetail joinery for drawers, a tight fit is crucial.
- Acclimation: Allow wood to acclimate to the workshop’s humidity and temperature to minimize movement after gluing.
Glue Application: Achieving Optimal Coverage
- “Wet the Joint”: Apply enough glue to completely cover both mating surfaces. When clamping, a small, even squeeze-out indicates sufficient coverage.
- Even Spread: Use a brush, roller, or glue spreader to distribute glue evenly. For PVA glues, a bead applied to one surface and then spread can work. For hot hide glue, use a stiff brush.
- Open Time: Be mindful of the glue’s “open time” – the period it remains workable before starting to set. For complex assemblies or multiple joints, choose a glue with a longer open time.
- Don’t Starve the Joint: A common mistake is using too little glue, leading to a “starved joint” where the bond is weak due to insufficient adhesive.
Clamping: The Crucial Pressure
- Even Pressure: Apply even clamping pressure across the entire joint. Too little pressure results in a weak bond; too much can squeeze out all the glue, also leading to a starved joint.
- Cauls: Use cauls (pieces of scrap wood) between clamps and the workpiece to distribute pressure evenly and prevent marring the wood.
- Squareness: Always check for squareness after clamping and before the glue sets. Wood can shift under pressure.
- Cure Time: Respect the glue’s specified clamping time. Removing clamps too soon can weaken the bond. Full cure strength can take 24 hours or longer, depending on the glue and environmental conditions.
Cleanup: A Tidy Finish
- Wet Glue: For water-based glues (PVA), wipe away squeeze-out immediately with a damp cloth. Be careful not to spread glue into wood grain where it can interfere with finishing.
- Dry Glue: For dried PVA, scrape or sand away. For polyurethane, scrape while still slightly tacky or after it’s fully cured. Epoxy requires scraping or specific solvents before it hardens.
Choosing the Right Adhesive for Specific Joints and Projects in 2026
The ultimate goal of “The Ultimate Guide to Wood Glue: Choosing the Right Adhesive for Every Woodworking Joint and Project” is to enable informed decisions for every woodworking scenario. Here, we match glue types to common joints and projects.

Matching Glue to Joinery Methods
- Butt Joints: These rely entirely on the glue for strength. Use a strong, high-initial-tack PVA (like Titebond Original or II) or epoxy for maximum strength and gap-filling.
- Dovetails & Mortise and Tenon: These mechanical joints offer significant surface area. A good PVA glue (Type I or II depending on environment) is usually sufficient. Hot hide glue is also excellent for these due to its minimal creep. For visible hand tool joinery, PVA is ideal.
- Edge Gluing (Panels): PVA glues (Titebond Original or II) are perfect here. They offer strong bonds, sand easily, and are readily available. Ensure straight edges for minimal gaps.
- Veneering: Hot hide glue is traditionally preferred for its long open time and reversibility, allowing for precise positioning and future repairs. Liquid hide glue or specific veneer glues can also be used.
- Inlays & Small Repairs: CA glue (medium or thin viscosity) for quick, small bonds. Epoxy for larger gaps or structural repairs on inlays.
Selecting Glue for Project Types
- Indoor Furniture (Tables, Chairs, Cabinets): Standard yellow PVA glue (Titebond Original) is the go-to. For high-demand projects like a custom wood workbench, it provides reliable strength.
- Outdoor Furniture (Adirondack Chairs, Planters): Waterproof PVA (Titebond III) or polyurethane glue is essential due to exposure to moisture and temperature fluctuations. For projects like crafting custom wooden planters, consider weatherproofing techniques in addition to waterproof glue.
- Cutting Boards & Kitchen Items: Titebond III is food-safe once cured and offers excellent water resistance against repeated washing.
- Musical Instruments: Hot hide glue is often preferred for its reversibility, minimal creep, and acoustic properties.
- Boat Building & Marine Projects: Epoxy resin is the superior choice for its complete waterproofing, structural strength, and ability to bridge gaps. Polyurethane can also be used for certain components.
- Restoration Projects: Hide glue is often the best choice for restoring vintage woodworking hand tools or antique furniture, allowing for future reversible repairs without damaging historical pieces.
- Decorative Items (e.g., Ultimate Guide to Wooden Candle Holders): PVA glue is generally sufficient. If incorporating electronics or needing extra rigidity for delicate parts, CA glue or epoxy might be useful for specific components.
Conclusion
The journey through “The Ultimate Guide to Wood Glue: Choosing the Right Adhesive for Every Woodworking Joint and Project” reveals that adhesive selection is far from a trivial decision. It’s a critical element that impacts the durability, aesthetics, and longevity of your woodworking creations. By understanding the unique properties of PVA, polyurethane, hide glue, epoxy, and CA glue, and mastering their application, you empower yourself to build projects that not only look exceptional but also stand the test of time.
In 2026, as woodworking continues to evolve, the fundamental principles of strong adhesion remain constant. Always consider the project’s environment, the type of joint, and the desired outcome when reaching for that glue bottle. With the right knowledge, you can transform ordinary joints into unbreakable bonds, ensuring your craftsmanship endures for generations.
Actionable Next Steps:
- Evaluate Your Project: Before applying glue, clearly define the project’s purpose (indoor/outdoor), the type of wood, and the specific joinery involved.
- Test Adhesion: If working with unusual materials or finishes, always perform a small test bond on scrap pieces.
- Read Labels: Pay close attention to manufacturer instructions regarding open time, clamping time, cure time, and safety precautions.
- Invest in Quality Clamps: Good glue requires good clamping. Ensure you have a sufficient variety and number of clamps for your projects.
