

A shocking 85% of DIYers and professional woodworkers cite inadequate workspace and fixed tool limitations as major obstacles to completing projects efficiently. This statistic underscores a common dilemma: how to achieve professional-grade results without a dedicated, expansive workshop. The solution often lies in strategic space utilization and versatile equipment. For many, this translates into Building a DIY Portable Workbench with Integrated Clamping and Vise Solutions – a project that transforms limitations into opportunities for enhanced productivity and mobility in 2026. This article will guide you through creating a versatile, portable workbench designed for small spaces or on-site projects, featuring built-in clamping mechanisms, a removable vise, and smart storage for essential tools, making it a true mobile workstation.
Key Takeaways
- Design for Mobility: Focus on lightweight, durable materials and features like folding legs or wheels for easy transport and storage.
- Integrate Clamping Solutions: Incorporate T-tracks, dog holes, and various clamping points directly into the workbench design for maximum versatility.
- Removable Vise Functionality: Plan for a quick-release or easily attachable vise that can be stored when not in use, optimizing workspace.
- Smart Storage is Crucial: Design dedicated compartments, shelves, or drawers for tools and accessories to keep the workspace organized and efficient.
- Versatility Enhances Productivity: A well-designed portable workbench can significantly improve efficiency for various woodworking tasks, from small repairs to intricate joinery.
Understanding the Need for a Portable Workbench in 2026
In the modern woodworking landscape of 2026, flexibility is paramount. Whether you’re a hobbyist with a cramped garage, a professional taking on client projects on-site, or simply someone who appreciates the ability to reconfigure their workspace, a portable workbench offers unparalleled advantages. Traditional workbenches, while sturdy, often tie you to a single location, limiting your operational scope. A DIY portable workbench, however, frees you from these constraints, allowing you to bring your workstation to the task, not the other way around.

The primary benefit of Building a DIY Portable Workbench with Integrated Clamping and Vise Solutions is its adaptability. It can serve as a sturdy platform for cutting, assembling, and finishing, providing the necessary support and stability wherever it’s needed. For those navigating smaller living spaces, a portable bench can be folded and stored away, reclaiming valuable floor space. For on-site jobs, it becomes an indispensable tool, offering a stable and secure platform for various tasks, from precise joinery to rough carpentry.
Consider the common challenges faced by woodworkers:
- Limited Space: Many enthusiasts operate out of garages, basements, or even apartment balconies, where permanent, bulky workbenches are impractical.
- On-Site Project Demands: Professionals frequently need a stable work surface and secure clamping options at client locations.
- Versatility Requirements: Different projects demand different setups. A portable bench can be reconfigured or moved to accommodate various tools and workflows.
This project is not merely about building a table; it’s about crafting a mobile hub that enhances your capabilities. By integrating clamping and vise solutions directly into the design, you ensure that your work remains secure, allowing for greater precision and safety, regardless of your working environment. This is particularly important for tasks like mastering dovetail joints with hand tools or detailed wood carving techniques where a stable workpiece is critical.
A well-designed portable workbench can significantly boost productivity. Imagine not having to scramble for clamps or improvise workholding solutions. With integrated features, everything is readily available and strategically placed, making your workflow smoother and more efficient. This article will guide you through the thoughtful design and construction process, ensuring your portable workbench is robust, functional, and perfectly suited to your needs.
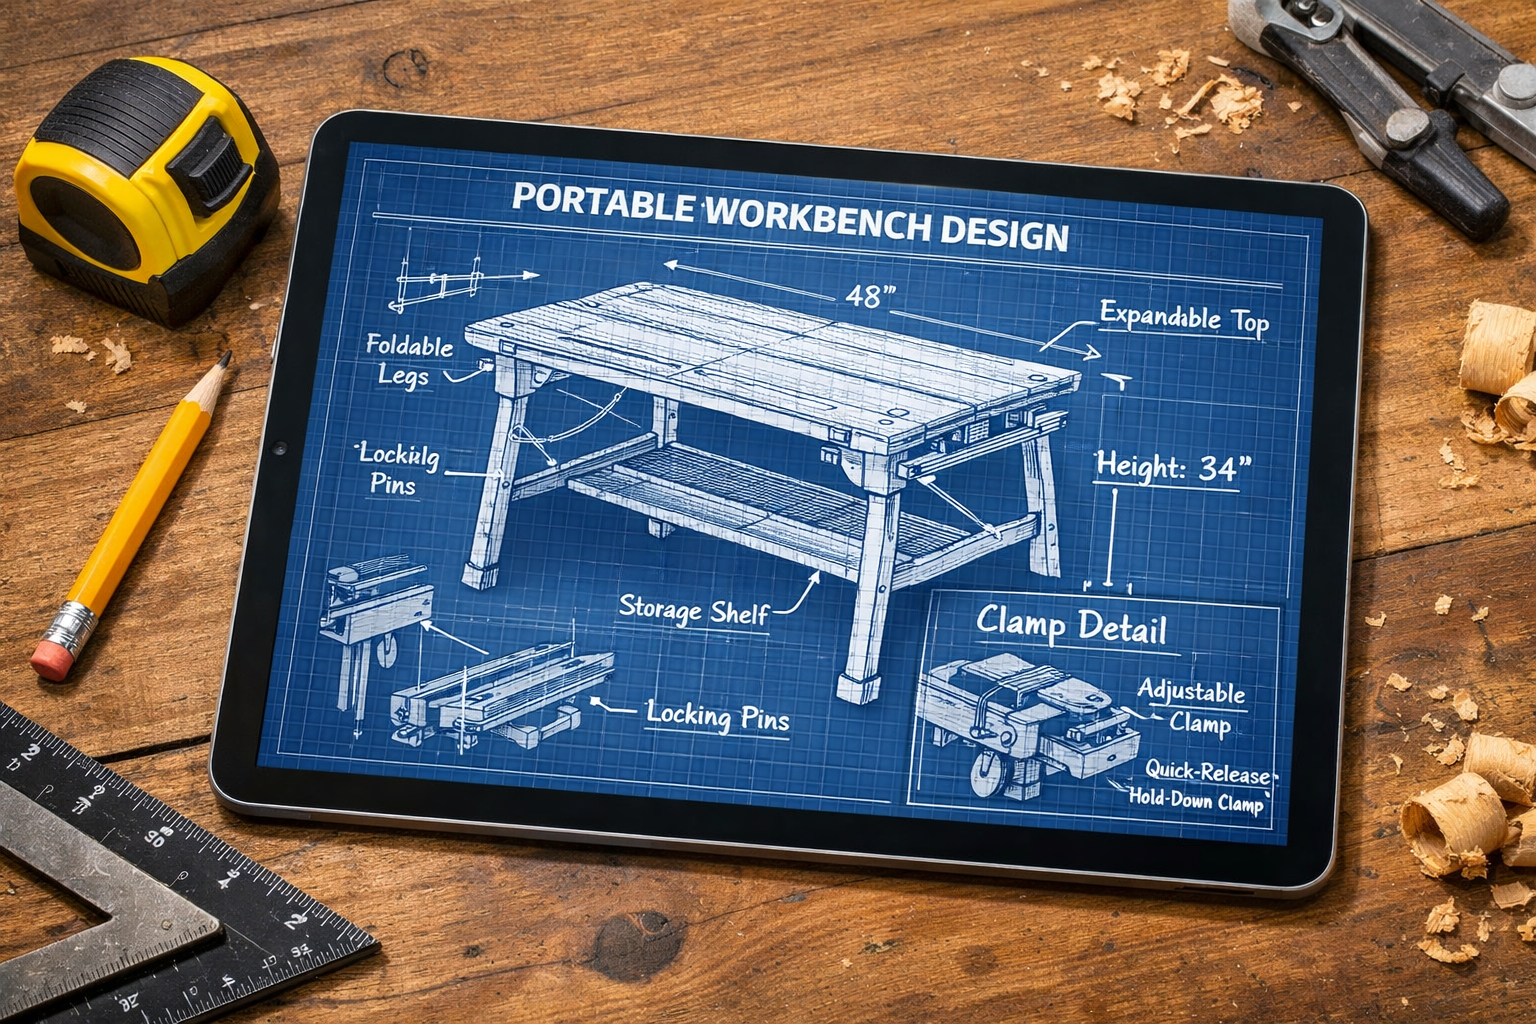
Designing Your Mobile Workstation: Features and Materials
The foundation of a successful portable workbench lies in its design. Before you cut a single piece of wood, careful planning is essential, focusing on mobility, integrated clamping, a removable vise, and intelligent storage.
Key Design Considerations
When embarking on Building a DIY Portable Workbench with Integrated Clamping and Vise Solutions, prioritize these elements:
- Portability:
- Weight: Choose materials that are sturdy but not excessively heavy. Plywood, especially Baltic birch, is an excellent choice for its strength-to-weight ratio.
- Dimensions: Design a footprint that is large enough for your typical projects but compact enough to navigate doorways and fit into storage.
- Folding Mechanisms: Incorporate folding legs or a collapsible design if space-saving storage is a high priority. Wheels or casters (lockable) are also vital for easy movement.
- Integrated Clamping Solutions:
- T-tracks: These aluminum tracks can be routed into the workbench top or sides, allowing for quick and flexible clamping with specialized T-track clamps.
- Dog Holes: A grid of strategically placed holes (typically ¾-inch or 20mm) through the workbench top allows for bench dogs and holdfasts, offering versatile clamping options across the entire surface.
- Bench Aprons: Consider adding sturdy aprons around the perimeter to provide additional clamping surfaces for standard F-clamps or C-clamps.
- Removable Vise Integration:
- Mounting Points: Design reinforced areas where a quick-release or clamp-on vise can be securely attached and removed. This could involve pre-drilled bolt holes or a recessed lip.
- Versatility: A removable vise allows you to use different types of vises (e.g., woodworking vise, machinist vise) depending on the task, or remove it entirely when not needed to create a flush work surface.
- Smart Storage:
- Under-Bench Shelving: Create open shelves or enclosed cabinets for storing frequently used tools, clamps, and materials.
- Tool Holders: Integrate small compartments, hooks, or magnetic strips for hand tools, pencils, and measuring tapes.
- Component Organization: Plan for dedicated spaces for bench dogs, T-track accessories, and the removable vise itself. This can dramatically improve efficiency, similar to how creating ergonomic workshop furniture enhances overall productivity.
Material Selection
Choosing the right materials is crucial for durability, stability, and portability.
| Component | Recommended Material (Pros) | Considerations (Cons) |
|---|---|---|
| Workbench Top | Baltic Birch Plywood (stable, strong, good screw retention), MDF (with laminate) (flat, dense, good for routing) | Plywood can be heavy, MDF is susceptible to water damage |
| Frame & Legs | Dimensional Lumber (Pine, Douglas Fir) (readily available, cost-effective), Hardwood (Oak, Maple) (very strong, durable) | Softwoods can dent easily, hardwoods are heavier/costlier |
| Hardware | Heavy-duty Casters (locking), Folding Leg Brackets, T-tracks (aluminum), Knob-and-bolt sets | Invest in quality hardware for longevity and safety |
| Joinery | Wood Glue, Screws (pocket hole screws), Bolts (for main structural joints), Dovetail joints for drawer stability | Proper joinery ensures long-term stability |
For joinery, while screws and glue provide excellent strength, mastering dovetail joints can elevate the craftsmanship and durability of any integrated drawers or compartments.
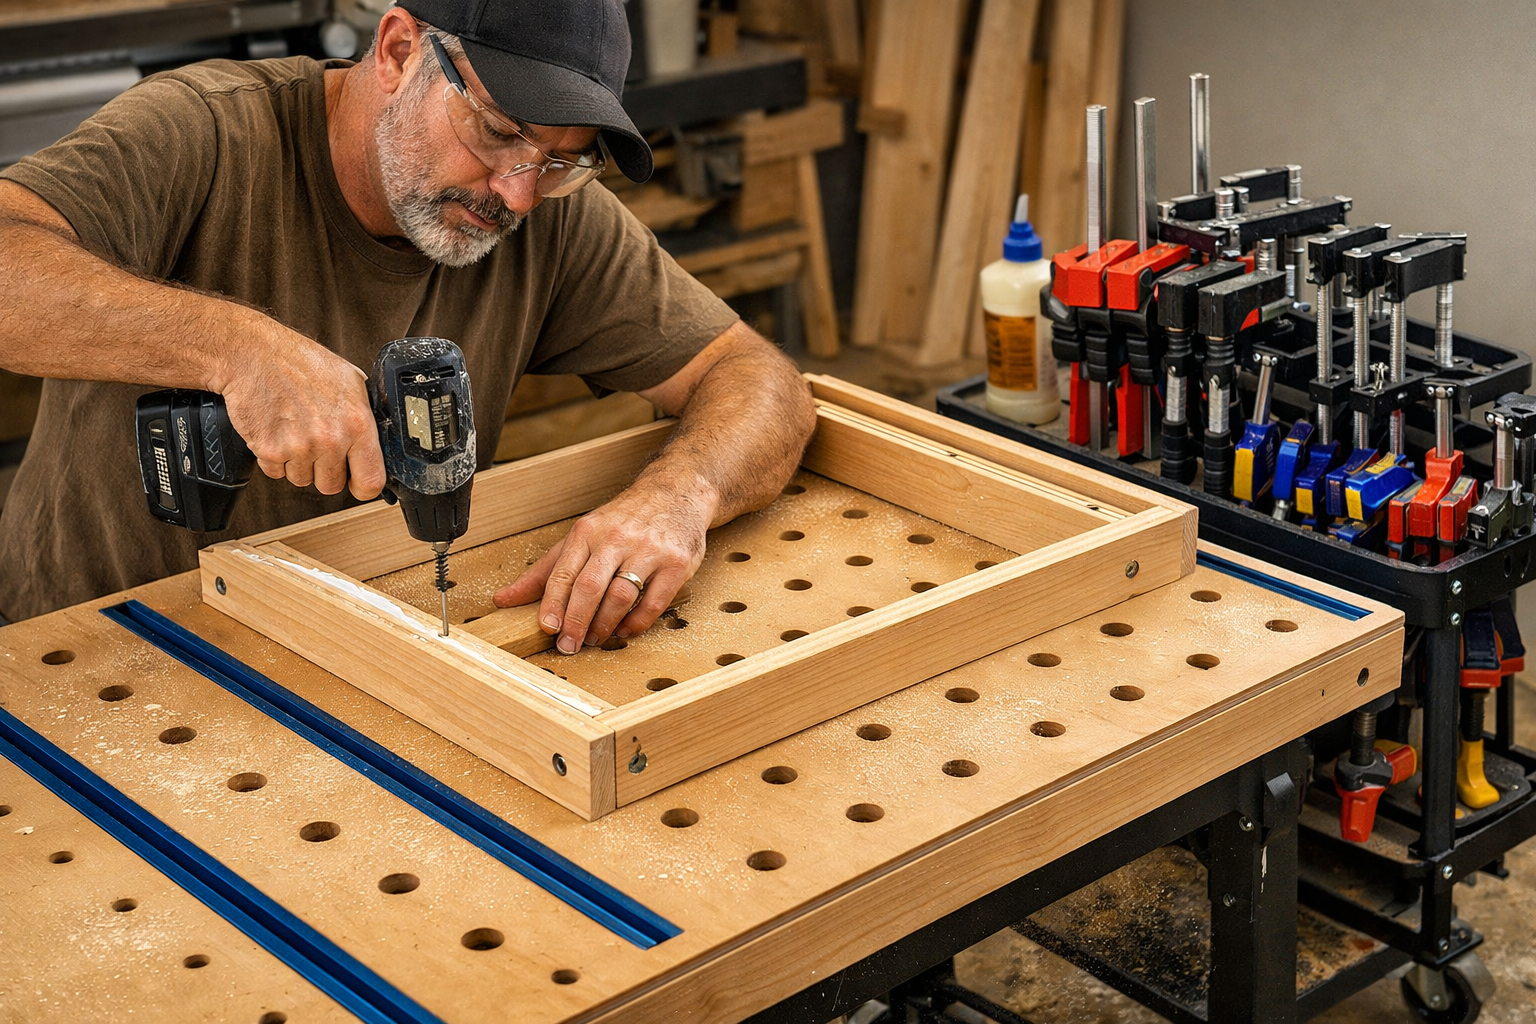
Construction Phase: Building a DIY Portable Workbench with Integrated Clamping and Vise Solutions
Once your design is finalized and materials are gathered, the construction phase begins. Precision in cutting and assembly is key to ensuring a stable, functional workbench. This section will walk you through the general steps for Building a DIY Portable Workbench with Integrated Clamping and Vise Solutions.
Step-by-Step Construction Guide
- Cut Materials to Size:
- Assemble the Frame:
- Begin by assembling the main framework for the workbench base. Use strong joinery methods such as mortise and tenon, lap joints, or pocket hole joinery with wood glue and screws.
- Ensure all joints are square and secure. This frame provides the stability for the entire structure.
- Install Folding Legs or Casters:
- If using folding legs, attach the heavy-duty folding leg brackets according to the manufacturer’s instructions. Reinforce these areas if necessary.
- For mobile units, attach locking casters to the bottom of the frame. Position them to distribute weight evenly and allow for easy maneuverability.
- Construct and Attach Workbench Top:
- Prepare your workbench top. This is where precision matters most for integrated features.
- Route T-tracks: Use a router with a straight bit to cut grooves for the T-tracks. Ensure the depth and width are snug for a flush fit. Secure the T-tracks with small screws.
- Drill Dog Holes: Using a drill press for accuracy, drill ¾-inch or 20mm dog holes in a grid pattern across the workbench top. Ensure they are perpendicular to the surface.
- Attach the finished top to the frame using screws from underneath, or by bolting it down from the top if a removable top is desired.
- Integrate Vise Mounting Points:
- Reinforce the area where your removable vise will attach. This might involve adding an extra layer of plywood or a hardwood block to the underside of the top.
- Drill pilot holes for the vise bolts if using a bolt-on system, or ensure a sturdy edge for a clamp-on vise.
- Build and Install Storage Solutions:
- Construct shelves, drawers, or cubbies for under-bench storage. Pocket holes are excellent for quick and strong box construction.
- Install drawer slides for smooth operation if adding drawers.
- Add hooks, magnetic strips, or small dividers as planned for tool organization. For ideas on efficient small-space storage, consider techniques from DIY compact entryway organizers.
- Apply Finish (Optional but Recommended):
- Sand all surfaces smooth, starting with coarse grit and progressing to fine grit.
- Apply a durable finish to protect the wood from moisture, spills, and wear. Options include polyurethane, spar varnish, or a hard wax oil. Pay particular attention to the workbench top.
Essential Tools and Techniques
- Measuring and Marking Tools: Tape measure, combination square, marking knife, pencil.
- Cutting Tools: Table saw, miter saw, circular saw, jigsaw. For detailed cuts, a band saw can be very useful.
- Drilling Tools: Cordless drill, drill press (highly recommended for accurate dog holes).
- Routing Tools: Router (fixed or plunge base) with various bits for T-tracks and edge profiles. Explore essential router bits for optimal results.
- Clamping: An array of clamps (bar clamps, F-clamps) is essential for gluing and assembly.
- Fasteners: Wood glue, screws (e.g., mastering woodworking screws), bolts, nuts, washers.
- Safety Gear: Safety glasses, hearing protection, dust mask.
Remember, patience and attention to detail during the construction phase will result in a robust and highly functional portable workbench that will serve you for years to come.
Maximizing Utility: Integrated Clamping, Vise Solutions, and Storage
A truly effective portable workbench transcends being just a flat surface; it becomes a multi-functional command center. This section focuses on harnessing the full potential of your DIY portable workbench through its integrated features and intelligent design.
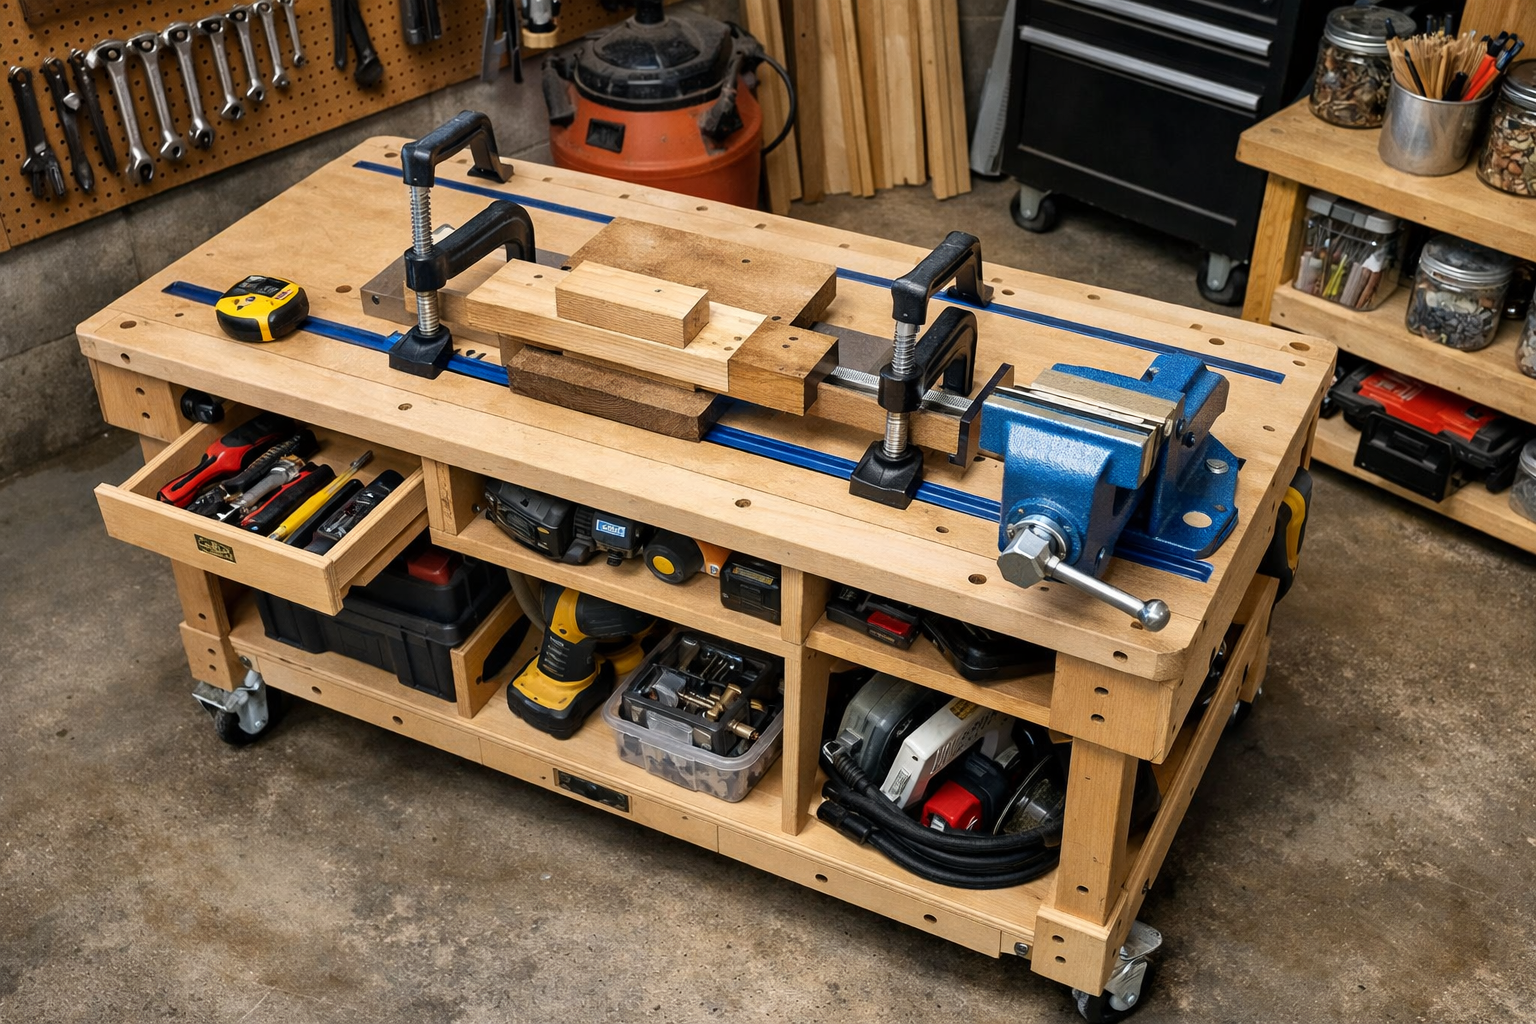
Leveraging Integrated Clamping
The built-in clamping solutions are what truly elevate your DIY portable workbench.
- T-track System: With T-tracks embedded in your workbench top, you can quickly secure workpieces of various shapes and sizes using T-track clamps. These allow for clamping anywhere along the track, offering tremendous flexibility. Consider using jigs that slot into the T-tracks for repetitive tasks or specialized cuts.
- Dog Holes and Bench Dogs: The grid of dog holes, combined with bench dogs and holdfasts, provides a versatile workholding system. You can clamp wide panels, hold stock for planing, or secure oddly shaped pieces. Pair bench dogs with a tail vise or end vise (if you choose to add one) for powerful clamping across the width of the bench.
- Bench Aprons: The sturdy aprons of your workbench are not just for structural integrity. They provide additional clamping surfaces for standard F-clamps, allowing you to secure items vertically or horizontally to the edge of the bench.
Optimizing with a Removable Vise
A removable vise is a game-changer for adaptability.

- Quick-Release Functionality: Many woodworking vises come with a quick-release mechanism, allowing for rapid adjustment. When integrated with your portable workbench, this means you can attach or detach the vise in minutes.
- Versatility: Depending on your project, you might need a traditional woodworking vise for joinery, a smaller jeweler’s vise for intricate work, or even a machinist’s vise for metalworking. The removable design lets you swap them out or store them away when not needed, maximizing your work surface.
- Storage: Design a dedicated, easily accessible spot for your vise when it’s not mounted. This prevents it from being misplaced or damaged and keeps your workspace tidy.
Implementing Smart Storage Solutions
Efficient storage is vital for a functional mobile workstation.
- Under-Bench Storage: Open shelves are excellent for frequently accessed items like sandpaper, glue, or extra clamps. Enclosed cabinets or drawers keep dust off more delicate tools and provide security. For example, if you’re building a wooden storage chest, you might need various tools that can be stored beneath.
- Tool-Specific Organizers: Create custom inserts or dividers for specific tools. A section for your bench dogs, another for your T-track accessories, and a small drawer for marking tools like pencils and rulers will keep everything in its place.
- Vertical Storage: Utilize the sides of your workbench with hooks or magnetic strips for hanging hand saws, squares, or screwdrivers. This keeps frequently used tools within arm’s reach without cluttering the main work surface.
- Portability of Storage: If your workbench folds, ensure any storage components are designed to remain secure during transport or are easily removable themselves. Small plastic bins that fit snugly into shelves can be a great solution for organizing small parts and making them portable.
By thoughtfully planning and executing these integrated features, your DIY portable workbench with integrated clamping and vise solutions will not only provide a stable work surface but also become an indispensable tool that dramatically improves your woodworking efficiency and capability in 2026. This focus on practical integration ensures that your mobile workstation is always ready for whatever project you tackle next.
Conclusion
Building a DIY portable workbench with integrated clamping and vise solutions is more than just a woodworking project; it’s an investment in your productivity, flexibility, and overall enjoyment of your craft. In 2026, where space and mobility are often at a premium, such a versatile workstation becomes an invaluable asset for hobbyists and professionals alike. By following the principles of thoughtful design, careful material selection, and precise construction, you can create a robust, adaptable, and highly efficient mobile workbench tailored to your specific needs.
Remember, the true power of this workbench lies in its integrated features: the strategic placement of T-tracks and dog holes for dynamic clamping, the adaptability of a removable vise, and the efficiency of smart, organized storage. These elements transform a simple work surface into a dynamic command center, ready to tackle projects in any location, from a small apartment to an on-site client job.
Actionable Next Steps:
- Refine Your Design: Sketch out detailed plans, considering your specific space limitations, project types, and preferred clamping methods.
- Source Quality Materials: Invest in durable plywood, sturdy hardware, and reliable casters to ensure longevity and stability.
- Prioritize Safety: Always wear appropriate personal protective equipment (PPE) during construction and operation.
- Start Building: Take it step-by-step, focusing on accuracy in each phase, from cutting to assembly and finishing.
- Test and Customize: Once built, put your workbench to the test with various projects and customize its storage and clamping accessories to perfectly suit your workflow.
Embrace the challenge of creating your own mobile workstation, and experience the freedom and efficiency it brings to your woodworking endeavors in 2026.
SEO Meta Title: Build a DIY Portable Workbench: Clamping & Vise Solutions SEO Meta Description: Learn to build a DIY portable workbench with integrated clamping and vise solutions. Optimize small spaces, boost efficiency, and tackle any project in 2026.
