


The pursuit of a perfectly smooth, glass-like wooden surface—a finish that gleams without the need for excessive sanding—is a hallmark of skilled woodworking. Yet, many aspiring craftspeople struggle to achieve this elusive ideal, often relying on power sanders that leave behind tell-tale swirl marks. The secret, often overlooked in Western woodworking, lies in the ancient craft of Japanese hand planes, known as Kanna. This comprehensive guide, “The Beginner’s Guide to Japanese Woodworking Planes: Understanding Kanna Types, Setup, and Sharpening for Fine Finishing,” will introduce you to these unique tools, empowering you to unlock unparalleled precision and surface quality in your projects in 2026.
Key Takeaways

- Japanese planes (Kanna) are fundamentally different from Western planes, operating on a pulling stroke and requiring distinct setup and sharpening.
- Understanding various Kanna types, such as hiraganna, senzori-ganna, and hoso-ganna, is crucial for selecting the right tool for specific woodworking tasks.
- Proper setup involves precisely fitting the blade to the dai (body) and adjusting the chipbreaker, which is vital for tear-out free cutting.
- Sharpening Kanna blades demands a systematic approach using Japanese waterstones to create exceptionally keen, durable edges.
- Mastering these tools offers superior surface finish, eliminates sanding dust, and deepens your connection to the woodworking process.
Unraveling Kanna: The Beginner’s Guide to Japanese Woodworking Planes: Understanding Kanna Types
Japanese woodworking planes, or kanna, are more than just tools; they are a centuries-old tradition embodying precision, simplicity, and efficiency. Unlike Western planes that are pushed, Kanna operate on a pulling stroke, which offers greater control and allows for very thin shavings. This pulling action also helps to minimize tear-out, especially on figured or difficult grain. The core components of a Kanna are the dai (wooden body), the blade (iron), and often a chipbreaker (osae-gane).
Fundamental Kanna Types
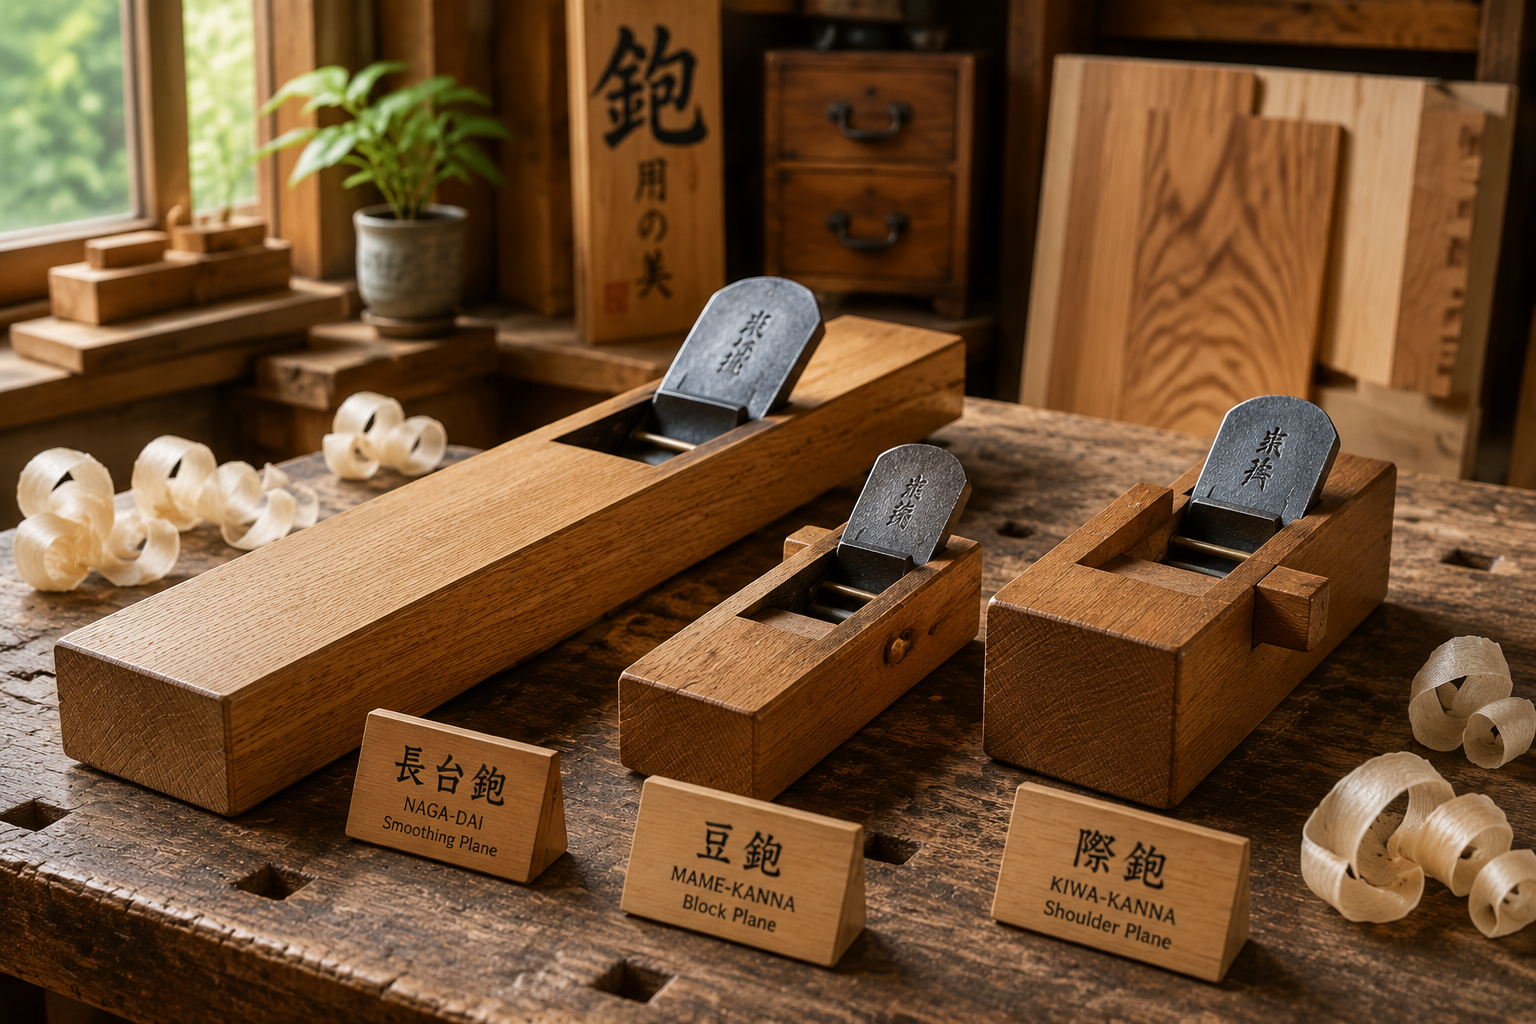
While there is a vast array of specialized Kanna, beginners should focus on a few key types that cover most essential planing tasks:
- Hiraganna (Smoothing Plane): This is the most common and versatile Japanese plane, designed for general surfacing, flattening, and achieving a smooth finish. They come in various lengths, with longer ones excelling at flattening large surfaces and shorter ones at fine finishing. A standard smoothing plane is an essential first Kanna.
- Senzori-ganna (Scrub Plane): Characterized by a highly curved cutting edge, the senzori-ganna is used for rapid material removal, quickly reducing rough timber to a more manageable thickness. It leaves a scalloped surface that is then refined with a hiraganna.
- Hoso-ganna (Block Plane/Small Plane): These smaller planes are ideal for precise tasks like trimming tenons, chamfering edges, or working in confined spaces. They often lack a chipbreaker.
- Kikubari-ganna (Shoulder Plane): Used for cleaning up dados, rabbets, and tenon shoulders, these planes have a blade that extends to the side edges of the plane body, allowing them to cut right into corners.
Understanding these types helps you select the right tool for the job, a critical step in mastering the art of Japanese planing.
Initial Setup of Your Kanna: A Crucial Step for Fine Finishing
The performance of a Japanese plane hinges almost entirely on its proper setup. A Kanna is typically sold with a blade and dai that are not perfectly matched, requiring the user to “tune” the plane to optimal working condition. This process can be intimidating but is profoundly rewarding.
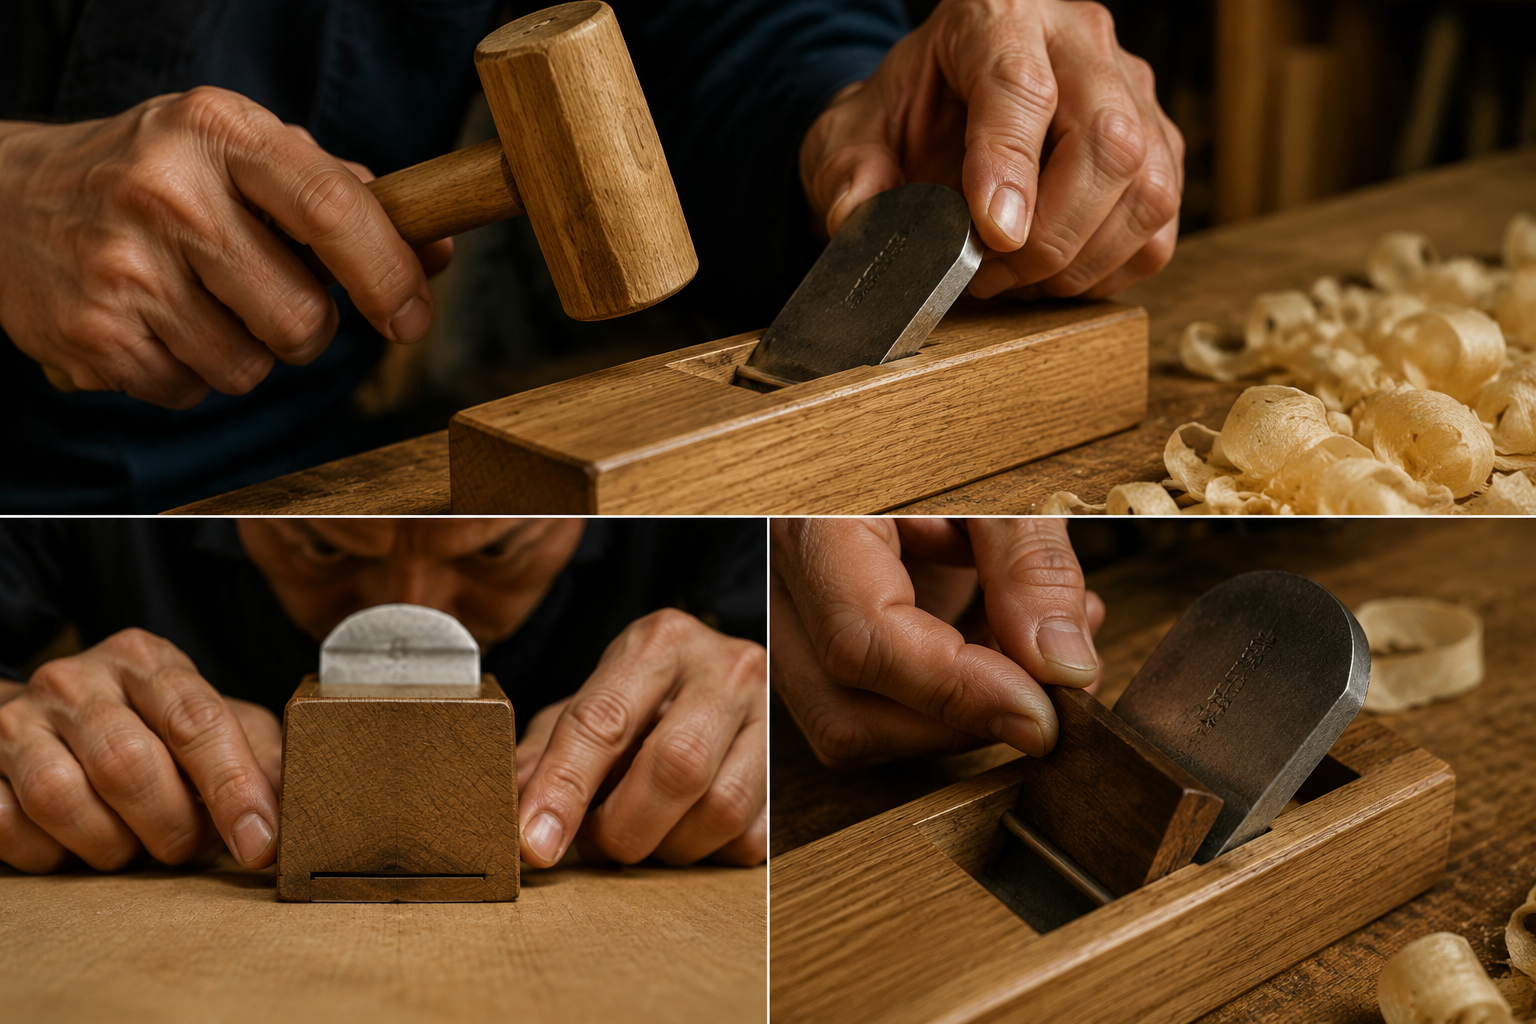
Fitting the Blade to the Dai
The blade must sit snugly in its bed within the dai. This involves shaping the blade’s seating area within the wooden body.
- Check Fit: Insert the blade into the dai and gently tap it with a small wooden mallet. Observe where the blade makes contact with the dai—these are typically shiny spots.
- Relieve Pressure Points: Use a men-tori kanna (a small, specialized plane for chamfering edges) or a sharp chisel to carefully shave wood from the contact points, primarily from the central area of the bed. The goal is to ensure the blade makes contact only along its outer edges, creating a stable three-point contact for the blade and allowing for easy adjustment.
- Create Bed Slope: Ensure the blade rests securely but can still be adjusted. The back of the blade should be tight against the dai‘s bed, while the front (cutting edge) should be slightly relieved, allowing the blade to be pushed out for adjustment.
Adjusting the Sole (Dai)
The sole of a Japanese plane is often intentionally left slightly hollowed (called ura-dashi) or cambered in specific areas. This prevents the plane from suctioning to the wood and reduces friction, allowing for incredibly thin shavings.
- Front and Rear Contact: Typically, only the front 1/4 inch and the very back edge of the sole should make contact with the workpiece. The middle section is slightly relieved.
- Using a Reference Surface: Place the Kanna on a known flat surface (like a jointer bed or a thick piece of glass with sandpaper) and observe the contact points. Carefully scrape or plane away wood from the sole to achieve the desired hollow, always checking against your flat reference. This step requires patience and precision. For detailed guidance on preparing your plane, consider exploring resources on Restoring Vintage Woodworking Hand Tools: A Guide to Rust Removal.
Setting the Chipbreaker (Osae-gane)
The chipbreaker works in conjunction with the main blade to curl and break the wood shavings, preventing tear-out.
- Close Gap: The chipbreaker should sit very close to the cutting edge of the main blade—ideally, within 0.5mm to 1mm. This small gap is crucial for effective tear-out prevention, especially when working on difficult grain or for very fine finishing passes.
- Secure Fit: The chipbreaker itself should be sharpened on its underside to create a clean, sharp edge that sits flush against the main blade. It should be firmly held in place by its own wedge, preventing any vibration during planing.
The initial setup of a Kanna is a foundational skill. It’s an intimate process that teaches you the mechanics of the tool, enabling you to achieve the exquisite finishes Japanese woodworking is known for.
Sharpening for Fine Finishing: Mastering the Kanna Blade
A dull plane is worse than no plane at all. For Japanese planes, a truly razor-sharp edge is paramount for achieving those tissue-paper-thin shavings and flawless surfaces. Japanese sharpening relies on a progression of waterstones.
The Waterstone Progression
- Coarse Stone (220-400 grit): Used for repairing significant nicks, establishing the primary bevel angle, or flattening the back of the blade (the ura).
- Medium Stone (1000-2000 grit): This is your workhorse stone, used for most routine sharpening to refine the bevel established by the coarse stone and prepare the edge for polishing.
- Fine Stone (4000-8000 grit): Essential for creating a keen edge. This stone refines the scratches from the medium stone, making the edge sharper.
- Finishing/Polishing Stone (10,000+ grit): For the ultimate edge, a very fine polishing stone (or natural stone like a Nakayama) removes the finest scratches and polishes the bevel to a mirror finish, resulting in an edge that glides effortlessly through wood.
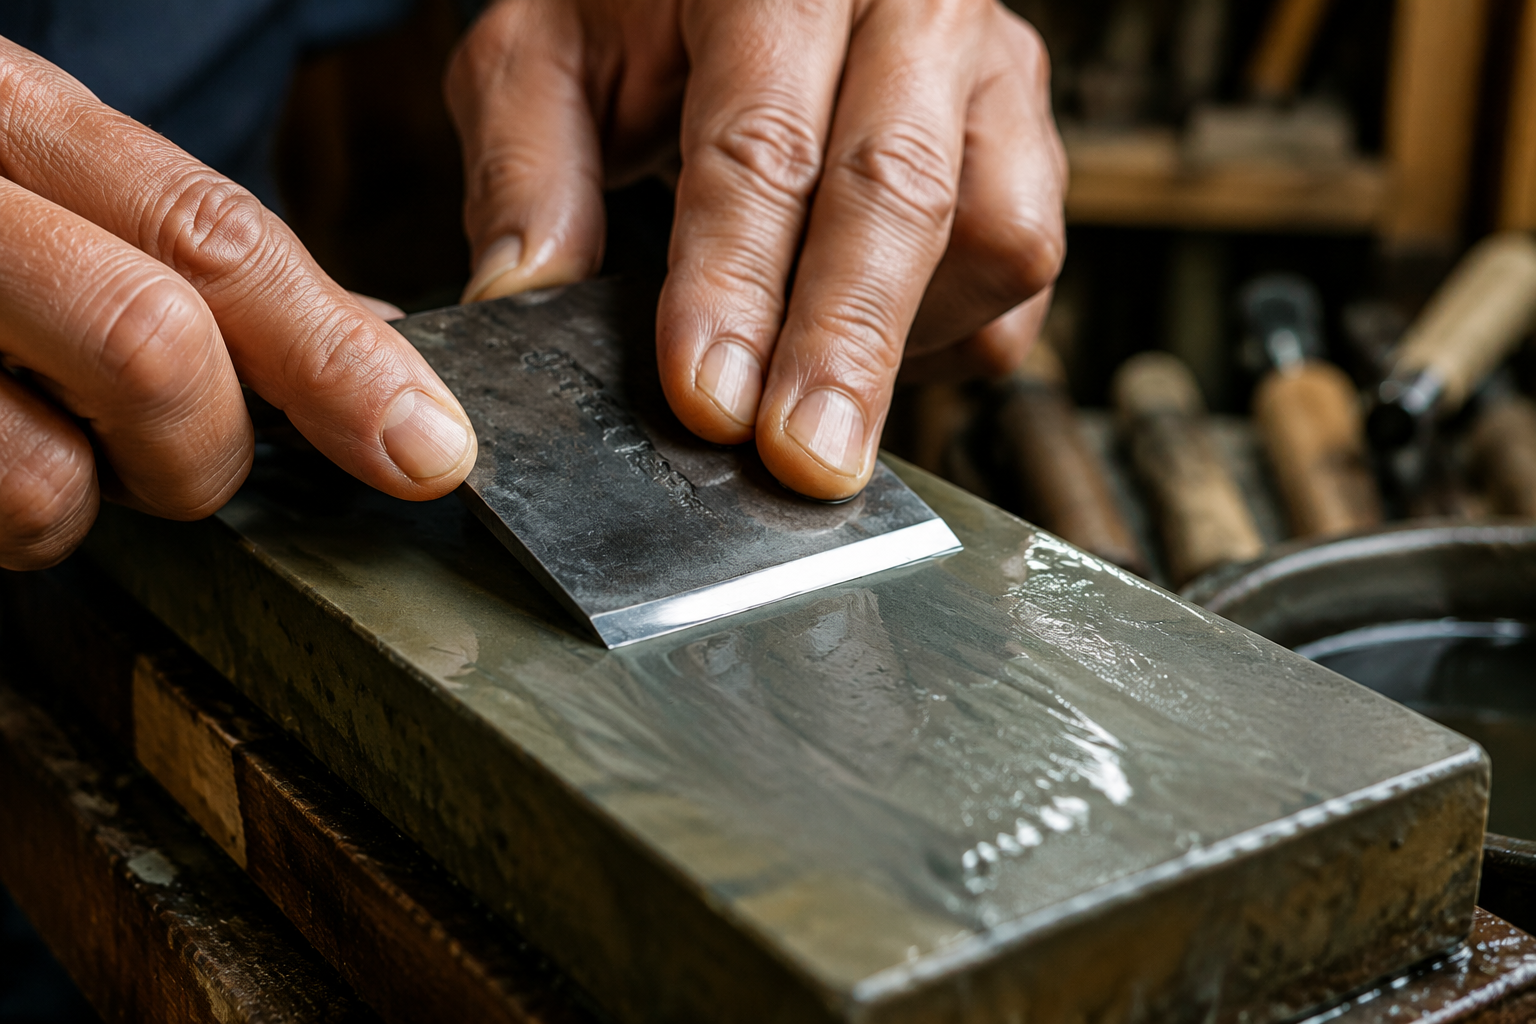
Sharpening the Bevel (Omote)
The bevel of a Kanna blade is typically a single, long bevel.
- Maintain Angle: Hold the blade firmly against the waterstone, maintaining a consistent angle. For most Kanna, this is between 25-30 degrees. You can use a sharpening jig initially, but freehand sharpening is the ultimate goal.
- Even Pressure: Apply even pressure across the blade as you move it back and forth or in figure-eight patterns on the stone.
- Develop a Burr: Continue sharpening until a uniform burr (a thin wire edge) forms along the entire length of the opposite side of the blade (the ura). This indicates that the entire bevel has been sharpened.
Sharpening the Back (Ura)
The back of a Japanese plane blade is concave (ura-suki), with a raised area along the cutting edge called the ura. This hollow grind helps reduce friction and makes it easier to achieve a truly flat back, which is as crucial as the bevel.
- Flattening the Ura: With the blade’s flat back (the ura) facing down, press it firmly onto a coarse or medium waterstone, ensuring contact only on the raised edge of the ura. Grind until a consistent, highly polished strip appears along the cutting edge. This strip should be perfectly flat.
- Removing the Burr: Once the ura is perfectly flat and polished, gently run the blade across a fine stone, flat on its back, to remove the burr created during bevel sharpening. A single, light stroke is often enough.
- Stropping: For an even finer edge, consider stropping the blade on a leather strop charged with honing compound. This further refines the edge.
Consistency in angle and thoroughness in each grit are key to achieving a truly sharp Kanna blade. This dedicated sharpening process is what allows Japanese planes to produce unparalleled surface finishes. For more in-depth knowledge on achieving razor-sharp edges, refer to our guide on “The Ultimate Guide to Sharpening Woodworking Chisels and Planes”.
Planing Techniques for Superior Finish
With your Kanna properly set up and sharpened, you’re ready to experience the joy of planing. The technique is intuitive once you understand the principles.

- Stance and Grip: Adopt a balanced stance with your body behind the plane, ready to pull. Hold the dai firmly with both hands, one near the front and the other near the back.
- The Pulling Stroke: Begin the stroke with even pressure, focusing on maintaining a consistent angle. As you pull the plane towards you, transfer your weight smoothly from your back foot to your front foot.
- Thin Shavings: Aim for the thinnest possible shavings. If your plane is set up correctly and sharp, it should produce gossamer-thin, translucent shavings that curl gracefully. Thick shavings indicate either a dull blade or too much blade projection.
- Reading the Grain: Always plane with the grain. Planing against the grain will lead to tear-out, even with a perfectly tuned Kanna. Learn to identify the grain direction on your workpiece. Sometimes, the grain might reverse, requiring you to plane in a different direction for a section.
- Overlapping Strokes: Overlap each stroke by about half the width of the blade to ensure an even surface.
- Skimming Passes: For the absolute finest finish, take very light, almost skimming passes across the entire surface. These final passes are where the magic of the Kanna truly shines, leaving a silky-smooth surface ready for finishing. Consider exploring unique wood finishing techniques to complement your finely planed surfaces.
Maintaining Your Kanna in 2026
Regular maintenance ensures your Kanna remains a reliable tool.
- Keep it Clean: After each use, wipe down the blade and dai to remove any wood dust or moisture.
- Oil the Blade: Apply a thin coat of camellia oil or another rust-preventative oil to the blade, especially if storing for extended periods.
- Flatten Waterstones: Over time, waterstones dish out. Use a flattening stone (nagara) or coarse sandpaper on a flat surface to keep your waterstones perfectly flat for effective sharpening.
- Store Properly: Store Kanna blades slightly retracted into the dai and in a dry environment to prevent rust and swelling of the wood.
Japanese planes are more than just tools for surface preparation; they are a means to connect more deeply with the material and the craft. The tactile feedback, the rhythmic sound of a perfectly tuned plane, and the visual delight of paper-thin shavings are all part of the experience.
The Benefits of Mastering Japanese Woodworking Planes: Understanding Kanna Types, Setup, and Sharpening for Fine Finishing
The investment of time and effort into mastering Japanese planes yields significant benefits for any woodworker:
- Superior Surface Quality: Kanna produce a planed surface that is often superior to sanded surfaces. The blade shears the wood fibers cleanly, leaving a smooth, lustrous finish that power sanders simply cannot replicate. This “burnished” surface also takes finishes exceptionally well.
- Reduced Dust and Noise: Working with hand planes eliminates the dust and noise associated with power sanders, contributing to a cleaner, quieter, and healthier workshop environment.
- Enhanced Control and Precision: The pulling action of Kanna offers incredible control, allowing for precise adjustments and removal of minuscule amounts of material, critical for joinery and delicate work. This precision can be invaluable when working on projects like Mastering Dovetail Joints with Hand Tools: A Step-by-Step Guide for Flawless Wood Joinery.
- Deeper Connection to Craft: There is a profound satisfaction in working with hand tools. The direct feedback from the wood, the quiet focus, and the tangible results foster a deeper appreciation for the material and the craft itself.
- Longevity of Tools: Properly maintained Kanna, with their robust construction, can last for generations, becoming heirloom tools that improve with age and use.
Embracing Japanese planes is not just about adopting a different tool; it’s about embracing a different philosophy of woodworking—one that prioritizes precision, patience, and a deep respect for the material.
Conclusion
Embarking on the journey of mastering Japanese woodworking planes in 2026 is a transformative experience for any woodworker seeking to elevate their craft. This “Beginner’s Guide to Japanese Woodworking Planes: Understanding Kanna Types, Setup, and Sharpening for Fine Finishing” has provided you with the essential knowledge to begin this exciting path. From differentiating between the various Kanna types and meticulously setting up your plane’s dai and blade, to mastering the nuanced art of waterstone sharpening, each step contributes to achieving the exquisite surface finishes that define traditional Japanese woodworking.
The initial learning curve might seem steep, but the rewards—a deeper connection to your material, a quieter workshop, and surfaces of unparalleled quality—are immeasurable. Begin with a good quality hiraganna, dedicate time to its setup and sharpening, and practice regularly. You’ll soon discover the profound satisfaction of transforming rough lumber into a silky-smooth canvas with nothing but a sharp blade and your own skill. The journey into Kanna is not just about making wood smooth; it’s about refining your woodworking sensibilities and achieving a level of craftsmanship that truly stands apart.
SEO Meta Title: Japanese Woodworking Planes: Kanna Guide for Beginners (2026) SEO Meta Description: Master Japanese woodworking planes (Kanna) in 2026. Learn types, expert setup, and sharpening for superior fine finishing and unparalleled surface quality.
