


The resurgence of hand-cut joinery in modern woodworking workshops, far from being a purely nostalgic pursuit, represents a strategic integration of time-honored techniques with contemporary efficiency. Woodworkers in 2026 are increasingly discovering that the precision, strength, and aesthetic appeal of classic hand-cut joints, such as dovetails and mortise-and-tenons, can be achieved with remarkable efficiency when adapted for modern workflows. This Beginner’s Guide to Hand-Cut Joinery: Classic Joints Adapted for Modern Workshop Workflows aims to demystify these foundational techniques, offering a practical pathway for enthusiasts to elevate their craft by embracing the best of both worlds.
Key Takeaways

- Hand-cut joinery offers superior strength, precision, and aesthetic value compared to many machine-made joints.
- Modern tools and jigs significantly streamline the layout and cutting process for classic hand joints.
- Mastering essential joints like dovetails, mortise-and-tenons, and box joints is fundamental for advanced woodworking.
- A sharp, well-maintained set of hand tools is crucial for achieving clean, accurate results.
- Integrating traditional joinery enhances both the structural integrity and market value of custom furniture.
Embracing Hand Tools and Modern Layouts for Precision Joinery
The perception that hand-cut joinery is slow and laborious often deters new woodworkers. However, this overlooks the advancements in modern layout tools and the efficiency gained through a focused approach. In 2026, the modern workshop isn’t about choosing between hand tools and power tools, but rather intelligently combining them. Precision is paramount in joinery, and while power tools can expedite certain steps, hand tools offer an unmatched level of control for the critical details that define a strong, beautiful joint.
Consider the layout phase: traditional methods often relied solely on marking gauges and knives. Today, digital calipers, precision squares, and even laser guides can accelerate initial measurements and transfers, ensuring accuracy from the outset. Once the layout is complete, the art of hand-cutting begins.
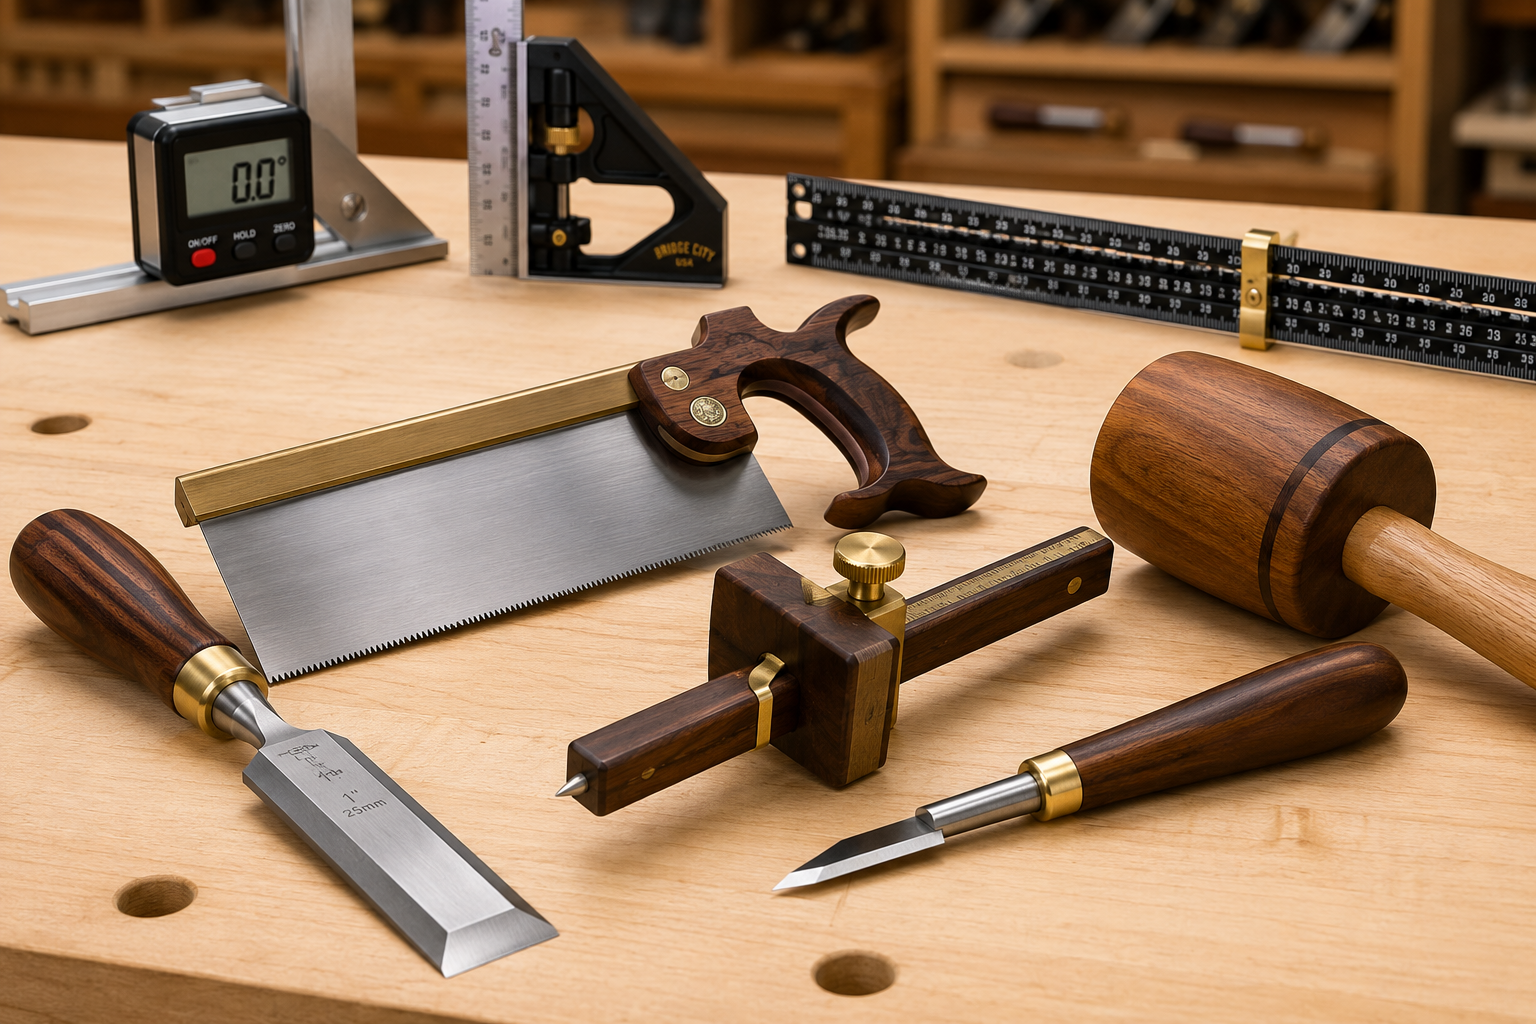
Essential Hand Tools for Joinery:
- Dovetail Saw: A fine-toothed saw designed for precise cross-cuts and rip-cuts in joinery.
- Bench Chisels: A set of sharp chisels ranging in width for paring and chopping waste.
- Mallet: For driving chisels with control and impact.
- Marking Gauge: To scribe parallel lines for tenons, dados, and rabbets.
- Marking Knife: For creating crisp, accurate lines that guide saw and chisel cuts.
- Paring Chisel: A longer, thinner chisel for delicate clean-up work.
- Block Plane: For fine-tuning tenon cheeks or joint surfaces.
Integrating Modern Layout Techniques:
- Digital Precision: Use digital calipers for exact thickness measurements of stock, ensuring consistent sizing for mortises and tenons.
- Angle Accuracy: Employ a digital angle finder to verify perfect 90-degree cuts or specific angles for splayed joints, a critical step often overlooked.
- Visual Aids: Some woodworkers utilize projection systems to overlay joint patterns directly onto stock, aiding in complex layouts, although traditional marking remains fundamental for critical accuracy.
By combining the speed and exactness of modern measuring tools with the tactile feedback and control of hand saws and chisels, woodworkers can achieve superior results. For an introduction to various woodworking joints and their applications, refer to our Beginner’s Guide to Essential Woodworking Joints: When to Use Which.
Step-by-Step Tutorials for Essential Hand-Cut Joints in Your Modern Workshop
Mastering a few fundamental hand-cut joints will dramatically expand your woodworking capabilities. This section will walk through the core steps for three classic joints: the mortise-and-tenon, the through dovetail, and the box joint, emphasizing how modern approaches can enhance their execution.
The Mortise-and-Tenon Joint
The mortise-and-tenon is a cornerstone of furniture construction, renowned for its strength and versatility. It consists of a tenon (a projection) on one piece of wood fitted into a mortise (a recess) in another.
Workflow Adaptation: While traditionally cut entirely by hand, many modern workflows utilize a router or mortising machine for the bulk of the mortise, then refine and pare to exact dimensions with hand chisels.
- Layout:
- Using a pencil, square, and marking knife, define the mortise and tenon locations.
- Employ a marking gauge to scribe the shoulder lines of the tenon and the width of the mortise. Modern precision squares help ensure lines are perfectly perpendicular.
- Tip: Mark all components from the same reference face and edge to ensure alignment.
- Cutting the Tenon:
- Clamp the workpiece securely in a vise.
- Using a fine-toothed tenon saw, cut down to the shoulder lines, ensuring the saw rides precisely on the waste side of your knife lines.
- Cut the shoulders of the tenon. A shoulder plane can be used for final paring of the tenon cheeks for a perfect fit.
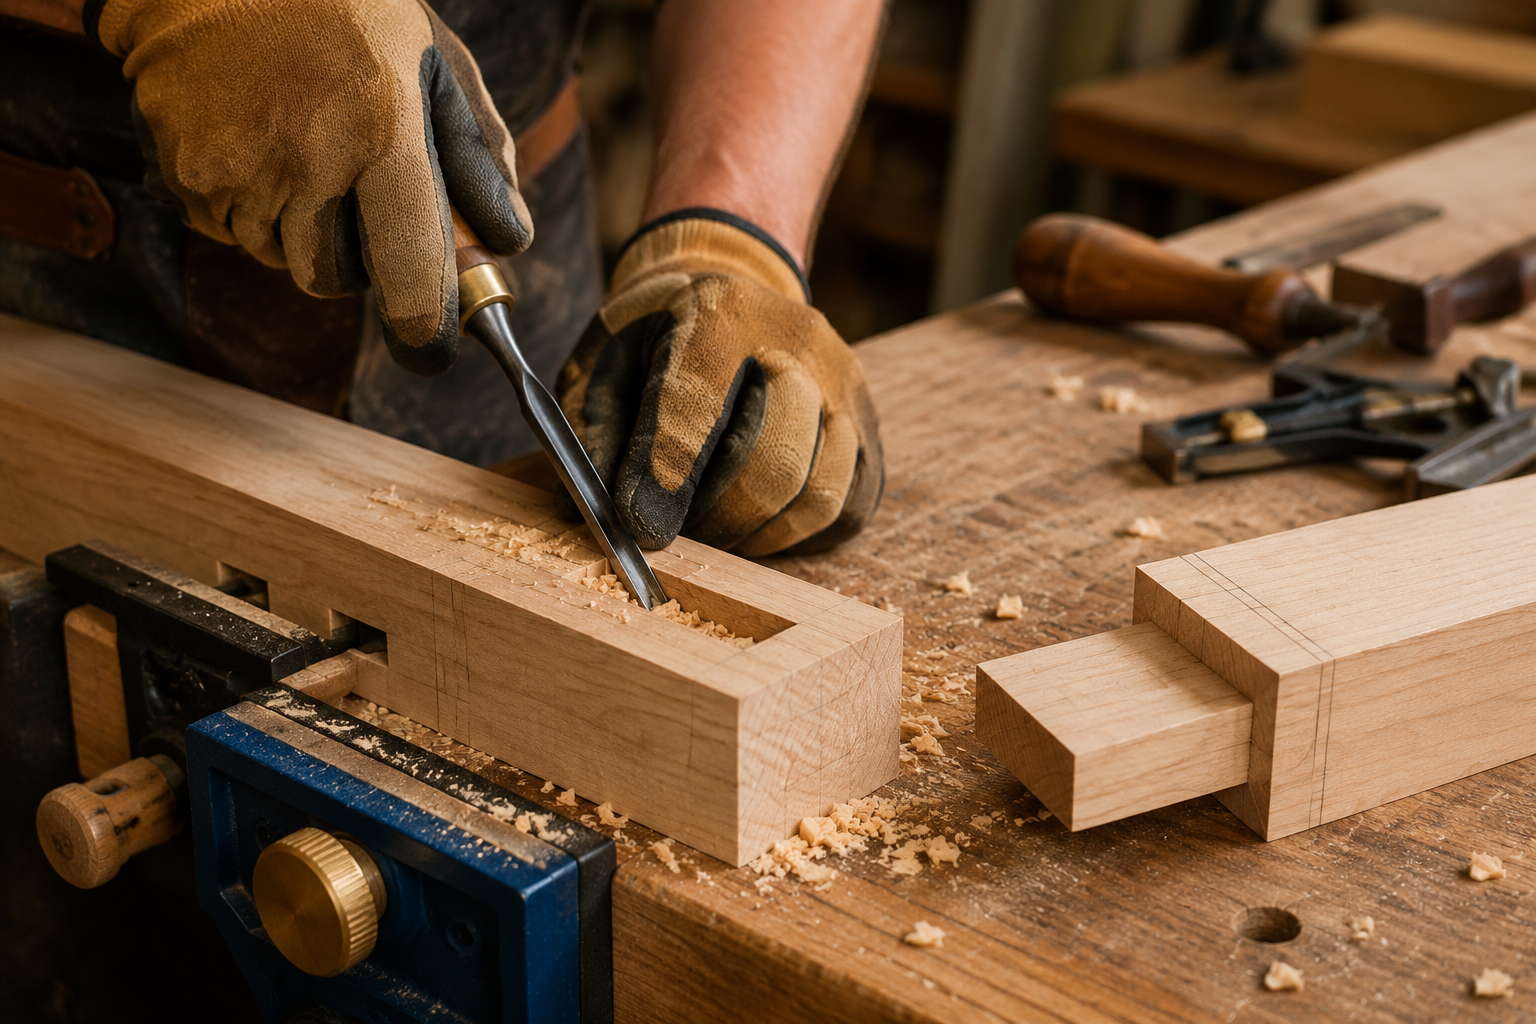
- Cutting the Mortise:
- If using a power tool for the rough cut, hog out most of the waste with a router, drill press with a mortising attachment, or a dedicated mortiser.
- Switch to hand tools: use a sharp chisel matching the mortise width. Start by chopping perpendicular to the grain, working from both edges towards the center to prevent breakout.
- Pare the sides of the mortise with careful, shallow cuts, always working towards your knife lines.
- Tip: Keep your chisel extremely sharp. Regularly hone it for clean cuts.
- Test Fit and Refine:
- Gently attempt to fit the tenon into the mortise. It should be snug but not require excessive force.
- Identify high spots and carefully pare them down with a chisel or block plane.
- Once a perfect fit is achieved, apply a high-quality wood glue (see The Ultimate Guide to Wood Glue) and clamp.
The Through Dovetail Joint
Dovetail joints are synonymous with high-quality woodworking, prized for their mechanical strength, resistance to pulling apart, and aesthetic beauty. The through dovetail, where the joint is visible on both faces, is a classic. For a deeper dive, consider Mastering Dovetail Joints with Hand Tools: A Step-by-Step Guide.
Workflow Adaptation: Modern workshops often employ specialized dovetail marking gauges and magnetic saw guides to ensure consistent angles and precise cuts, significantly speeding up the layout and initial sawing stages.
- Prepare Stock: Ensure both pieces are perfectly square and flat, and precisely the same thickness.
- Layout Pins or Tails (First Piece):
- Choose whether to cut the pins or tails first. For beginners, cutting tails first is often easier.
- Mark the baseline on the end grain, slightly proud of the thickness of the mating piece.
- Using a dovetail marking gauge (or a bevel gauge set to a 1:6 or 1:8 ratio for hardwoods/softwoods respectively), mark the angles for the tails.
- Space the tails evenly across the board.
- Cut Tails:
- Saw precisely to the knife lines, angling the saw to match the layout marks. A magnetic saw guide can be invaluable here for consistency.
- Carefully chisel out the waste between the tails. Use a coping saw to remove larger waste pieces efficiently before paring with chisels.
- Transfer Tails to Pin Board (Second Piece):
- Carefully align the tail board (first piece) onto the end grain of the pin board (second piece).
- Use a marking knife to trace the exact shape of the tails onto the pin board. This ensures a perfect fit.
- Cut Pins:
- Saw precisely to the knife lines on the pin board, removing the waste.
- Chisel out the waste between the pins. Again, a coping saw can help remove larger sections.
- Test Fit and Refine:
- Gently bring the two pieces together. They should slide in with a satisfying snugness.
- Identify any tight spots and pare them down with a sharp chisel.
- Apply glue and clamp carefully. For making custom drawers, check out Mastering Dovetail Drawers for Cabinets: Hand-Cut and Router Jigs.
The Box Joint (Finger Joint)
The box joint, or finger joint, is a strong and decorative joint used primarily for connecting the sides of boxes or drawers. It’s simpler to cut than a dovetail but offers excellent surface area for glue.
Workflow Adaptation: While often associated with router tables and jigs, hand-cut box joints are achievable and provide a distinct aesthetic. Modern techniques focus on consistent marking and controlled sawing.
- Layout:
- Ensure both mating pieces are exactly the same width and thickness.
- Decide on the width of your ‘fingers’. Typically, they are between 1/4″ and 1/2″.
- Using a marking gauge, scribe a baseline on the end grain of both pieces, indicating the depth of the joint (the thickness of the mating piece).
- Using a combination square and marking knife, lay out the finger widths on the end grain of both pieces, alternating waste and keepers.
- Cutting the Fingers:
- Securely clamp one workpiece in a vise, ideally with a sacrificial backing board to prevent tear-out.
- Using a fine-toothed back saw (or a dedicated joinery saw), saw down precisely to the baseline, staying on the waste side of your knife lines.
- Carefully chisel out the waste sections. You can use a coping saw to remove the bulk of the waste before paring with a chisel, much like dovetails.
- Transfer (Optional but Recommended):
- Alternatively, after cutting one board’s fingers, use it as a template to mark the second board for a perfect fit, similar to dovetails.
- Test Fit and Refine:
- Gently interlock the fingers. The joint should be tight but not overly difficult to assemble.
- Pare any high spots with a chisel.
- Apply glue and clamp securely.
Adapting Classic Joinery for Modern Workshop Workflows
The beauty of hand-cut joinery in 2026 lies in its adaptability. It’s not about rejecting modern technology but leveraging it to enhance traditional craftsmanship. The goal is to achieve the best possible results with maximum efficiency. This Beginner’s Guide to Hand-Cut Joinery: Classic Joints Adapted for Modern Workshop Workflows emphasizes a hybrid approach.


Strategies for Modern Workshop Integration:
- Precise Stock Preparation: Utilize jointer and planer for perfectly dimensioned and square stock. This foundation is critical for any joint, hand or machine.
- Hybrid Tool Use: Employ power tools for rough material removal (e.g., bandsaw for larger waste on dovetails, router for mortise bulk) and finish with hand tools for precision and refinement.
- Jigs and Fixtures: Develop or purchase simple jigs that aid in hand-cutting. For example, a simple shooting board for squaring tenon shoulders or a dovetail guide for consistent angle cuts.
- Sharpening Efficiency: Invest in modern sharpening systems (e.g., diamond plates, Japanese waterstones, powered sharpeners) to ensure chisels and plane irons are razor-sharp. A dull tool leads to frustration and poor results.
- Workflow Optimization: Plan your joinery steps logically. For example, lay out all joints at once, then proceed to saw all lines, then chisel all waste. This batching of similar tasks improves efficiency.
- Ergonomics: Modern workbenches are designed to be stable and comfortable, allowing for better control over hand tools. Consider adding a bench vise or dedicated clamping solutions.
- Dust Management: While hand tools generate less airborne dust than power tools, keeping your workspace clean is still important for visibility and health. A DIY Smart Workshop Dust Collection System can maintain a pristine environment.
By adopting these modern workshop workflows, woodworkers can overcome the perceived barriers to entry for hand-cut joinery. The satisfaction of crafting a piece with robust, visually appealing hand-cut joints is unparalleled, adding a dimension of quality and artistry that truly stands out.
Conclusion
Embarking on the journey of hand-cut joinery can be one of the most rewarding aspects of woodworking. This Beginner’s Guide to Hand-Cut Joinery: Classic Joints Adapted for Modern Workshop Workflows has demonstrated that far from being an outdated practice, these traditional techniques are highly relevant in 2026. By strategically integrating modern layout tools, jigs, and efficient workflow practices, woodworkers can achieve the precision, strength, and beauty of classic joints without sacrificing workshop productivity.
Start small, perhaps with a simple box joint, then progress to the mortise-and-tenon, and finally the challenging but immensely satisfying dovetail. Focus on tool sharpness, meticulous layout, and patient refinement. The skills developed through hand-cut joinery will not only enhance the structural integrity and aesthetic value of your projects but will also deepen your understanding and connection to the craft. Embrace the hybrid approach, and soon you’ll be creating pieces that truly stand the test of time, proudly displaying the mark of genuine craftsmanship.
SEO Meta Title: Beginner’s Guide to Hand-Cut Joinery in 2026: Classic Joints Made Easy SEO Meta Description: Master hand-cut joinery in 2026 with our guide to classic joints adapted for modern workshops. Learn mortise-and-tenon, dovetails, and more.
