
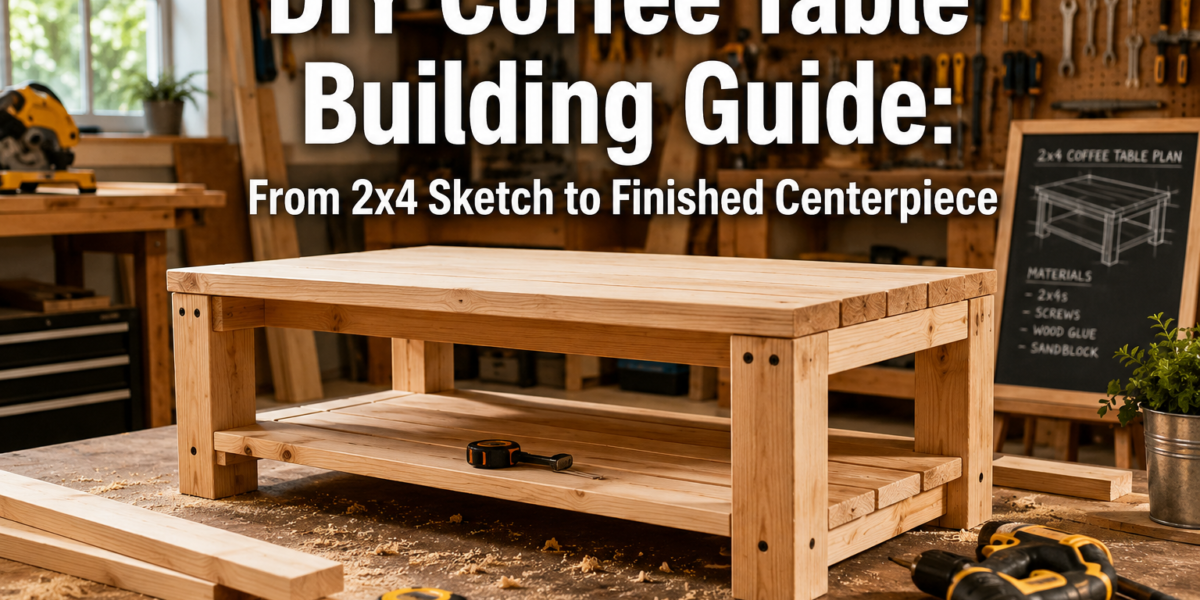

The average person spends over $200 on a new coffee table, often settling for mass-produced designs that lack personal character or robust construction. Imagine instead crafting a unique, durable centerpiece for your living space that reflects your style and skill, all while saving money and gaining immense satisfaction. This comprehensive DIY Coffee Table Building Guide: From 2×4 Sketch to Finished Centerpiece empowers you to transform humble 2×4 lumber into a stunning, custom coffee table, proving that quality furniture isn’t exclusive to showrooms.
Key Takeaways
- Accessible Project: Building a coffee table from 2x4s is a highly approachable project for woodworkers of all skill levels, offering a sturdy and attractive result.
- Detailed Planning is Crucial: Success begins with precise measurements, a clear design, and careful material selection before any cuts are made.
- Master Essential Techniques: This guide covers fundamental woodworking skills, including accurate cutting, strong joinery, and effective sanding and finishing.
- Cost-Effective and Rewarding: Creating your own furniture provides significant cost savings over retail options and delivers a deeply fulfilling sense of accomplishment.
- Customization is Key: Adapt the design and finish to perfectly match your home decor, making your coffee table truly unique.
Planning Your Coffee Table: From Concept to Cut List
Embarking on a woodworking project, especially a substantial piece like a coffee table, requires meticulous planning. The journey from a simple concept to a detailed cut list is where durability, aesthetics, and ease of construction are determined. This initial phase sets the foundation for your DIY Coffee Table Building Guide: From 2×4 Sketch to Finished Centerpiece.

Design Considerations and Sketching
Before touching a saw, visualize your ideal coffee table. Consider its intended use, the dimensions of your living space, and the existing decor. A standard coffee table is typically between 16 and 20 inches tall, and 24 to 36 inches wide, with a length of 40 to 60 inches. However, building your own allows for complete customization.
Key design elements to consider:
- Style: Modern, rustic, minimalist, industrial? 2x4s lend themselves well to sturdy, often rustic or modern minimalist designs.
- Dimensions: Measure your living area to determine optimal length, width, and height. Remember to account for clearance around existing furniture.
- Storage: Do you need shelves, drawers, or a simple open design? Adding complexity with shelves will require more cuts and precise joinery.
- Leg Structure: Tapered legs, straight posts, or a solid panel base? Each affects stability and appearance.
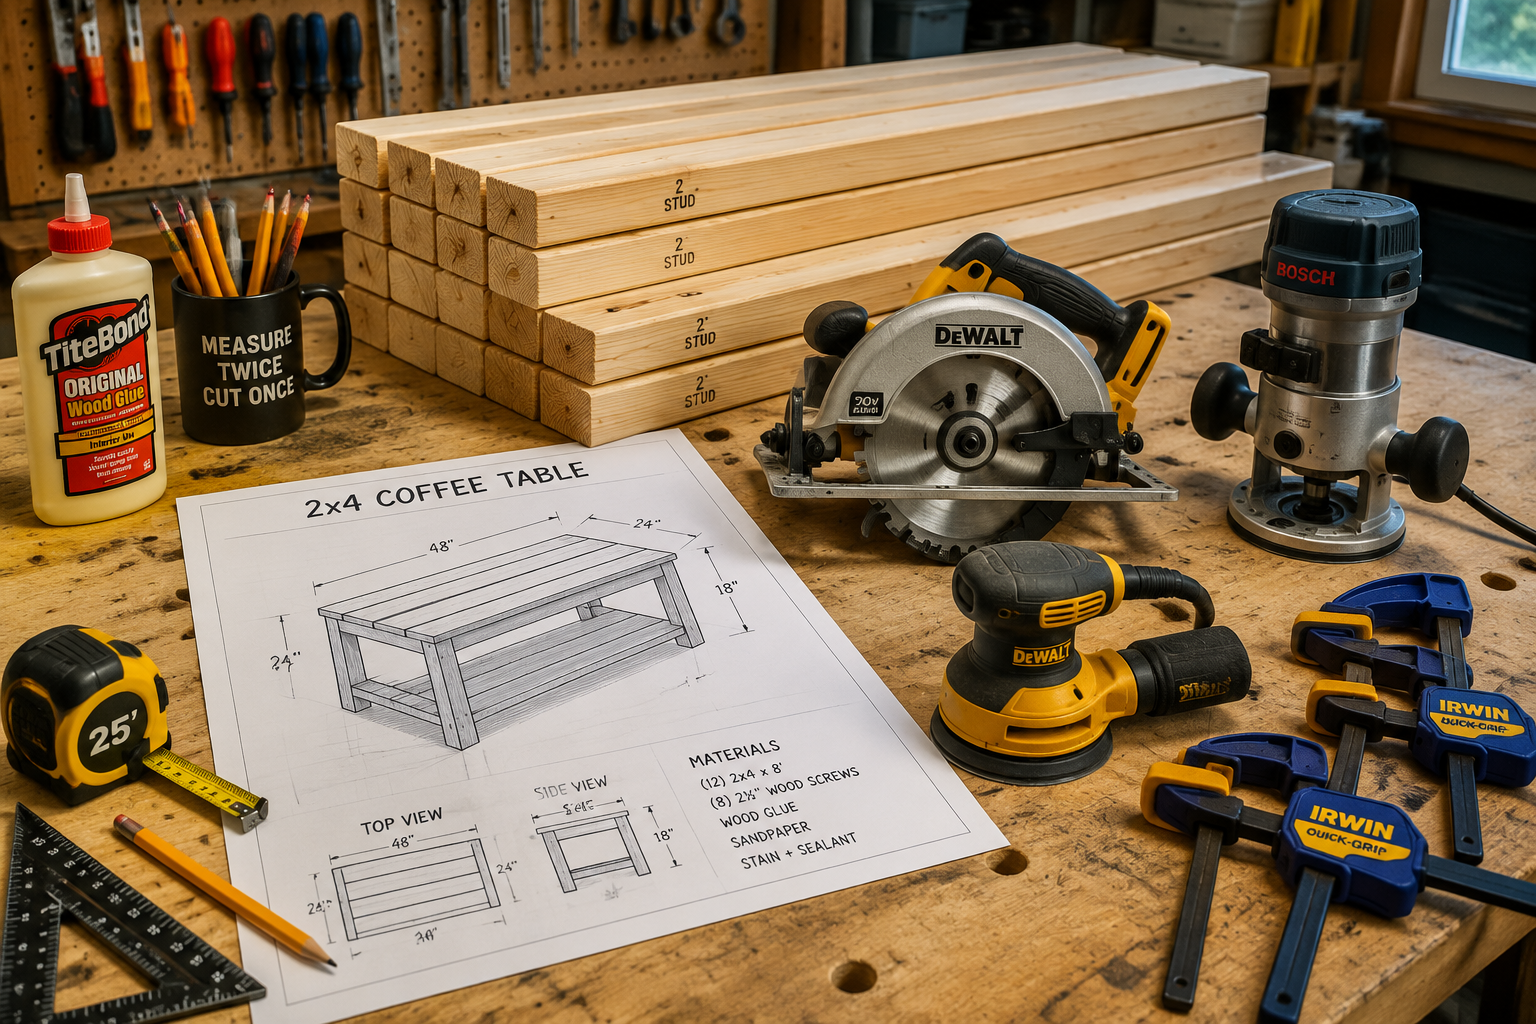
Start by sketching your design. Don’t worry about artistic talent; focus on proportions and major components. A simple isometric sketch can help visualize the final product. Label approximate dimensions on your sketch. For more beginner-friendly designs, consider exploring DIY Coffee Table Plans: 15 Beginner-Friendly Designs for Your Home in 2025.
Material Selection: The Mighty 2×4
While “2×4” refers to the nominal size of lumber, its actual dimensions are usually 1.5 inches by 3.5 inches. This readily available and inexpensive material is an excellent choice for a sturdy coffee table.
Choosing quality 2x4s:
- Straightness: This is paramount. Look down the length of each board to check for bows, twists, or cups. These imperfections can cause significant problems during assembly.
- Knots: Avoid large, loose, or numerous knots, especially near the edges or ends, as they can weaken the wood and make cutting difficult. Small, tight knots are generally acceptable.
- Moisture Content: Lumber can warp as it dries. While kiln-dried 2x4s are common, ensure they aren’t unusually heavy or wet, indicating high moisture.
- Surface Quality: Look for smooth surfaces free from excessive splinters or damage. You’ll be sanding these, but starting with decent stock saves effort.
Consider the type of wood. Most 2x4s are spruce, pine, or fir (SPF). These softwoods are easy to work with but can dent more easily than hardwoods. If you prefer a more durable surface, you might opt for hardwoods for the tabletop, but the frame can still be 2x4s.
Creating Your Cut List
Once your design is finalized, translate it into a precise cut list. This list details every piece of wood you need, its exact dimensions, and its purpose.
Example Cut List (for a simple rectangular coffee table):
| Component | Quantity | Length (inches) | Width (inches) | Thickness (inches) | Notes |
|---|---|---|---|---|---|
| Top Slats | 5-7 | 48 | 3.5 | 1.5 | For a 48″ L x 24″ W top |
| Legs | 4 | 16 | 3.5 | 1.5 | Adjust for desired table height |
| Long Aprons | 2 | 42 | 3.5 | 1.5 | Connect long sides of legs |
| Short Aprons | 2 | 18 | 3.5 | 1.5 | Connect short sides of legs |
| Bottom Shelf Slats | 3-4 | 45 | 3.5 | 1.5 | Optional: for a lower storage shelf |
Tips for your cut list:
- Measure twice, cut once: This adage is crucial. Double-check all measurements against your sketch and desired final dimensions.
- Account for kerf: The saw blade removes a small amount of wood (the kerf) with each cut. Plan your cuts to maximize material usage and minimize waste.
- Label everything: As you cut, immediately label each piece with its purpose (e.g., “Leg A,” “Long Apron 1”) to avoid confusion.
- Consider a table saw: While a circular saw can work, a Craftsman 113.299 Table Saw or similar tool offers superior precision for repetitive cuts and ripping wider boards if needed.
Assembly and Joinery Techniques for a Sturdy Coffee Table
With your perfectly cut lumber ready, the next phase in your DIY Coffee Table Building Guide: From 2×4 Sketch to Finished Centerpiece involves bringing the pieces together. Strong joinery is essential for a durable coffee table that withstands daily use in 2026.
Essential Tools and Safety
Before you begin assembling, gather your tools and prioritize safety.
Required Tools:
- Measuring Tape and Pencil: For marking and re-verifying dimensions.
- Drill/Driver: For pilot holes and driving screws.
- Wood Clamps: Crucial for holding pieces securely during glue-up and assembly. At least 4-6 clamps are recommended.
- Wood Glue: High-quality wood glue (PVA type) for strong bonds.
- Screws: Wood screws (e.g., Kreg pocket hole screws if using that method) appropriate for the wood thickness. Refer to Mastering Woodworking Screws: Your Ultimate Guide for 2026 for selection advice.
- Orbital Sander or Sanding Blocks: With various grit sandpaper (80, 120, 180, 220).
- Safety Glasses and Hearing Protection: Always wear these when using power tools.
Joinery Methods for 2x4s
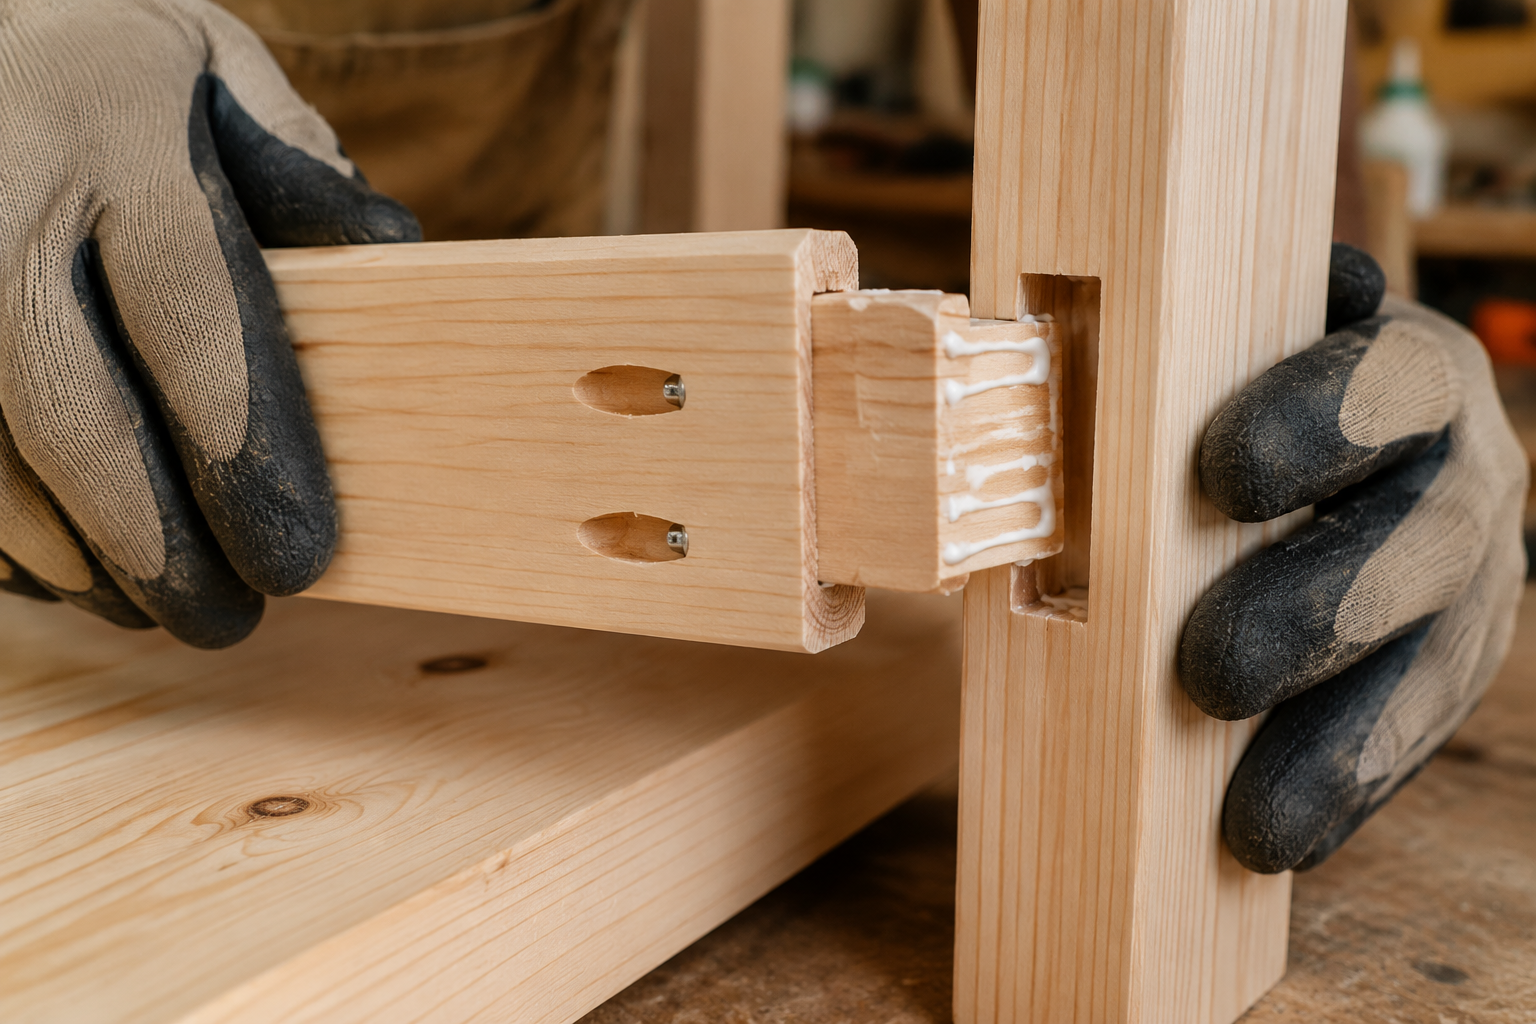
For a coffee table built from 2x4s, common and effective joinery methods include pocket holes, butt joints reinforced with screws, and mortise and tenon joints for advanced builders.

Pocket Hole Joinery:
- Description: This is an excellent choice for beginners and provides strong, clean joints. It involves drilling angled pilot holes into one piece of wood, then joining it to another with self-tapping screws.
- Process: Use a pocket hole jig to create the holes. Apply wood glue to the mating surfaces, clamp the pieces together, and drive the pocket hole screws. This method is ideal for attaching aprons to legs and assembling tabletops or shelves.
- Advantages: Quick, strong, relatively easy to hide if holes are on the underside.
- Application: Perfect for securing apron pieces to the legs, and for assembling the individual slats of your tabletop or bottom shelf.
Butt Joints with Screws and Glue:
- Description: The simplest joint, where two pieces of wood are butted together and fastened. For strength, it requires both glue and screws.
- Process: Apply glue generously to both mating surfaces. Clamp the pieces tightly. Drill pilot holes to prevent splitting, then drive appropriate wood screws.
- Advantages: Simple, requires minimal special tools.
- Disadvantages: Less robust than pocket holes or mortise and tenon unless carefully reinforced. Can be visible if screws are not hidden.
Edge Joining for Tabletop/Shelves:
- Description: To create a solid tabletop or shelf from multiple 2×4 slats, you’ll need to edge join them.
- Process: Apply a continuous bead of wood glue along the long edges of two adjacent 2x4s. Clamp them together tightly, ensuring the surfaces are flush. Let the glue dry completely. Repeat until all slats are joined. Biscuit joiners or dowels can reinforce these joints but are not strictly necessary if clamps provide sufficient pressure and glue is used correctly.
- Tip: Alternate the growth rings (end grain pattern) of the 2x4s when edge joining to minimize warping.
Step-by-Step Assembly Guide
This guide focuses on a common 2×4 coffee table design with a solid top and an apron frame.
Assemble the Leg and Apron Frames:
- Begin by creating two “end frames” (two legs connected by a short apron piece) and two “side frames” (two legs connected by a long apron piece).
- Apply wood glue to the ends of the apron pieces.
- Using pocket holes (recommended) or pre-drilled pilot holes and screws, attach the aprons flush with the outer faces of the legs.
- Ensure squareness using a framing square before the glue sets.
- Repeat for all four frame sections.
- For maximizing support and stability, ensure your table base width for stability is adequate for your chosen top.
Connect the Frames:
- Once the individual frames are dry, join them to form the complete base.
- Apply glue to the remaining mating surfaces of the aprons and legs.
- Use pocket holes or screws to secure the remaining aprons to the legs, completing the rectangular or square base frame.
- Again, check for squareness across all corners and diagonals.
Assemble the Tabletop:
- Lay your tabletop 2×4 slats on a flat surface.
- Apply wood glue along the long edges of each slat.
- Clamp them together tightly using several bar clamps or pipe clamps. Ensure the surface remains as flat as possible.
- Wipe away any glue squeeze-out with a damp cloth immediately.
- Allow the glue to cure completely, ideally for 24 hours.
Attach the Tabletop to the Base:
- Once the tabletop glue is dry, center the tabletop on your assembled base.
- Use “Z-clips,” “figure-8 fasteners,” or pre-drill angled pilot holes through the apron and into the underside of the tabletop. These methods allow for wood movement, which is crucial to prevent cracking. Avoid rigidly screwing the top directly to the apron from above, as seasonal changes in humidity will cause the wood to expand and contract.
- Secure with screws.
Pull Quote: “The integrity of your coffee table hinges on the strength of its joinery. Don’t rush the glue-up; clamps and patience are your best friends.”
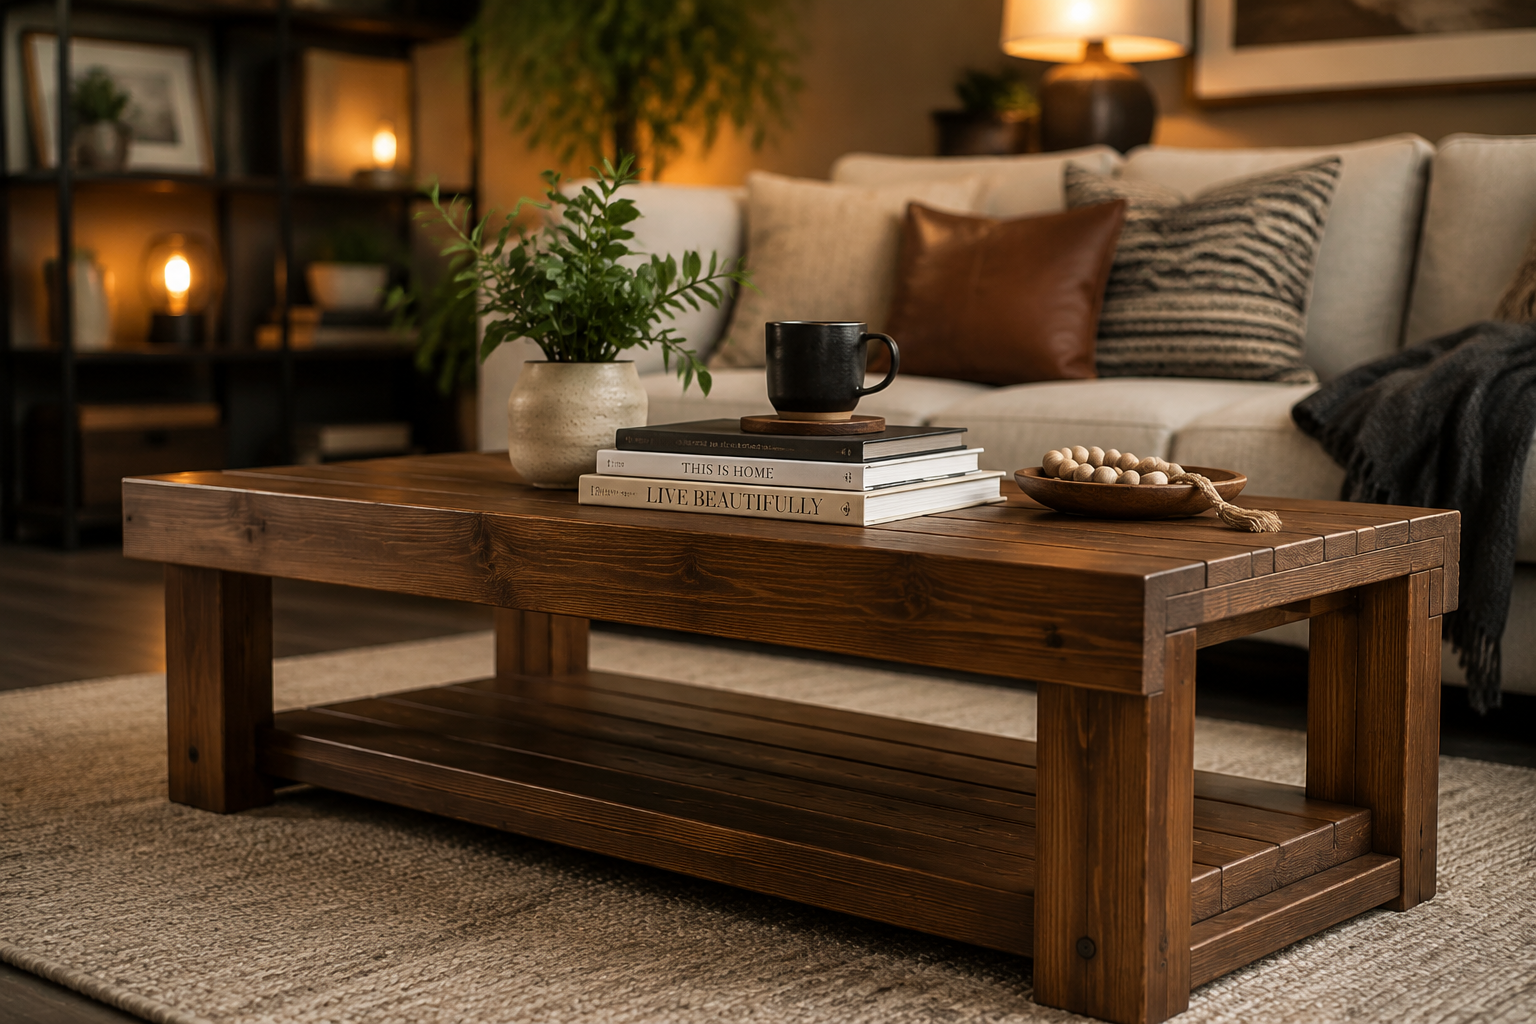
Finishing Touches: Sanding, Staining, and Sealing Your Centerpiece
The final stage of your DIY Coffee Table Building Guide: From 2×4 Sketch to Finished Centerpiece transforms your raw wooden creation into a beautiful, functional piece of furniture. Proper sanding, staining, and sealing are crucial for durability and aesthetics.
The Importance of Thorough Sanding
Sanding is perhaps the most overlooked yet critical step. It prepares the wood to absorb stain evenly and creates a smooth, pleasant surface.
Sanding Schedule:
- Rough Sanding (80-100 grit): Start with a coarser grit to remove any mill marks, glue residue, or significant imperfections from the 2x4s. Focus on getting all surfaces flat and smooth.
- Medium Sanding (120-150 grit): Progress to a medium grit to remove the scratches left by the coarser paper. This smooths the surface further.
- Fine Sanding (180-220 grit): Finish with a fine grit. This step polishes the wood and prepares it for staining or finishing. Do not skip this, especially for the tabletop. For very smooth finishes, you can go up to 320 grit.
Tips for Sanding:
- Go with the grain: Always sand in the direction of the wood grain to avoid visible scratches.
- Clean between grits: After each grit, wipe down the entire piece with a tack cloth or compressed air to remove all dust. Residual dust from coarser grits can create scratches when using finer paper.
- Edge and corner attention: Pay close attention to edges and corners, slightly breaking sharp edges for a softer feel and to prevent splintering.
Choosing Your Finish: Stain or Natural
The finish you choose will significantly impact the look and longevity of your coffee table.
Staining:
- Purpose: Stain adds color to the wood, enhancing its grain and depth. 2x4s (typically pine or spruce) can take stain, but they often do so unevenly, leading to a blotchy appearance.
- Conditioning: To combat blotchiness, apply a wood conditioner before staining, especially on softwoods like pine. This helps the wood absorb the stain more uniformly.
- Application: Apply stain evenly with a brush or cloth, following the grain. Allow it to penetrate for the recommended time (check product instructions), then wipe off any excess. Always test the stain on a scrap piece of your 2x4s first.
- Color Matching: If you’re trying to match existing furniture, bring a small sample or photo with you when selecting stain.
Natural Finish:
- Purpose: If you prefer the natural look of the wood, you can skip staining and go straight to sealing.
- Appearance: This will highlight the light, natural tones of the 2x4s.
Sealing for Protection and Durability
Once the stain is dry (if you used it), or after thorough sanding, it’s time to apply a protective topcoat. This protects the wood from moisture, scratches, and daily wear and tear.
Common Topcoats for Coffee Tables:
Polyurethane (Oil-Based or Water-Based):
- Oil-Based: Offers excellent durability and a warm, amber tone that deepens over time. It’s more odor-intensive and takes longer to dry but is very robust.
- Water-Based: Dries faster, has less odor, and typically dries clear, preserving the natural wood color. Slightly less durable than oil-based but still very good.
- Application: Apply thin, even coats with a good quality brush, foam brush, or sprayer. Lightly sand with 220-320 grit sandpaper between coats (after drying) to ensure adhesion and smoothness. Wipe away dust thoroughly. Apply at least 2-3 coats, more for high-traffic areas like a coffee table. For insights on compatibility, see Can You Put Spar Urethane Over Polyurethane? Compatibility Insights.
Danish Oil or Linseed Oil:
- Purpose: These oils penetrate the wood, providing a natural, matte finish that enhances the grain. They offer moderate protection and are easy to repair if scratched.
- Application: Apply generously, let it soak in, then wipe off excess. Repeat multiple times for better protection. For a comparison, read Danish Oil vs. Linseed: The Ultimate Wood Finishing Guide. Note that you can stain over linseed oil if you decide to add color later.
Lacquers:
- Purpose: Provide a very hard, durable, and usually high-gloss finish.
- Application: Typically sprayed, requiring specific equipment and ventilation. Faster drying times.
Finishing Tips:
- Work in a clean, dust-free environment: Dust can settle on wet finishes, creating imperfections.
- Read product instructions: Always follow the manufacturer’s recommendations for application, drying times, and recoating.
- Patience is key: Rushing the drying or curing process can lead to a less durable and aesthetically pleasing finish. Let each coat dry fully before proceeding.
- Consider feet/pads: Attach felt pads or rubber feet to the bottom of the legs to protect your floors and make the table easier to move.
Conclusion
Building your own coffee table from 2x4s is a rewarding endeavor that culminates in a custom, robust centerpiece for your home. This DIY Coffee Table Building Guide: From 2×4 Sketch to Finished Centerpiece has walked you through every stage, from meticulous planning and accurate cuts to strong joinery and beautiful finishing. By embracing the process and focusing on craftsmanship, you not only create a functional piece of furniture but also develop valuable woodworking skills and a deeper appreciation for handmade items. The satisfaction of seeing your design come to life, from humble lumber to a finished showpiece, is unparalleled.
Actionable Next Steps
- Refine Your Design: Revisit your living space and sketch out the precise dimensions and style for your ideal coffee table.
- Gather Materials: Head to your local lumberyard and carefully select the straightest, knot-free 2x4s, along with your chosen finishing products.
- Prepare Your Workshop: Ensure you have all necessary tools, safety gear, and a clean, well-ventilated area for cutting, assembling, and finishing.
- Start Building: Take it one step at a time, focusing on accuracy in each cut and strength in every joint. Don’t be afraid to ask for help or consult additional resources if you encounter challenges.
- Personalize and Enjoy: Once complete, style your new coffee table with personal touches and enjoy the fruits of your labor for years to come.
Meta Title: DIY Coffee Table Building Guide: 2x4s to Centerpiece Meta Description: Build your own stunning coffee table from 2x4s with our 2026 DIY guide. From sketch to finish, learn cuts, joinery, and finishing.

