

For many, the allure of woodworking lies in the tangible connection between hand, tool, and material, offering a profound sense of accomplishment far removed from the digital demands of 2026. This connection is most evident in precision joinery, where the fit of two pieces of wood can be a testament to skill and patience. While modern power tools offer speed, mastering traditional hand tools provides an unparalleled level of control and finesse. This article, “Beginner Woodworking: How to Choose and Use Hand Planes, Chisels, and Saws for Precision Joinery,” delves into the foundational techniques and essential tools that empower beginners to achieve truly fine results, building a solid base for a lifelong craft.
Key Takeaways
- Foundation First: Begin with a small, high-quality set of hand planes, chisels, and saws, prioritizing sharpening over sheer quantity of tools.
- Sharpening is Paramount: A dull tool is dangerous and ineffective; mastering sharpening is the single most important skill for precision joinery.
- Hand Planes for Surface Prep: Learn to flatten, square, and smooth wood effectively with planes before any joinery begins.
- Chisels for Detail and Joinery: Understand how to pare, chop, and clean out joints with control and accuracy.
- Saws for Precision Cuts: Select and use handsaws appropriate for ripping, cross-cutting, and cutting joinery components with minimal waste.
Choosing and Using Hand Planes for Precision Joinery
Hand planes are the workhorses of traditional woodworking, indispensable for achieving flat, square, and smooth surfaces, the very foundation of accurate joinery. Without properly prepared stock, even the most skilled joinery techniques will result in gaps and weak connections. For Beginner Woodworking: How to Choose and Use Hand Planes, Chisels, and Saws for Precision Joinery, a few key planes will form the core of your kit.
Essential Hand Planes for Beginners
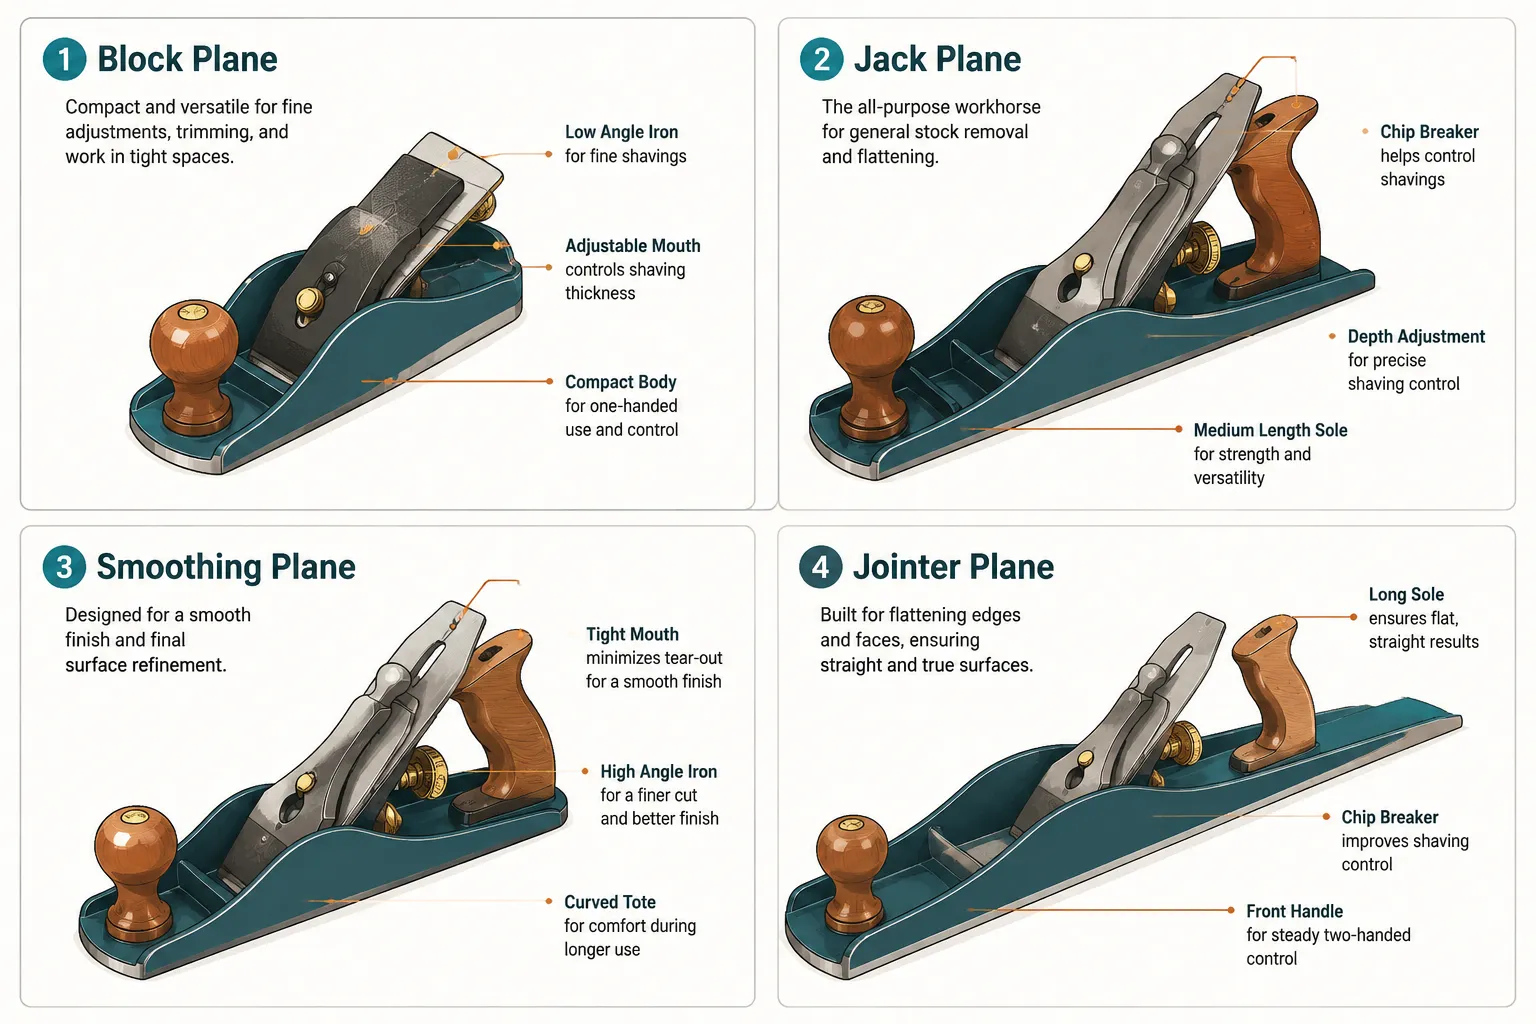
- Block Plane: Small, versatile, and held in one hand, block planes excel at chamfering edges, trimming end grain, and small cleanup tasks. Their low-angle iron is ideal for working across grain.
- Bench Plane (Jack Plane or Smoothing Plane): A jack plane (typically a #5) is a good all-rounder for general stock removal and preliminary flattening. A smoothing plane (usually a #4) is used for final surface preparation, leaving a silky-smooth finish ready for sanding or finishing. Many beginners start with a quality #4 or #5.
- Jointer Plane (Optional but Recommended): While a larger investment, a jointer plane (like a #7 or #8) is critical for creating perfectly straight edges on long boards, ensuring tight glue joints for wider panels.
When choosing planes, consider the quality of the sole (flatness), the iron (steel quality and thickness), and the adjustability. Vintage planes, often found at reasonable prices, can be excellent performers after restoration and sharpening, a topic explored in detail in our guide to Restoring Vintage Woodworking Hand Tools: A Guide to Rust Removal, Sharpening, and Handle Repair for Enhanced Performance.
Using Hand Planes Effectively
The art of planing involves more than just pushing the tool. Here’s a breakdown of fundamental techniques:
- Sharpening the Iron: This is non-negotiable. A razor-sharp iron is crucial for a clean cut and prevents tear-out. Learn to sharpen your plane irons to a keen edge, maintaining a consistent bevel angle.
- Setting the Iron: Adjust the depth of cut by turning the adjustment knob. For most tasks, aim for a very thin shaving, almost transparent. A thick shaving indicates too deep a cut, leading to chatter and tear-out.
- Lateral Adjustment: Use the lateral adjustment lever to ensure the iron is parallel to the sole, providing an even cut across the width of the board.
- Body Mechanics: Use your entire body, not just your arms. Distribute your weight, starting with more pressure on the front handle and gradually shifting to the rear as you complete the stroke.
- Reading the Grain: Always plane with the grain to prevent tear-out. If you encounter resistance or rough spots, reverse direction or try a different angle.
For an in-depth exploration of plane usage, refer to Mastering Traditional Hand Planes for Fine Furniture Making: From Jointer to Smoothing Planes. Practice on scrap wood until you can consistently produce thin, uniform shavings and flat surfaces.
Choosing and Using Chisels for Precision Joinery
Chisels are the precision instruments of joinery, allowing for intricate detail, clean mortises, and perfectly fitted tenons. In “Beginner Woodworking: How to Choose and Use Hand Planes, Chisels, and Saws for Precision Joinery,” understanding the types and proper use of chisels is critical for achieving tight-fitting joints.
Essential Chisels for Beginners
For precision joinery, a small set of high-quality bench chisels is far more valuable than a large collection of mediocre ones.
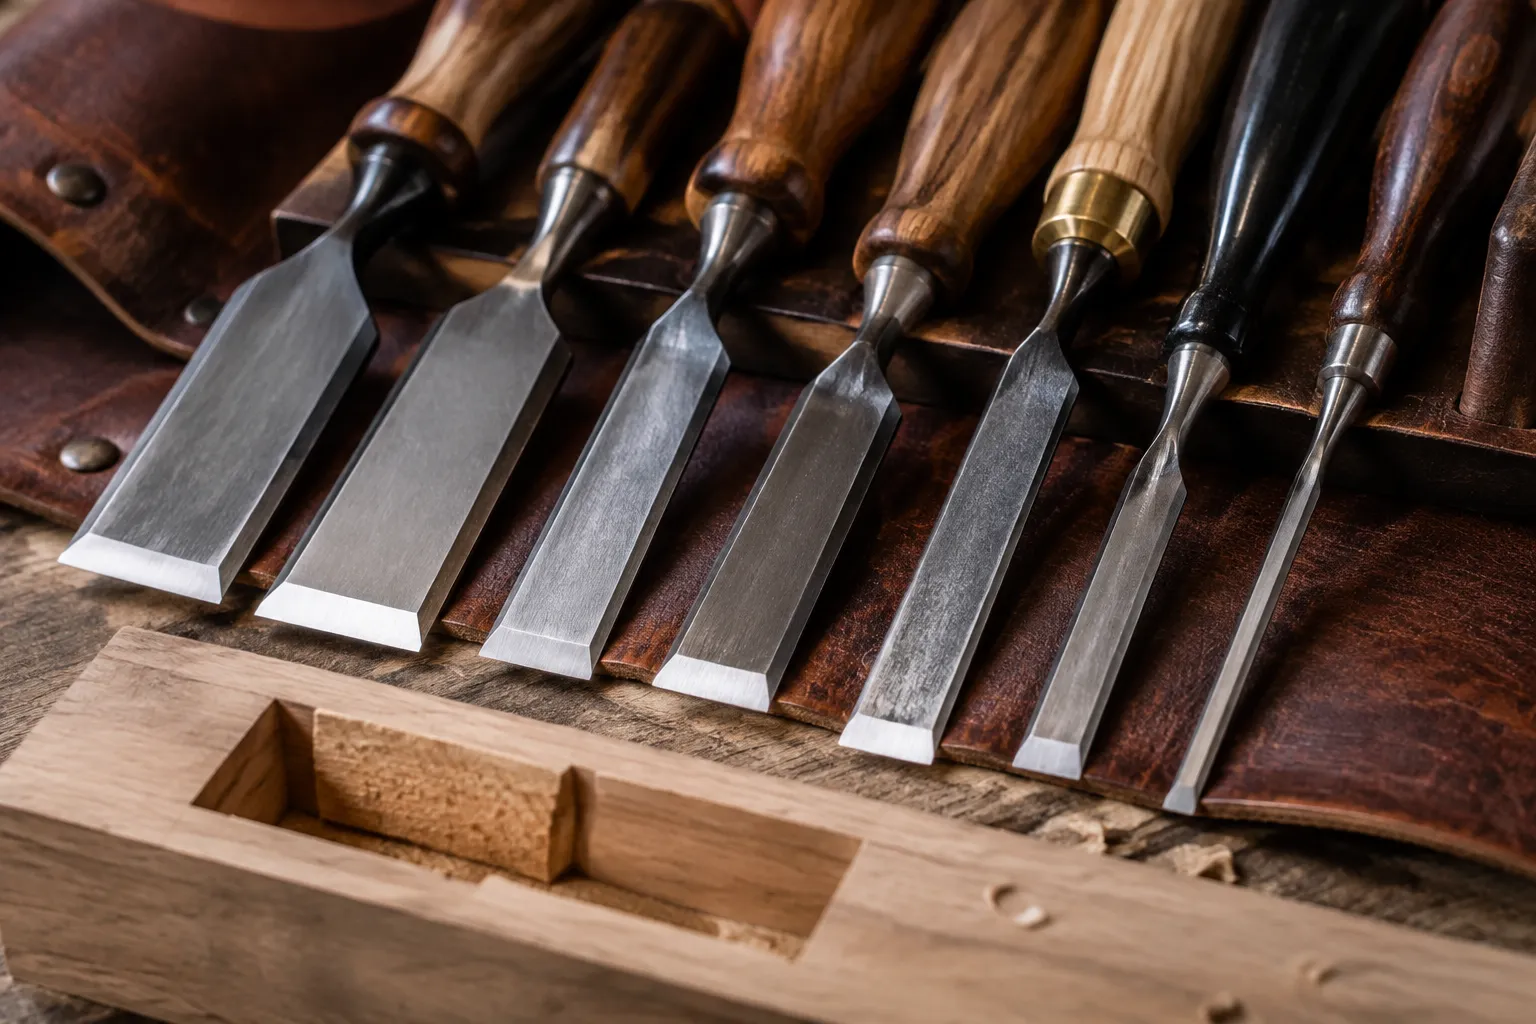
- Bench Chisels: These are your primary chisels for most joinery tasks. Start with a set of 3-4 sizes: 1/4 inch, 1/2 inch, 3/4 inch, and 1 inch. Look for chisels made from high-carbon steel that hold an edge well and have comfortable handles.
- Mortise Chisels (Optional, but recommended for mortise and tenon joinery): These are heavier, thicker-bladed chisels designed specifically for chopping deep mortises. Their robust construction prevents bending and ensures efficient waste removal.
Japanese chisels, with their laminated steel and distinctive handle design, offer exceptional sharpness but require a different sharpening approach. For now, focus on western-style bench chisels.
Using Chisels Effectively
Like planes, the effectiveness of a chisel hinges entirely on its sharpness. A dull chisel is a dangerous and frustrating tool.
- Sharpening: Chisel sharpening is similar to plane irons. Aim for a consistent primary bevel (typically 25-30 degrees) and a microbevel for increased edge retention. Strop frequently to maintain the edge.
- Grip and Control: Hold the chisel firmly but not rigidly. Your non-dominant hand often guides the blade, providing precision, while your dominant hand applies force, either by pushing or with a mallet.
- Paring: For delicate shaving of wood to a scribed line, hold the chisel bevel-down, guiding it with gentle pressure. Use your thumbs or fingers to brace the blade against the work for fine control.
- Chopping: For removing larger amounts of waste, such as when creating a mortise, use a mallet to strike the end of the chisel handle. Always work in stages, removing small amounts of wood, and keep the chisel perpendicular to the surface.
- Cleaning Out Joints: Chisels are indispensable for cleaning out the corners of mortises, tenons, and dovetails, ensuring square, tight-fitting joints.
- Working with Grain: Always consider the grain direction. When paring, work downhill with the grain. When chopping, especially in mortises, aim to sever the end grain fibers cleanly.
Mastering chisels requires patience and a good understanding of wood grain. Explore various techniques for cutting strong, beautiful joints without power tools by reading The Complete Guide to Hand Tool Joinery: Crafting Strong and Beautiful Joints Without Power Tools.
Choosing and Using Saws for Precision Joinery
Saws are fundamental to cutting the components for precision joinery. They allow you to define the shoulders of a tenon, the pins and tails of a dovetail, and the precise lengths of your stock. For Beginner Woodworking: How to Choose and Use Hand Planes, Chisels, and Saws for Precision Joinery, selecting the right saw and developing a precise sawing technique are crucial steps.
Essential Saws for Beginners
A common misconception is that you need many saws. For joinery, a few specialized handsaws will serve you well.
- Dovetail Saw: This is a small, fine-toothed backsaw designed for cutting the pins and tails of dovetail joints. Its thin blade and stiff back allow for precise, delicate cuts.
- Tenon Saw: A slightly larger backsaw than the dovetail saw, with coarser teeth, ideal for cutting the shoulders and cheeks of tenons. Its larger size allows for longer, straighter cuts.
- Carcass Saw: Similar to a tenon saw but typically with a finer tooth count, it’s excellent for cutting smaller joinery components and precise crosscuts on cabinet work (carcasses).
When choosing saws, consider the teeth per inch (TPI) for the intended cut (higher TPI for finer cuts), the quality of the blade, and the comfort of the handle. Many modern saws come pre-sharpened and are ready to use. For those interested in vintage tools, Restoring and Sharpening Hand Saws: Bringing Vintage Tools Back to Life for Precision Cutting provides valuable insights.
Using Saws Effectively for Joinery
Accuracy in sawing comes from practice and understanding the mechanics of the tool.
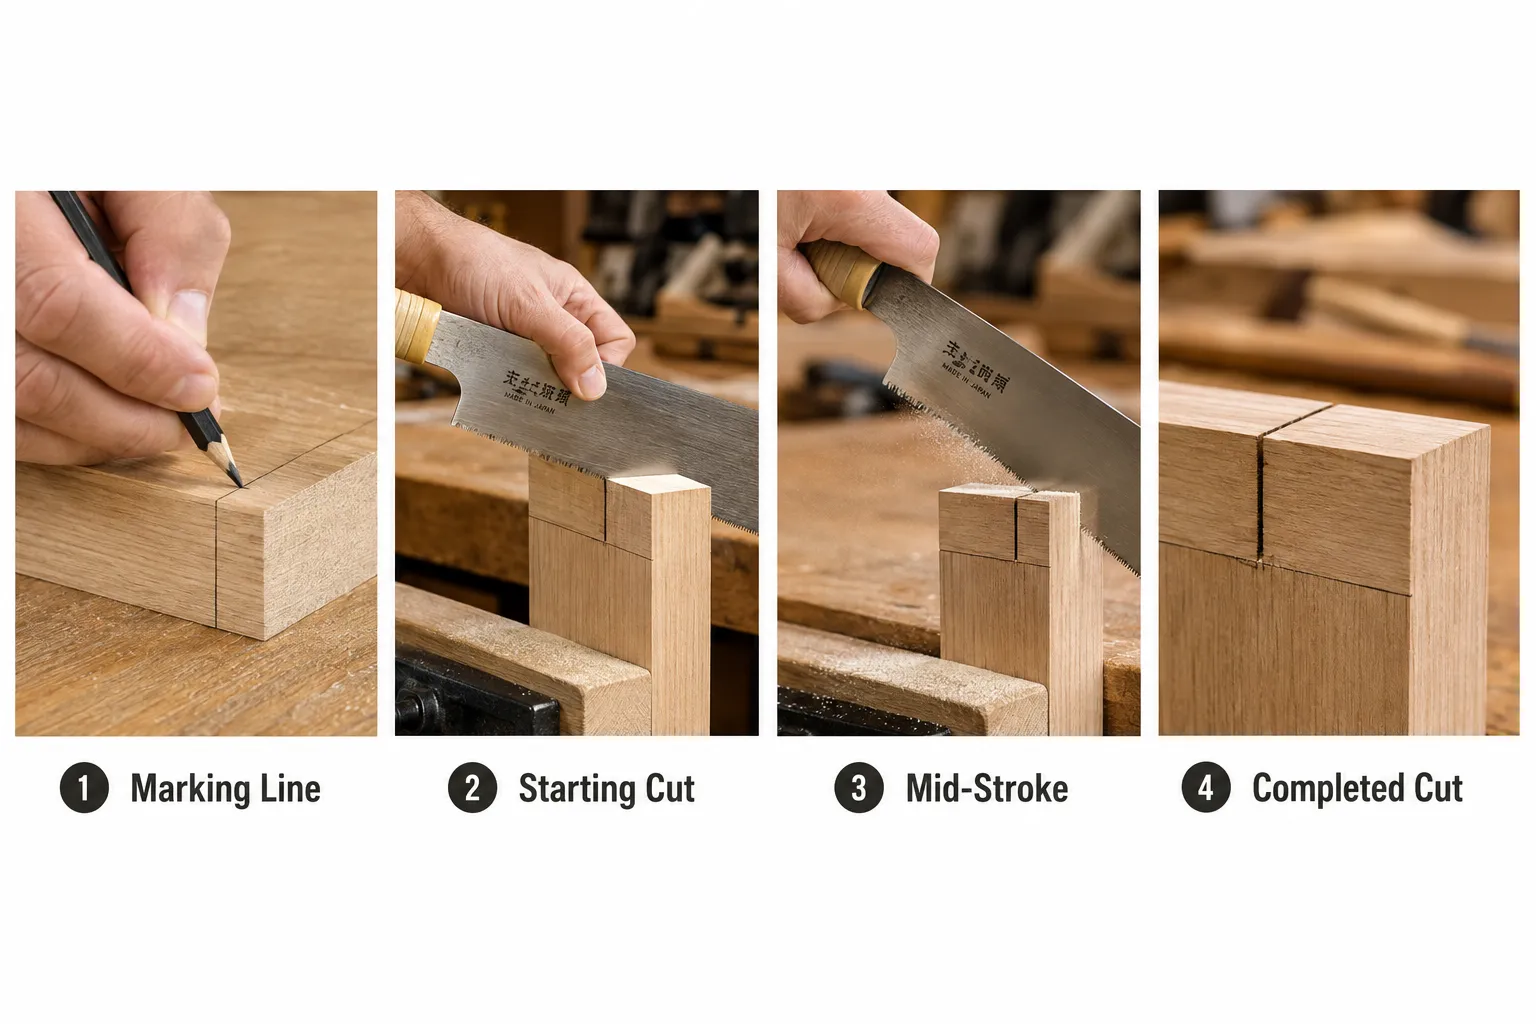
- Marking and Layout: Always mark your cutting lines clearly and precisely. Use a sharp pencil or, even better, a marking knife for a fine, clean line that the saw can register against.
- Stance and Grip: Adopt a balanced stance. Hold the saw with a firm but relaxed grip. The index finger often points along the blade to help guide it.
- Starting the Cut: Use your non-dominant thumb or knuckle to guide the saw blade at the start of the cut, ensuring it aligns perfectly with your marking line. Take a few gentle pull strokes (for Japanese saws) or push strokes (for Western saws) to establish the kerf.
- Sawing Technique: Let the saw do the work. Apply consistent, light pressure. For Western saws, maintain a consistent angle throughout the push and pull. For Japanese pull saws, focus on the pulling stroke, which does the cutting, and relieve pressure on the push stroke.
- Cutting to a Line: Develop the ability to split your marking line in half, or to cut just to one side of it, leaving the line itself for subsequent paring with a chisel. This ensures your joints are tight.
- Sawing Dovetails: When cutting dovetails, angle the saw precisely to match the layout lines. For pins, saw on the waste side of the lines. For tails, saw to the inside of the lines.
- Sawing Tenons: Use a tenon saw to cut the shoulders (cross-grain cuts) and the cheeks (rip cuts) of a tenon. Take care to cut squarely to avoid twisting the joint.
Consistency is key in sawing. Practice cutting to a line on scrap wood repeatedly. The goal is to produce cuts that are perfectly straight, plumb, and square, minimizing the need for chisel clean-up. Incorporating these skills into your repertoire will greatly enhance your ability to create projects like those discussed in Crafting Custom Wooden Display Cases For Collectibles: Protecting And Showcasing Your Treasures With Precision Joinery.
Sharpening: The Non-Negotiable Skill for Precision Joinery
It cannot be overstated: the single most critical skill for anyone embarking on “Beginner Woodworking: How to Choose and Use Hand Planes, Chisels, and Saws for Precision Joinery” is mastering sharpening. A dull tool is not only inefficient and frustrating, but it’s also more dangerous as it requires excessive force, leading to slips and potential injury. Sharp tools cut cleanly, require less effort, and produce superior results that are the hallmark of quality craftsmanship.
Why Sharpening Matters for Hand Tools
- Precision: A sharp edge cuts exactly where you intend, allowing for tight-fitting joints and clean, tear-out-free surfaces.
- Efficiency: Sharp tools slice through wood with minimal resistance, saving you time and physical effort.
- Safety: You exert less force with a sharp tool, reducing the risk of the tool slipping or deflecting unexpectedly.
- Finish Quality: Hand planes with sharp irons leave a glass-smooth surface that often requires no further sanding. Chisels cut crisp, clean lines without crushing wood fibers.
Basic Sharpening Setup for Beginners
While there are many advanced sharpening systems, a beginner can start with a straightforward and effective setup.
- Sharpening Stones/Plates:
- Coarse Stone (1000 grit): For quickly establishing a primary bevel or repairing a damaged edge.
- Medium Stone (4000-6000 grit): For refining the edge and removing scratches from the coarse stone.
- Fine Stone (8000+ grit or leather strop with compound): For putting a final, razor-sharp polish on the edge. Diamond plates are an excellent, durable, and flat alternative to waterstones or oilstones, especially for beginners.
- Honing Guide: This jig holds your plane iron or chisel at a consistent angle while you move it across the sharpening stones. It’s invaluable for beginners to learn to establish correct bevels before attempting freehand sharpening.
- Flattening Stone/Plate: A flat surface (like a diamond plate or a dedicated flattening stone) is essential for maintaining the flatness of your waterstones, ensuring an even sharpening surface.
The Sharpening Process: A General Overview
- Establish the Primary Bevel: Using the coarse stone and honing guide, grind the bevel of your chisel or plane iron until it’s consistent and free of significant nicks.
- Refine the Bevel: Move to the medium stone, maintaining the same angle with the honing guide. Continue until the scratches from the coarse stone are replaced by finer scratches, and a wire edge (burr) forms on the back of the blade.
- Hone the Edge: Progress to the fine stone. You’re aiming to remove the burr and polish the cutting edge.
- Strop (Optional but highly recommended): A leather strop charged with honing compound will put a final, incredibly keen edge on your tools, significantly improving their cutting performance.
Consistency in angle is the key. Practice on scrap tools or inexpensive chisels until you develop a feel for the process. Investing time in mastering sharpening will pay dividends in every aspect of your woodworking journey.
Maintaining and Storing Your Hand Tools
Proper maintenance and storage are essential for preserving the lifespan and performance of your hand planes, chisels, and saws. Neglect can lead to rust, dullness, and damage, undoing all your hard work in sharpening and technique.
Rust Prevention
Woodworking shops, especially those without climate control, can be prone to humidity, which is the enemy of bare metal tools.
- Clean Tools After Use: Wipe down all metal surfaces with a clean rag. Sawdust can absorb moisture and accelerate rust.
- Apply Rust Preventative: After cleaning, apply a thin coat of camellia oil, paste wax, or a specialized rust-inhibiting product to the bare metal parts of your planes, chisels, and saw blades.
- Desiccants: In very humid environments, consider placing desiccant packets (like silica gel) in your tool chest or cabinet.
Edge Protection
A sharp edge is a fragile edge. Protecting it from knocks and bumps is crucial.
- Chisel Guards: Store chisels with edge guards made from leather, plastic, or even old hose sections.
- Dedicated Storage: Keep chisels in a roll or a custom-made rack that prevents them from contacting each other or other tools.
- Saw Storage: Hang saws from pegs or store them in a rack where their teeth are protected and the blades remain straight. Avoid simply tossing them into a drawer.
General Care
- Keep Handles Clean: Wood handles can become slick with oil and sweat. Clean them periodically with a mild detergent and dry thoroughly.
- Check Fasteners: Periodically check and tighten any screws or bolts on your hand planes and saws to ensure stability and proper operation.
- Flatten Plane Soles (Periodically): While not a frequent task, if a plane’s sole becomes out of flat due to wear or stress, it may need to be re-flattened on abrasive paper applied to a perfectly flat surface (like a granite slab).
By establishing a routine of cleaning, protecting, and properly storing your tools, you ensure they remain in peak condition, ready to assist you in achieving the precision joinery results outlined in “Beginner Woodworking: How to Choose and Use Hand Planes, Chisels, and Saws for Precision Joinery.” This care also makes the tools a joy to use, enhancing the overall woodworking experience.
Conclusion
Embarking on the journey of “Beginner Woodworking: How to Choose and Use Hand Planes, Chisels, and Saws for Precision Joinery” is a rewarding commitment to craftsmanship. By carefully selecting your essential hand tools, dedicating time to mastering the critical skill of sharpening, and practicing the proper techniques for planes, chisels, and saws, you build a foundation for creating beautiful, durable projects. The tactile satisfaction of working with sharp hand tools, precisely cutting and fitting wood, is an experience that transcends mere construction; it’s an art form. Start with quality over quantity, prioritize a razor-sharp edge, and approach each cut with patience and deliberate intent. Your journey into the world of precision hand joinery has just begun, promising endless possibilities for creative expression and skill development.
Actionable Next Steps:
- Invest in Quality: Purchase one or two high-quality sharpening stones (e.g., a 1000/6000 grit combination stone or diamond plates) and a honing guide.
- Acquire Core Tools: Start with a good quality #4 or #5 bench plane, a 1/2-inch and 3/4-inch bench chisel, and a versatile dovetail saw.
- Practice Sharpening: Dedicate an hour to practicing sharpening on an old chisel or a piece of scrap metal until you can consistently create a burr and then remove it to achieve a sharp edge.
- Begin with Basic Joinery: Pick a simple joint like a half-lap or a through mortise and tenon. Practice marking, sawing, and chiseling on scrap wood until you can achieve a tight fit. Our Beginner’s Guide to Hand-Cut Joinery: Classic Joints Adapted for Modern Workshop Workflows can offer further guidance.
- Maintain Your Tools: Establish a routine for cleaning and protecting your tools after each use to prevent rust and damage.
SEO Meta Title: Beginner Woodworking: Hand Planes, Chisels & Saws for Joinery SEO Meta Description: Master precision joinery in 2026! Learn to choose, sharpen, and use hand planes, chisels, and saws for strong, beautiful woodworking projects.