
A perfectly executed wood finish can elevate a DIY project from ordinary to extraordinary, yet even the most meticulous woodworkers occasionally encounter frustrating issues. A stunning finish is often the defining characteristic of a high-quality piece, but when stains turn blotchy, polyurethane feels tacky, oils refuse to cure, or waxes build up unevenly, the vision for your project can quickly sour. This comprehensive guide on DIY Wood Finishing Troubleshooting: Fixing Common Problems with Stains, Polyurethane, Oils, and Waxes provides practical, actionable solutions to common finishing dilemmas, ensuring your efforts culminate in a beautiful, durable result every time.
Key Takeaways
- Preparation is paramount: Most finishing problems stem from inadequate surface preparation, including improper sanding or cleaning.
- Stain issues are often absorption-related: Blotching and uneven color usually indicate inconsistent wood porosity, solvable with pre-conditioners or gel stains.
- Polyurethane problems relate to application: Tackiness, bubbles, and orange peel are typically caused by improper application technique, environmental factors, or insufficient drying time.
- Oil and wax issues require patience and control: Tackiness in oil finishes points to over-application, while wax problems often involve buildup or improper buffing.
- Corrective actions exist for almost every problem: From light sanding and reapplication to complete stripping, there’s usually a way to salvage a finish.
Common Problems with Stains and How to Fix Them
Staining wood is an art that can quickly become a headache if not approached with care. Achieving a consistent, rich color often proves more challenging than anticipated. This section delves into common problems with stains, offering practical DIY Wood Finishing Troubleshooting: Fixing Common Problems with Stains, Polyurethane, Oils, and Waxes.
Blotchy or Uneven Stain Application
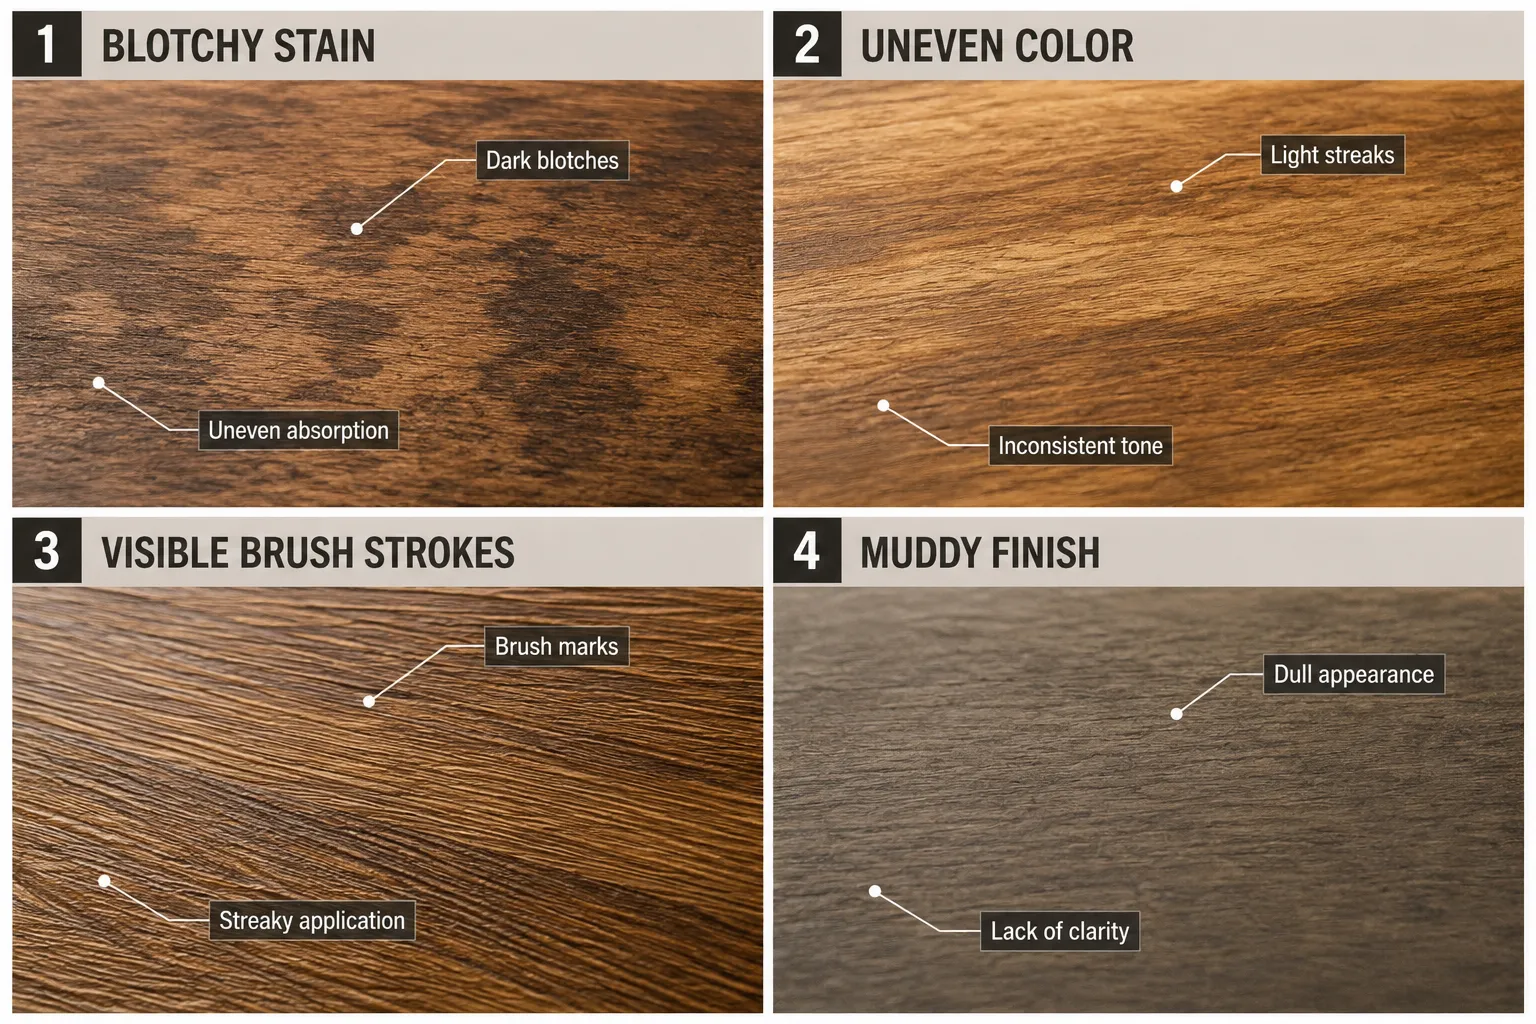
This is arguably the most frequent complaint with wood stains, especially on softwoods like pine, maple, or birch. Blotching occurs because different areas of the wood absorb the stain at varying rates due to inconsistent density or grain patterns.
Causes:
- Uneven wood porosity.
- Insufficient or inconsistent sanding.
- Lack of a wood conditioner.
Solutions:
- Light Sanding: For minor blotches, a very light sanding with 220-grit sandpaper can sometimes even out the surface absorption.
- Apply Wood Conditioner: If blotching is severe and you haven’t applied a pre-conditioner, you may need to strip the existing stain. Sand the wood back to bare wood (typically to 180-220 grit), then apply a wood conditioner evenly. A conditioner helps equalize the wood’s porosity, allowing the stain to penetrate more uniformly. Apply the stain after the conditioner has dried but before it fully cures (check product instructions).
- Use Gel Stains: Gel stains are less prone to blotching because they sit more on the surface rather than penetrating deeply. If you’re starting fresh, consider a gel stain for notoriously blotchy woods.
- Tinted Topcoat: For very light blotching under a clear topcoat, a tinted topcoat (e.g., a poly-stain product) can sometimes help mask inconsistencies. However, this is more of a cover-up than a fix.
Stain Not Penetrating or Too Light
Sometimes, the stain just doesn’t seem to “take” to the wood, resulting in a color much lighter than expected or a lack of depth.
Causes:
- Over-sanding the wood, closing off pores.
- Applying stain over a previous finish or sealer.
- Using an oil-based conditioner with a water-based stain (or vice versa).
- Insufficient dwell time for the stain.
Solutions:
- Re-sand: If the wood was sanded too finely (e.g., beyond 220 grit for most stains), the pores might be too closed for proper absorption. Sand back to 150-180 grit to open the grain, then reapply.
- Ensure Bare Wood: Confirm that no previous finish, wax, or glue residue is present. These act as barriers.
- Check Compatibility: Always match your conditioner type (oil-based, water-based) to your stain type.
- Increase Dwell Time: Allow the stain to sit on the wood surface for a longer period before wiping off excess, giving it more time to penetrate. Test a discreet area first.
- Additional Coats: Apply a second thin coat of stain, allowing adequate drying time between coats.
Stain Too Dark
Conversely, sometimes the stain comes out much darker than desired.
Causes:
- Excessive dwell time.
- Over-application.
- Highly porous wood.
Solutions:
- Wipe Immediately: For minor darkness, immediately wipe the fresh stain with a clean, lint-free cloth dampened with mineral spirits (for oil-based stains) or water (for water-based stains). This can lift some of the excess.
- Bleach (Last Resort): For very dark stains on bare wood, a wood bleach (oxalic acid for dark spots, two-part bleach for overall lightening) can lighten the wood. This is a drastic measure and requires careful application, often affecting the wood’s natural color. Always test on a scrap piece first.
- Tinted Topcoat (Lightening): A clear topcoat with a small amount of white pigment can slightly lighten the overall appearance of a dark stained piece without stripping.
DIY Wood Finishing Troubleshooting: Fixing Common Problems with Polyurethane
Polyurethane is a popular choice for its durability and protective qualities, but its application can sometimes lead to issues ranging from sticky surfaces to unsightly blemishes.
Sticky or Tacky Polyurethane
A polyurethane finish should cure to a hard, smooth surface. If it remains sticky or tacky, there’s a problem.
Causes:
- High humidity or low temperatures during application or curing.
- Applying coats too thick.
- Insufficient drying time between coats.
- Mixing incompatible products or using old/contaminated polyurethane.
- Applying over an uncured oil-based stain or sealer.
Solutions:
- Improve Ventilation and Environment: Move the piece to a warmer, drier environment (65-75°F (18-24°C) with 50-70% humidity is ideal). A fan can help air circulation, but avoid direct airflow that might stir up dust.
- Wait Longer: If the tackiness is minor, simply waiting longer (days, even weeks) can sometimes allow the finish to fully cure, especially with oil-based polyurethanes.
- Rub Down with Mineral Spirits/Naphtha: For minor tackiness, gently rub the surface with a lint-free cloth dampened with mineral spirits or naphtha (for oil-based poly). This can help dissolve and remove uncured surface poly. Be very gentle to avoid marring the finish.
- Scrape/Sand and Reapply: For severe tackiness or if the poly isn’t curing at all, the only reliable solution is to scrape or sand off the uncured finish. Use a plastic scraper for thick, gooey areas, then sand thoroughly down to a stable layer or bare wood before reapplying thin coats.
Bubbles or Fisheyes
These imperfections are common and can detract significantly from the finish’s appearance.
Causes:
- Bubbles: Shaking the can, over-brushing, applying too quickly, using an incorrect brush, or trapped air from porous wood.
- Fisheyes: Contamination (oil, silicone, wax) on the wood surface before application, or even airborne contaminants.
Solutions:
Address Bubbles:
- Stir, Don’t Shake: Always stir polyurethane gently, never shake, to avoid introducing air bubbles.
- Proper Brush/Applicator: Use a high-quality natural bristle brush for oil-based poly and a synthetic brush for water-based poly. Foam brushes or pads also work well for smooth finishes.
- Apply Thin Coats: Thinner coats allow bubbles to pop and dissipate more easily.
- Avoid Over-brushing: Brush smoothly in one direction and avoid going over the same area repeatedly once the poly starts to set.
- Debubbler Additive: Some polyurethanes can benefit from a small amount of a flow-out or debubbler additive.
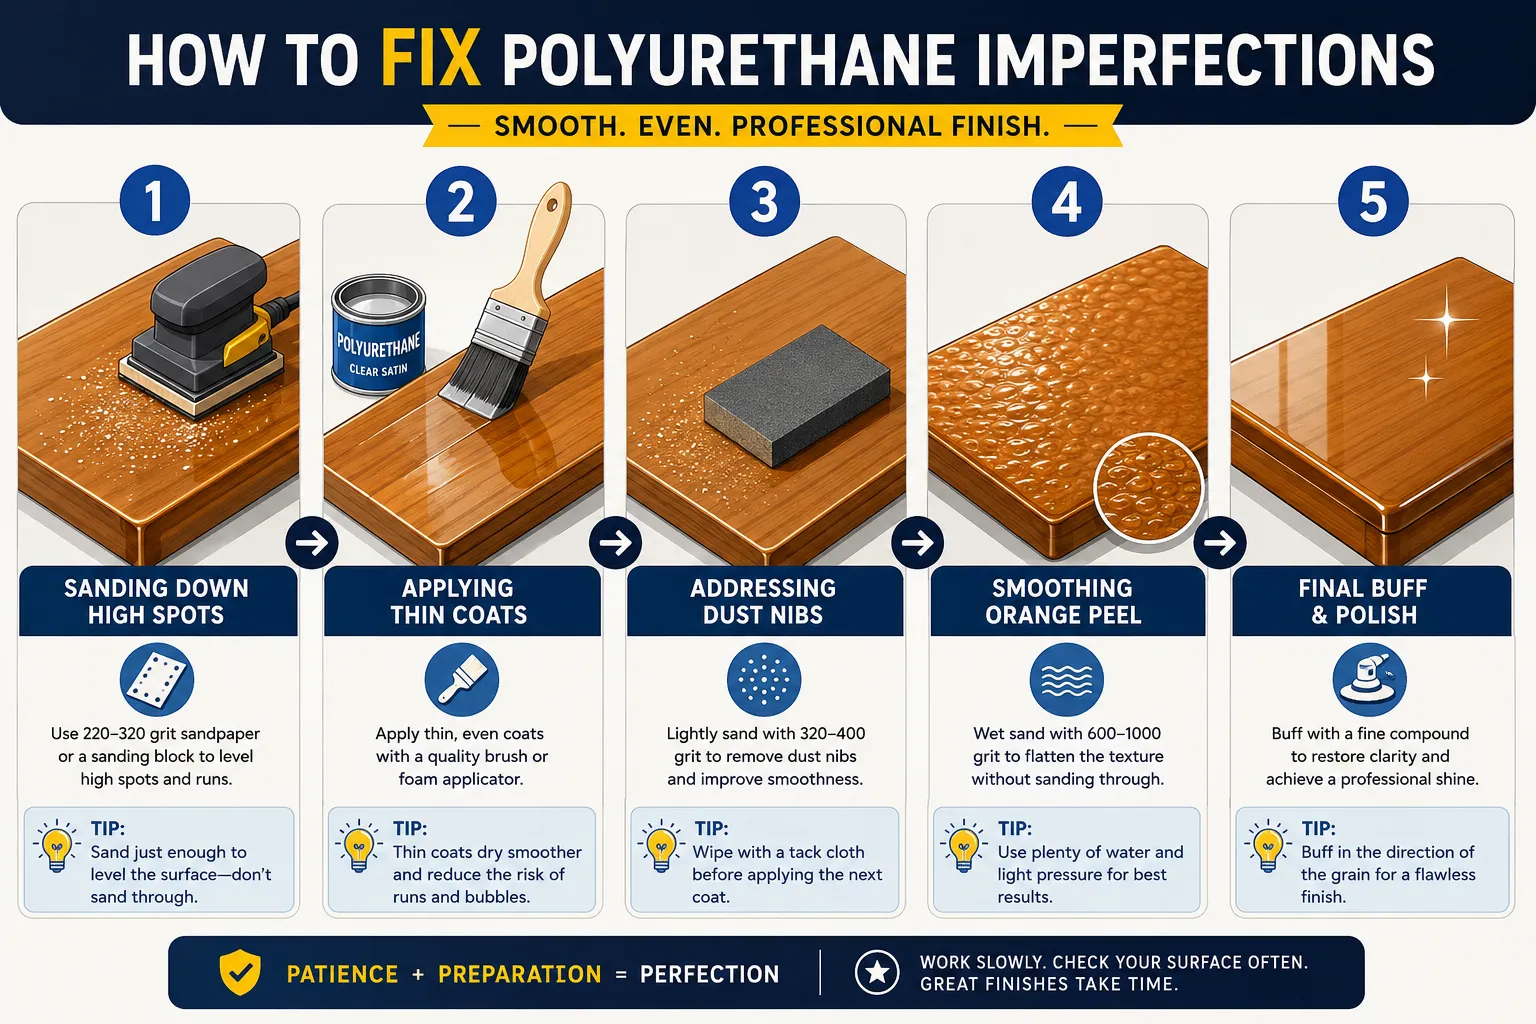
- Sand and Reapply: For cured bubbles, lightly sand the affected area with 220-320 grit sandpaper to level the surface, then reapply a thin coat.
Fix Fisheyes:
- Surface Cleaning: Fisheyes indicate contamination. Thoroughly clean the surface with mineral spirits or naphtha (for oil-based) or water (for water-based) to remove any contaminants. Ensure the wood is fully dry before reapplying.
- Additives: Some finishes allow for “fisheye eliminator” additives, but these can affect the finish’s properties and should be used as a last resort.
- Sand and Clean Aggressively: The most effective method is to sand down the affected area (or the entire piece if widespread) back to bare wood or a clean, uncontaminated layer. Clean meticulously before reapplication.
Orange Peel or Brush Marks
An uneven, textured finish resembling an orange peel, or visible brush strokes, indicates improper application.
Causes:
- Applying polyurethane too thick.
- Applying in cold conditions, causing it to dry too fast on the surface.
- Using an incorrect or poor-quality brush.
- Inadequate flow-out time (polyurethane doesn’t have time to level before drying).
Solutions:
- Sand Smooth: Once the polyurethane is fully cured, sand the orange peel or brush marks smooth with progressively finer sandpaper (e.g., 220-320-400 grit). This creates a level surface.
- Apply Thinner Coats: Ensure subsequent coats are applied very thinly. Two or three thin coats are always better than one thick one.
- Maintain Proper Environment: Apply in a room with moderate temperature and humidity to allow for proper flow-out and drying.
- Use Quality Tools: Invest in a good quality brush or foam applicator. For larger flat surfaces, a paint pad or roller designed for finishes can minimize marks.
- Consider Thinning: Some oil-based polyurethanes can be thinned slightly (5-10% with mineral spirits) to improve flow, especially in cooler conditions. Always check the manufacturer’s recommendations.
Fixing Common Problems with Oil and Wax Finishes
Oil and wax finishes offer a beautiful, natural look and feel, but they too can present challenges. Understanding how to address these can save your project. For more advanced finishing techniques, consider exploring advanced wood finishing.
Sticky or Gummy Oil Finish
Oil finishes, like tung oil or linseed oil, are designed to penetrate and cure within the wood. If they remain sticky on the surface, it’s usually due to over-application.
Causes:
- Applying too much oil.
- Not wiping off excess oil thoroughly.
- High humidity or low temperature slowing cure time.
- Applying over a sealed surface, preventing penetration.
Solutions:
- Wipe Thoroughly with Mineral Spirits/Naphtha: For a tacky oil finish, dampen a clean, lint-free cloth with mineral spirits, naphtha, or the same oil you used. Gently rub the sticky areas to dissolve and remove the uncured excess oil. You might need several cloths and some elbow grease.
- Scuff Sand: If wiping doesn’t work, a very light scuff sand with fine abrasive paper (e.g., 400-600 grit) can help remove the gummy layer. Then re-wipe with a fresh, clean cloth and allow to cure in a well-ventilated, moderately warm area.
- Patience: Sometimes, a sticky oil finish just needs more time to cure, especially in less-than-ideal environmental conditions. Ensure good air circulation.
- Proper Application: Remember for future applications: “apply it wet, let it sit for 20-30 minutes, wipe it dry.” The wood should feel dry to the touch within a few hours.
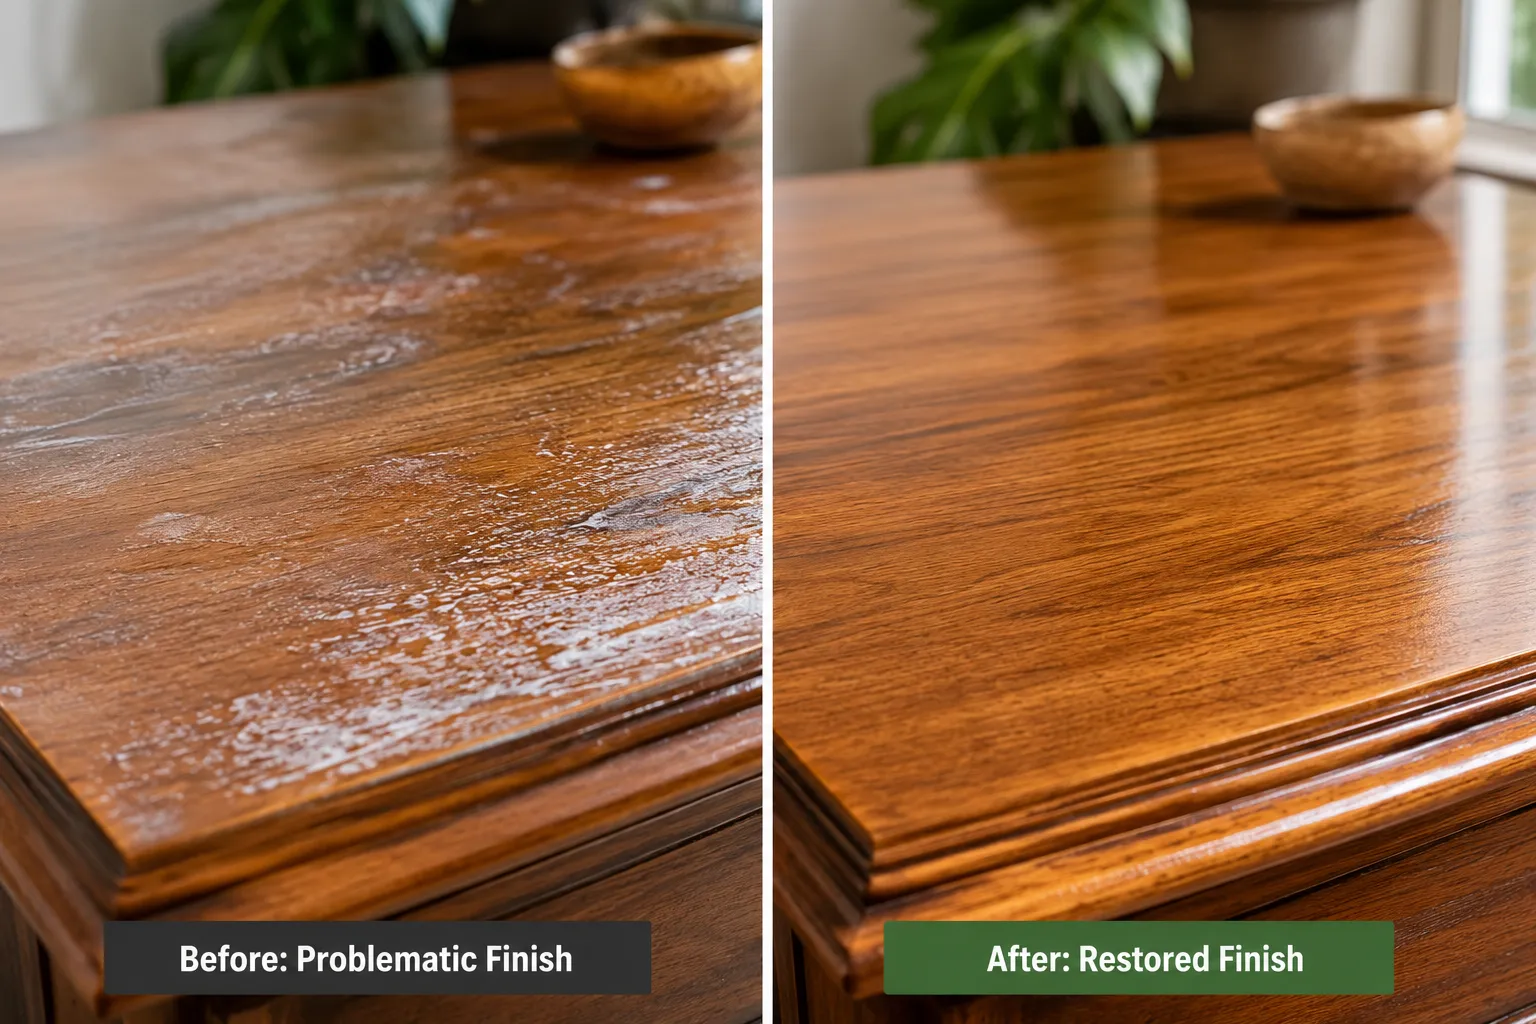
White Rings or Water Marks on Oil/Wax Finishes
These are common issues, especially on furniture that sees regular use.
Causes:
- Moisture trapped beneath the surface (often from condensation).
- Heat from hot objects.
- Acidic liquids.
Solutions:
- Mineral Spirits or Naphtha: For fresh, minor white rings on oil finishes, sometimes a gentle rub with a cloth dampened with mineral spirits can help.
- Rub with Fine Abrasive (Oil): For oil finishes, a very fine abrasive (like 0000 steel wool or a fine sanding pad) with a few drops of mineral oil or lemon oil can sometimes buff out the white ring. Follow the grain, then wipe clean and reapply a thin coat of your oil finish if needed.
- Toothpaste (Wax/Oil): Non-gel toothpaste (which is a mild abrasive) can sometimes rub out white rings on wax or oil finishes. Apply a small dab to a soft cloth, rub gently with the grain, then wipe clean and re-wax/oil.
- Heat Method (Wax/Oil): Place a clean, dry cotton cloth over the white ring. Gently iron over the cloth on a low setting for a few seconds. The heat can draw moisture out. Lift and check. Repeat if necessary, being careful not to scorch the wood.
- Remove and Reapply: For stubborn or deep rings, you might need to remove the finish from the affected area, clean the wood, and then reapply your oil or wax.
Excessive Wax Buildup or Dull Wax Finish
Wax is meant to provide a subtle sheen and protection, but too much or improper application can lead to a dull, hazy, or greasy surface.
Causes:
- Applying too much wax.
- Not buffing thoroughly.
- Layering wax too frequently without cleaning.
- Dust settling on uncured wax.
Solutions:
- Remove Excess Wax: Dampen a clean, lint-free cloth with mineral spirits or naphtha. Gently rub the affected area to dissolve and lift the excess wax. You may need multiple cloths. Allow it to dry.
- Buff Thoroughly: Once excess is removed and the surface is dry, buff vigorously with a clean, dry, soft cloth (like a microfiber towel or an old cotton t-shirt). The friction will create a subtle sheen.
- Apply Thinner Coats (Future): In the future, apply wax very sparingly. “Less is more” is the rule for wax. Apply a thin, even layer, allow it to haze for 10-15 minutes, then buff until smooth.
- Clean Regularly: For maintaining wax finishes, periodic cleaning with a damp cloth (not wet) and re-buffing is usually sufficient. Only reapply wax when necessary, after cleaning.
General Troubleshooting Tips and Prevention
Many finishing problems can be avoided with careful planning and execution. Incorporating quality tools and techniques, as seen in projects like building a DIY console table, significantly impacts the final finish.
Environmental Control
- Temperature and Humidity: Most finishes perform best at temperatures between 65-75°F (18-24°C) and relative humidity of 50-70%. High humidity can slow drying, while low humidity can cause finishes to dry too quickly, leading to brush marks or orange peel.
- Dust Control: Dust is the enemy of a smooth finish. Work in a clean, well-ventilated area. Use a shop vacuum with a HEPA filter, wipe down surfaces with a tack cloth before applying finish, and consider a dust collection system for your workshop.
Surface Preparation is Key
- Sanding Schedule: Follow a consistent sanding schedule, progressing through grits (e.g., 80, 120, 150, 180 or 220). Avoid skipping grits, as this leaves deeper scratches that subsequent grits can’t fully remove. For stains, typically stop at 180 or 220 grit to allow for good absorption. For clear finishes, you can go finer, up to 320 or 400 grit for an ultra-smooth surface.
- Cleanliness: After sanding, thoroughly remove all sanding dust. A shop vacuum followed by a tack cloth is essential. Avoid using compressed air, as it can embed dust further into the wood grain.
- Wood Conditioner: As mentioned, use a pre-stain wood conditioner on blotch-prone woods to ensure even stain absorption.
Application Techniques
- Thin Coats: Regardless of the finish type, applying multiple thin coats is almost always better than a few thick coats. Thin coats dry and cure more uniformly, reduce drips, and minimize issues like tackiness, bubbles, and orange peel.
- Proper Tools: Use high-quality brushes appropriate for the finish type (natural bristles for oil-based, synthetic for water-based). Foam brushes, paint pads, or sprayers can also provide excellent results.
- Edge Control: Pay attention to edges and corners to prevent drips and buildup.
- Testing: Always test your finishing process (sanding schedule, conditioner, stain, topcoat) on a scrap piece of the same wood used for your project. This allows you to fine-tune the process and avoid surprises. For example, testing on scrap from your DIY dining table is crucial.
Dealing with Cured Finishes
If a finish has fully cured and has minor imperfections like dust nibs or very light orange peel, it can often be remedied without stripping the entire piece.
- Sand/Rub Down: Use fine abrasive paper (e.g., 320-600 grit) or 0000 steel wool to gently level the surface.
- Clean: Remove all sanding dust.
- Buff/Polish: For a high-gloss finish, you can then polish with rubbing compounds designed for clear coats, followed by a swirl remover. For lower sheens, a light buffing might suffice.
- Apply Final Coat: If necessary, apply one final, very thin coat of your chosen finish.
Conclusion
Wood finishing can be an incredibly rewarding aspect of DIY woodworking, but it’s rarely without its challenges. By understanding the common pitfalls associated with stains, polyurethane, oils, and waxes, and knowing the appropriate troubleshooting steps, you can confidently tackle most problems that arise. Remember that patience, proper preparation, and meticulous application are your best allies in achieving a beautiful, durable finish. Don’t be discouraged by imperfections; view them as learning opportunities. With the right knowledge and techniques, nearly any finishing flaw can be corrected, turning a potential disaster into a triumphant project. Continue refining your skills and enjoy the process of transforming raw wood into finished masterpieces in 2026.
References
- Flexner, B. (2005). Understanding Wood Finishing: How to Choose and Apply the Right Finish. Fox Chapel Publishing.
- Jewitt, P. (2018). The Essential Wood Finisher: A Refinishing Guide. F+W Media.
SEO Meta Title: DIY Wood Finishing Troubleshooting: Fix Stains, Poly & Oil Flaws SEO Meta Description: Solve common wood finishing problems like blotchy stains, sticky polyurethane, and gummy oil finishes with this expert DIY troubleshooting guide for 2026.