
The average household in the United States spent over $500 on furniture in 2024, a figure that continues to rise. Imagine being able to craft your own custom pieces, not only saving money but also imbuing your home with unique, handcrafted items. This aspiration is entirely achievable, even for those with no prior experience. This article, “Woodworking for Absolute Beginners: A Practical Guide to Carpentry Skills for Furniture Making,” serves as your comprehensive introduction to the foundational carpentry skills necessary to transform raw lumber into beautiful, functional furniture. We will break down the essential techniques, from accurate measuring and precise cutting to strong joinery and effective finishing, making the journey into woodworking accessible and rewarding for anyone eager to learn.
Key Takeaways
- Carpentry is the foundational skill for all woodworking, especially furniture making.
- Mastering basic tools (measuring, cutting, fastening) is crucial before tackling complex projects.
- Understanding different wood types and their properties is key to successful project outcomes.
- Beginner-friendly joinery techniques like butt joints, pocket holes, and half-lap joints provide strong connections.
- Safety in the workshop is paramount and requires diligent practice and awareness.
Starting Your Journey: Essential Tools and Understanding Wood for Absolute Beginners
Embarking on “Woodworking for Absolute Beginners: A Practical Guide to Carpentry Skills for Furniture Making” requires a foundational understanding of both the tools you’ll use and the material you’ll shape. Think of carpentry as the essential building blocks: knowing how to accurately measure, cut, and join wood forms the core of creating any piece of furniture. Starting with the right mindset and a basic set of tools is far more important than owning a workshop full of expensive machinery.
Core Hand Tools for Beginners
You don’t need a massive investment to begin. Many fundamental carpentry skills are best learned with hand tools, which teach you a deeper appreciation for the material and the process. Here’s a list of essential hand tools to get you started:
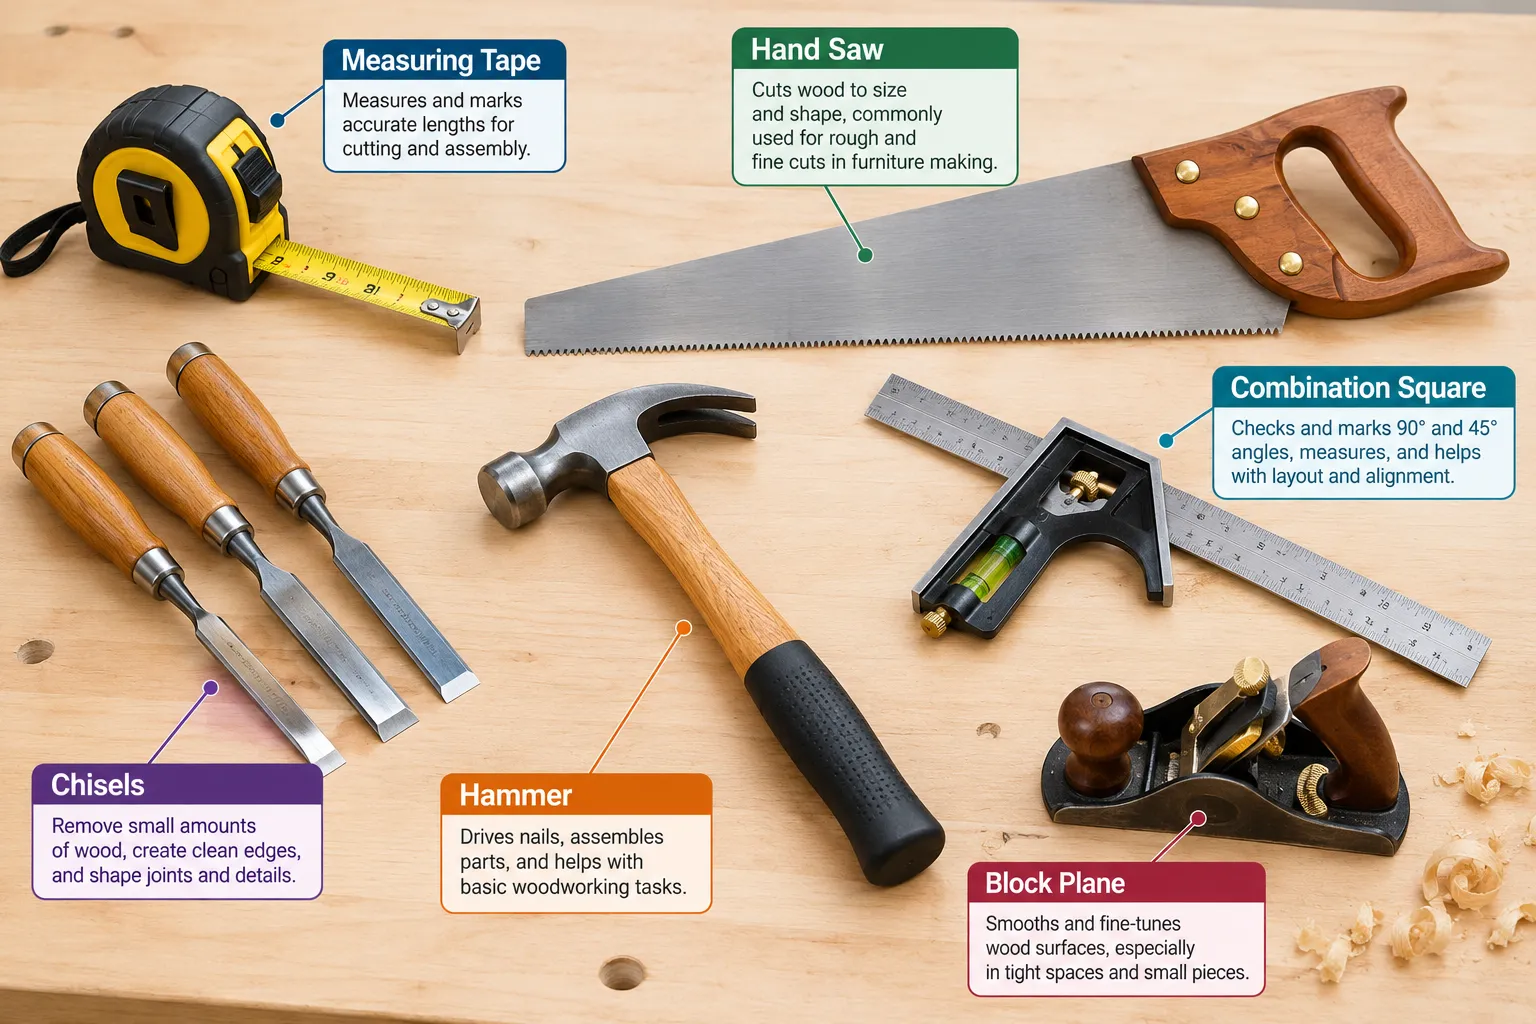
- Measuring Tape: Absolutely indispensable for accurate dimensions. Choose one with a sturdy blade and clear markings.
- Pencils: For marking cut lines, drill points, and joint layouts. Keep them sharp!
- Combination Square: Critical for marking perfectly square lines and checking angles.
- Hand Saw: A versatile tool for cutting wood. For furniture making, a crosscut saw (for cutting across the grain) and a ripsaw (for cutting with the grain) are ideal, though a good all-purpose saw can suffice initially.
- Chisels: Essential for refining joints, cleaning out mortises, and shaping wood. Start with a basic set of three: 1/4″, 1/2″, and 1″ sizes.
- Mallet: Used with chisels for striking. A rubber or wooden mallet is preferred over a metal hammer to avoid damaging chisel handles.
- Block Plane: A small plane great for chamfering edges, fitting joints, and fine-tuning small pieces.
- Clamps: A beginner cannot have too many clamps. They hold workpieces securely for cutting, gluing, and assembly. Bar clamps, F-clamps, and C-clamps are all useful.
- Safety Gear: Eye protection (safety glasses), hearing protection (earmuffs or plugs), and dust masks are non-negotiable.
While hand tools are excellent for learning, some power tools can significantly speed up and improve precision as you advance. A cordless drill/driver is an excellent first power tool, useful for drilling pilot holes and driving screws. For more on fastening, consider our guide on Mastering Woodworking Screws Your Ultimate Guide For 2026.
Understanding Wood: Your Primary Material
Wood isn’t just wood; it comes in various types, each with unique characteristics that affect how it’s worked and its suitability for different furniture projects.
Hardwoods vs. Softwoods:
| Category | Characteristics | Common Examples | Typical Uses in Furniture |
|---|---|---|---|
| Hardwoods | Denser, more durable, often from deciduous trees, complex grain | Oak, Maple, Cherry, Walnut, Poplar | High-quality furniture, flooring, cabinetry, decorative pieces |
| Softwoods | Less dense, easier to work, from coniferous trees, simpler grain | Pine, Fir, Cedar, Spruce | Construction, rustic furniture, interior trim, beginner projects |
For beginners, softwoods like pine are often recommended due to their affordability and ease of cutting and shaping. However, hardwoods like poplar offer a good balance of workability and durability for slightly more ambitious projects.
Mastering Basic Carpentry Skills for Furniture Making
Once you have your basic tools and a grasp of wood types, it’s time to dive into the core carpentry skills essential for “Woodworking for Absolute Beginners: A Practical Guide to Carpentry Skills for Furniture Making.” These techniques form the bedrock of all furniture construction.
Accurate Measuring and Marking
Precision begins here. Even a millimeter off can compound into significant errors later in your project.
- Measure Twice, Cut Once: This adage is the golden rule of woodworking. Always double-check your measurements before making any cut.
- Sharp Pencil, Clear Lines: Use a sharp pencil for crisp, thin lines. Thick lines introduce ambiguity.
- Reference Edges: Always measure from a true, square edge. If your stock isn’t perfectly square, you’ll need to create a reference edge first.
- Combination Square for Accuracy: Use your combination square to draw lines perfectly perpendicular or at 45-degree angles to your board’s edge.
Essential Cutting Techniques
Effective cutting is about control and safety.
Hand Saw Technique:
- Stance: Stand comfortably with good balance.
- Starting the Cut: Use your thumb or a block of wood as a guide to start the cut accurately on your marked line. Make a few light pull strokes to establish a kerf (the slot the saw blade makes).
- Full Strokes: Use long, smooth strokes, letting the saw do the work. Don’t force it. Maintain a consistent angle.
- Support the Offcut: As you near the end of the cut, support the piece being cut off to prevent it from splitting or tearing out.
Using a Miter Box: For perfectly square or angled cuts with a hand saw, a miter box (either a simple plastic one or a more advanced metal version) is invaluable. It guides the saw blade precisely.
Basic Joinery for Strong Furniture
Joinery is how you connect separate pieces of wood to form a cohesive structure. For beginners, simple yet strong joints are the key.
- Butt Joint: The simplest joint, where two pieces of wood are joined end-to-end or edge-to-edge. While it can be weak on its own, it gains strength with the addition of fasteners (screws, nails) and wood glue.
- Pocket Hole Joinery: A popular beginner-friendly method. A specialized jig drills angled holes, allowing screws to draw the pieces tightly together for a strong, concealed joint.
- Half-Lap Joint: This joint involves removing half the thickness from each of two pieces of wood, allowing them to overlap and create a flush surface. It offers significantly more surface area for glue than a butt joint and is excellent for frames. Learn more about Beginners Guide To Hand Cut Half Lap Joints Simple Yet Strong Connections For Furniture And Frames.
- Dovetail Joint: While more advanced, the dovetail is a classic for a reason, renowned for its strength and beauty. For those ready for a challenge, refer to The Essential Guide To Dovetail Joinery For Beginners Hand Cut Vs Router Jig Techniques.
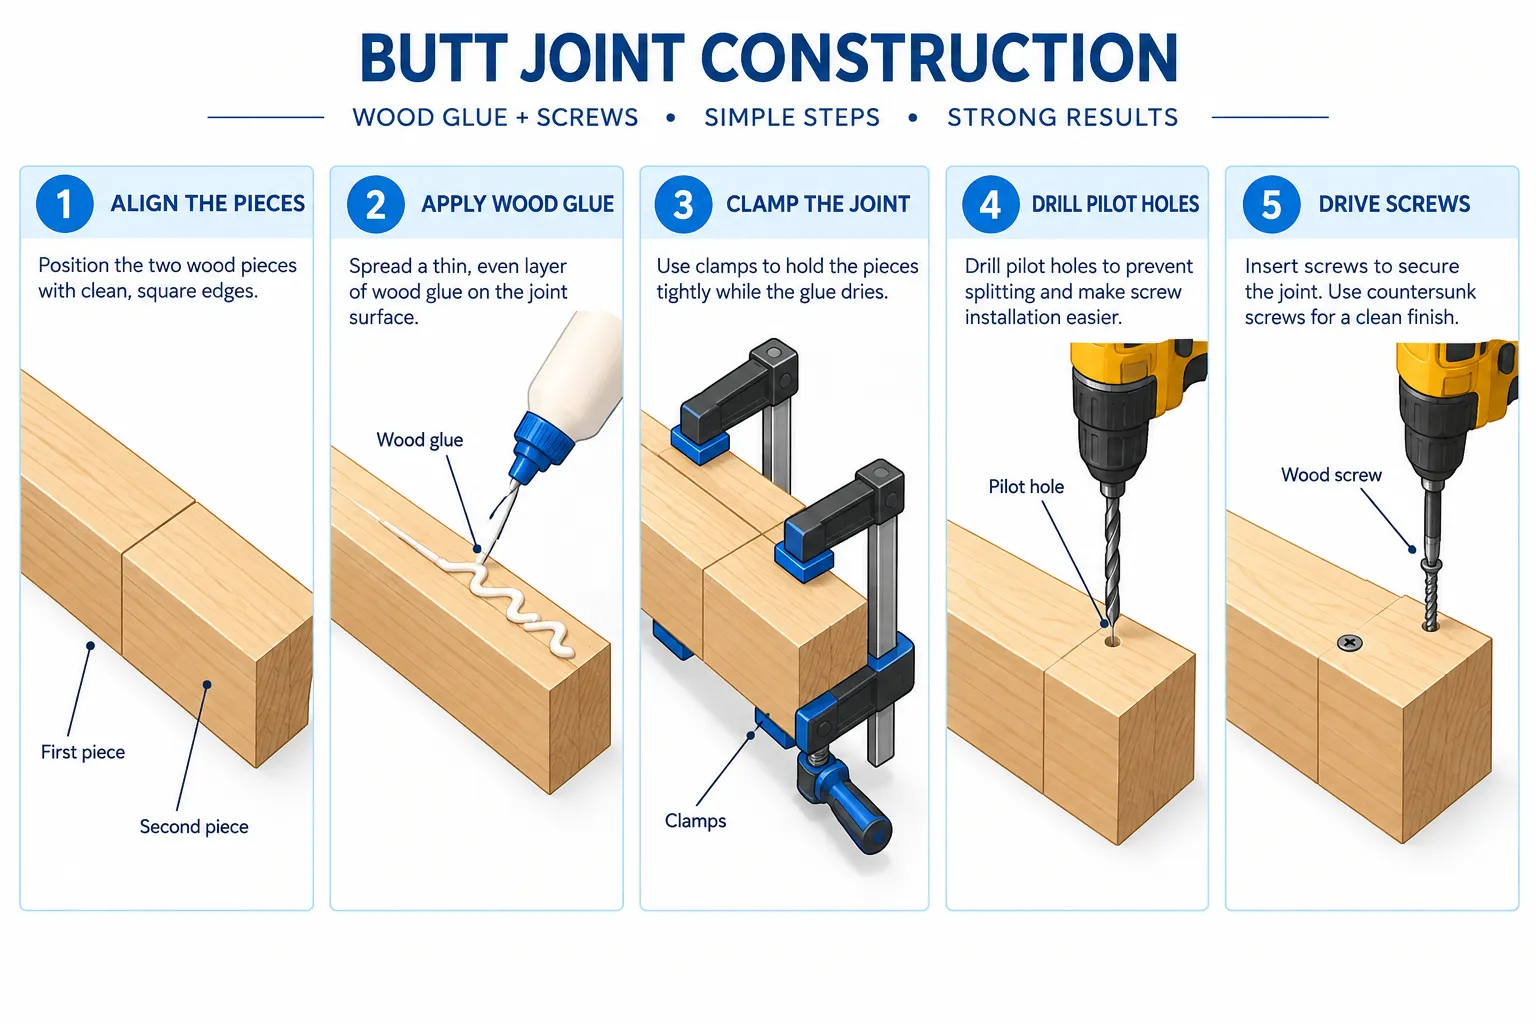
Applying Wood Glue: Always use a good quality wood glue. Apply a thin, even coat to both surfaces of the joint, then clamp firmly until dry. Clamping pressure is crucial for a strong glue bond.
Practical Projects and Finishing Touches
With fundamental carpentry skills under your belt, it’s time to apply your knowledge to tangible projects. “Woodworking for Absolute Beginners: A Practical Guide to Carpentry Skills for Furniture Making” comes alive when you create your first pieces. Remember, every master woodworker started with a simple project.
Recommended First Furniture Projects
Starting small builds confidence and hones skills.
- Simple Shelf: A straightforward project to practice measuring, cutting square, and using butt joints with screws and glue. You can make a floating shelf or one with simple supports.
- Small Stool or Bench: Introduces the concept of legs and aprons (the horizontal pieces connecting the legs). This is an excellent project for practicing pocket hole joinery.
- Basic Planter Box: Good for practicing multiple butt joints and learning about moisture resistance in wood.
- Bedside Table: A classic beginner furniture project that allows you to combine various techniques, including simple box construction and adding a small drawer if you’re feeling ambitious. Our guide on Crafting Your Perfect Woodworking Nightstand A Comprehensive Guide For 2026 can provide further inspiration.
- Small Gifts: Consider making Crafting Small Woodworking Gifts For The Holidays Profitable And Personalized Projects For Beginners to gain experience with various cuts and finishes on smaller scales.
Sanding and Finishing Your Work
The final steps are crucial for transforming your raw wooden pieces into polished furniture.
- Sanding: This is a critical, often overlooked step. Start with a coarser grit sandpaper (e.g., 80 or 100 grit) to remove any tool marks or imperfections, then progressively move to finer grits (e.g., 150, 220 grit) for a smooth finish. Always sand with the grain of the wood. Remove dust thoroughly between grits.
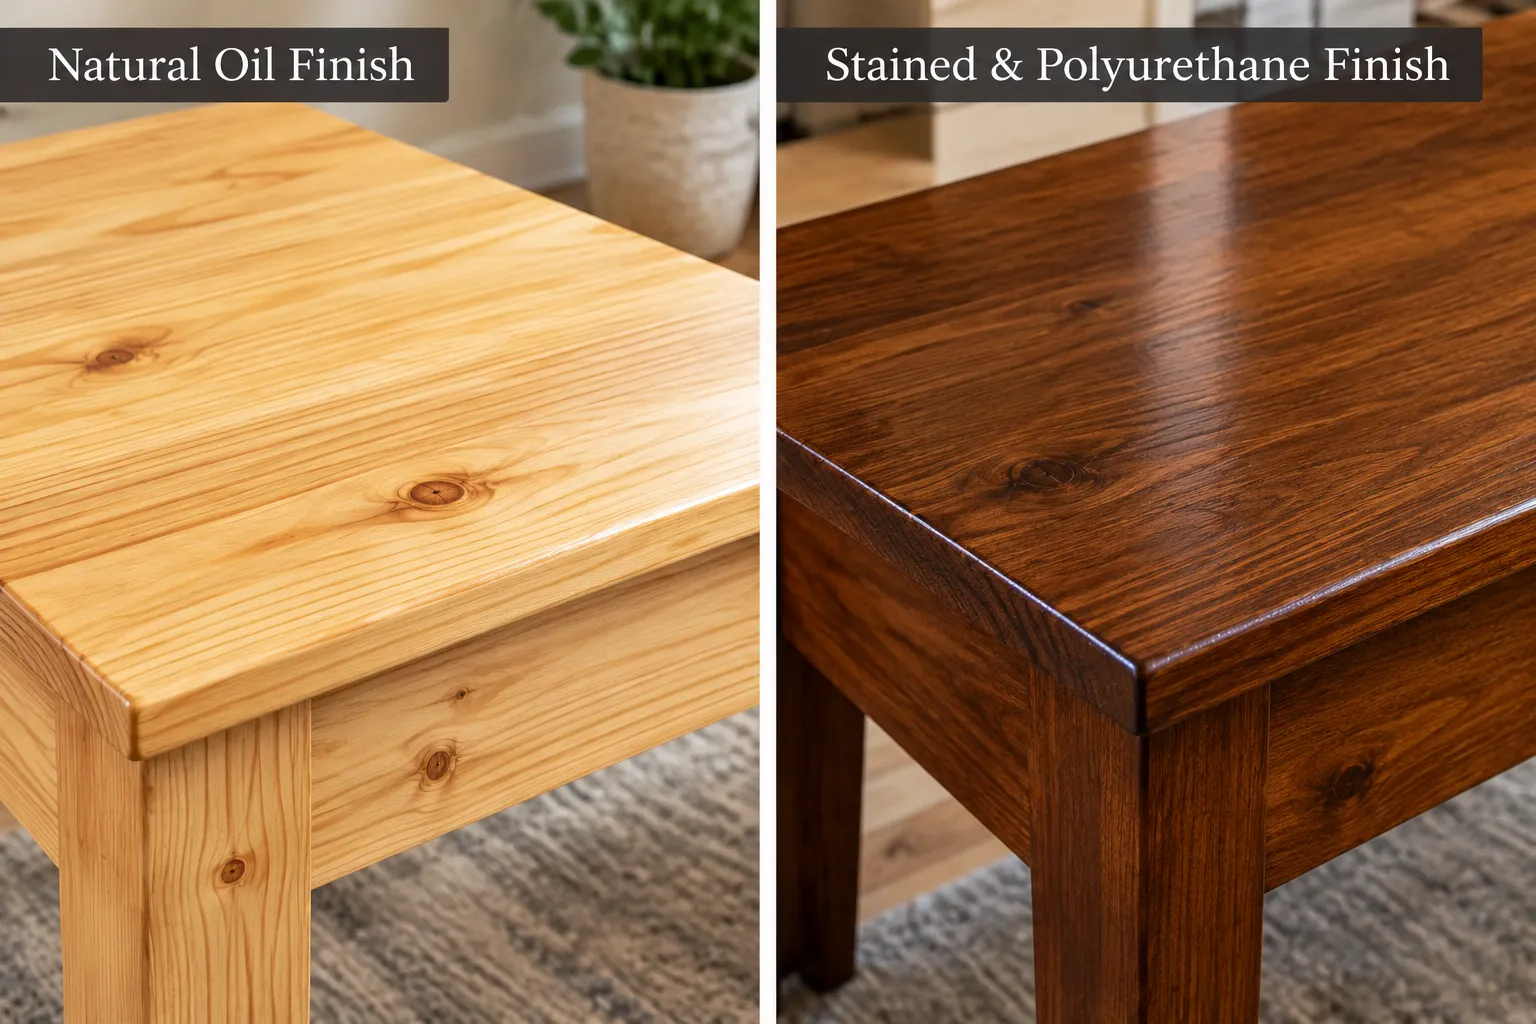
- Choosing a Finish: The finish protects the wood and enhances its appearance.
- Oils (e.g., Tung Oil, Linseed Oil): Penetrate the wood, offering a natural look and feel. They are easy to apply and repair.
- Waxes: Provide a low-luster finish and some protection, often used over other finishes for added depth.
- Varnishes/Polyurethanes: Create a durable, protective film on the surface. They come in various sheens (matte to glossy) and offer excellent protection against spills and wear.
- Stains: Change the color of the wood while allowing the grain to show through. Always test stains on scrap wood first, as they can look different on various wood species. For more on applying finishes, see Oak Wood Finishing Techniques.
Safety First in the Workshop
No guide to woodworking is complete without emphasizing safety.
- Always Wear Safety Glasses: Wood dust and flying debris are serious hazards.
- Hearing Protection: Power tools can be very loud.
- Dust Collection/Mask: Fine wood dust is a respiratory irritant.
- Read Tool Manuals: Understand how to safely operate every tool before using it.
- Keep Your Workspace Clean: A cluttered workshop is an accident waiting to happen.
- Unplug Tools: Always unplug power tools when changing blades, bits, or making adjustments.
- Never Rush: Take your time, focus on the task, and avoid distractions.
By following these guidelines and diligently practicing your skills, you will steadily progress from an absolute beginner to someone capable of crafting beautiful and lasting furniture pieces.
Conclusion
Embarking on the journey of “Woodworking for Absolute Beginners: A Practical Guide to Carpentry Skills for Furniture Making” is a rewarding endeavor that opens the door to creativity, self-sufficiency, and the satisfaction of building something tangible with your own hands. We’ve explored the foundational aspects, from understanding essential tools and different wood types to mastering crucial carpentry skills like accurate measuring, precise cutting, and reliable joinery. You now have a roadmap for tackling your first furniture projects and applying the finishing touches that transform raw materials into cherished pieces.
The key to success in woodworking is practice, patience, and a commitment to safety. Start with simple projects, learn from your mistakes, and gradually build your skill set. The woodworking community is vast and supportive, offering endless resources and inspiration. In 2026, the joy of crafting custom furniture is more accessible than ever before. Take the first step, pick up those tools, and begin creating.
Actionable Next Steps:
- Acquire Basic Tools: Start with a measuring tape, combination square, sharp pencil, hand saw, and a few clamps. Don’t forget safety glasses.
- Source Beginner-Friendly Wood: Purchase a small quantity of pine or poplar for practice cuts and a simple project.
- Practice Fundamental Skills: Dedicate time to practicing accurate measuring, marking square lines, and making straight cuts with your hand saw on scrap wood.
- Build a Simple Project: Construct a basic wooden shelf or a small planter box to solidify your understanding of butt joints, gluing, and fastening.
- Learn Basic Finishing: Experiment with sanding and applying a simple oil or clear coat to a practice piece to see the transformation.
SEO Meta Title: Woodworking for Absolute Beginners: Practical Carpentry for Furniture SEO Meta Description: Start woodworking in 2026 with this beginner’s guide to carpentry. Learn essential tools, skills, and projects for making custom furniture.