

The average cost of custom framing can range from $100 to over $500 per piece, depending on the size, materials, and complexity. For many, this cost becomes a barrier to properly displaying cherished artwork, photographs, and memorabilia. This Beginner’s Guide to Building Custom Picture Frames: Tools, Techniques, and Matting for Any Artwork aims to demystify the process, empowering enthusiasts to craft professional-looking frames at a fraction of the cost. With readily available tools and a methodical approach, anyone can transform a simple piece of wood into a sophisticated frame that perfectly complements their art and home decor in 2026.
Key Takeaways
- Custom framing is an accessible woodworking skill that significantly enhances artwork presentation.
- Basic hand tools and a few specialized items are sufficient to begin building professional frames.
- Accurate measurements and precise miter cuts are fundamental to achieving tight, seamless frame corners.
- Proper assembly techniques, including gluing and clamping, are crucial for a durable and aesthetically pleasing result.
- Matting offers a protective and aesthetic buffer, greatly influencing how artwork is perceived within its frame.
Essential Tools and Materials for Your First Custom Picture Frame
Embarking on the journey of custom picture framing requires a thoughtful selection of tools and materials. While a fully equipped workshop is ideal, beginners can achieve impressive results with a more modest setup. Understanding the purpose of each item will ensure a smoother, more enjoyable building experience as you follow this Beginner’s Guide to Building Custom Picture Frames: Tools, Techniques, and Matting for Any Artwork.

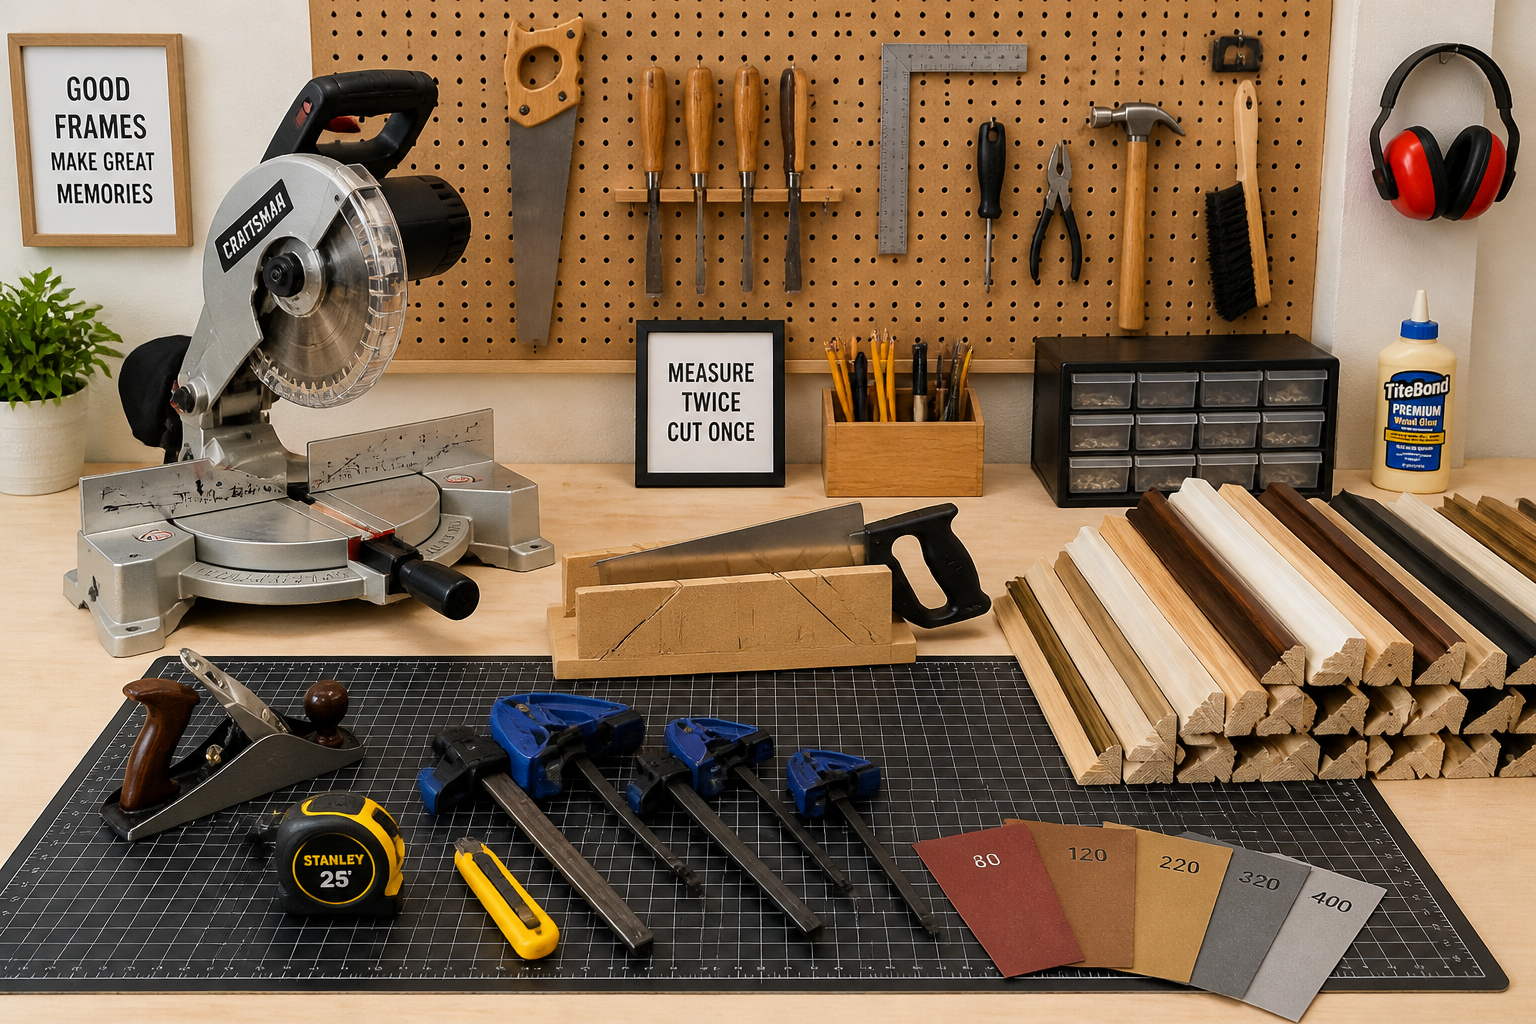
Hand Tools: The Foundation of Framing
Even in 2026, many fundamental woodworking tasks for picture frames rely on reliable hand tools. These offer precision and control, which are vital for crafting tight-fitting joints.
- Measuring Tape or Ruler: Essential for accurate measurements of your artwork and molding. A good quality steel tape measure or a long, accurate ruler is non-negotiable.
- Pencil: For marking cut lines, always mark on the waste side of your line to ensure accuracy.
- Miter Box and Saw: For beginners, a manual miter box with a sharp backsaw is an economical and effective way to make precise 45-degree cuts. For a more detailed look at basic hand tools, consider exploring our guide on Essential Hand Tools for Every Woodworker: A Comprehensive Guide to.
- Clamps: Corner clamps or strap clamps are indispensable for holding frame pieces together squarely while the glue dries. Adjustable bar clamps can also be useful.
- Wood Glue: High-quality wood glue (PVA type) is critical for strong frame joints.
- Utility Knife / Craft Knife: For cutting mat board, backing board, and other materials with precision.
- Sandpaper: A selection of grits (e.g., 120, 180, 220) for smoothing wood surfaces.
- Rabbet Plane (Optional but Recommended): A small plane for fine-tuning the frame’s rabbet depth or width, ensuring artwork sits flush.
Power Tools: Stepping Up Your Efficiency
As your skills grow, certain power tools can significantly increase efficiency and accuracy.
- Miter Saw (Chop Saw): For faster, more consistent 45-degree cuts. A good quality miter saw is a game-changer for framing. Ensure it’s calibrated correctly for precise angles.
- Table Saw: While not strictly necessary for simple frames, a table saw can be used to rip molding from larger stock or cut rebates (rabbets) for the artwork to sit in. Always prioritize safety when using a table saw. Learn more about optimal table saw performance with articles like Pro-Tech 10 Table Saw: A Comprehensive Guide for Optimal Performance.
- Router and Router Table: For creating custom molding profiles or cutting rabbets with precision. Mastering the Router Table: Beyond Basic Edges for Precision Joinery offers further insight.
- Brad Nailer or V-Nailer: For securing frame corners with brad nails or specialized V-nails, which pull the joint together tightly.
Materials: Choosing Your Frame’s Character
The right materials define the final look and feel of your custom picture frame.
- Wood Molding: Available in various profiles, species (pine, oak, maple, walnut), and finishes. For beginners, a softer wood like pine or poplar is easier to work with. Consider sourcing sustainable wood, as discussed in Sustainable Wood Sourcing for the Modern Woodworker: Beyond Reclaimed.
- Mat Board: Acid-free mat board is essential to protect your artwork from degradation. Available in a vast array of colors and textures.
- Backing Board: Acid-free foam core or cardboard for supporting the artwork and mat within the frame.
- Glazing: Glass or acrylic (plexiglass) to protect the artwork. Acrylic is lighter and more shatter-resistant, ideal for larger frames or shipping.
- Frame Hardware:
- Offset Clips or Flexi-Points: To hold the artwork, mat, and backing securely in the frame’s rabbet.
- Picture Wire and D-Rings or Sawtooth Hangers: For hanging the finished frame.
Mastering Techniques: From Cutting to Assembly
The core of building a custom picture frame lies in precise measurements, accurate cuts, and solid joinery. This section will walk you through the fundamental techniques for a successful Beginner’s Guide to Building Custom Picture Frames: Tools, Techniques, and Matting for Any Artwork.
Step 1: Accurate Measurement
The golden rule of framing: measure twice, cut once.
- Measure Your Artwork: Precisely measure the width and height of your artwork. Add 1/8 inch to both dimensions if you want a slight border, or use the exact dimensions if matting will cover the edges.
- Determine Mat Opening (if using a mat): The mat opening should be slightly smaller than your artwork (e.g., 1/8 inch smaller on each side) to create an overlap and prevent the art from falling through.
- Calculate Frame Molding Lengths: This is where many beginners get tripped up.
- Inside Edge Measurement: For each side of your frame, add the width of the frame molding (e.g., 2 inches) multiplied by two to your artwork’s external dimension (if no mat is used, or the mat’s outer dimension if a mat is used). This gives you the length of the inside edge of your frame pieces.
- Example: Artwork is 8×10 inches. Molding is 2 inches wide.
- For the 8-inch side: 8 inches (artwork width) + 2 inches (molding rabbet on left) + 2 inches (molding rabbet on right) = 12 inches (outside edge of frame).
- This calculation is for the outer perimeter of the frame. For miter cuts, you generally work from the length of the rabbet. The most reliable method is to measure from the inside edge of the rabbet. If your artwork is 8×10 inches, and your rabbet is 1/4 inch deep, then your inner frame dimension needs to be exactly 8×10 inches. The length of the long point of your 45-degree miter cut for an 8-inch side will be 8 inches plus twice the width of the molding (e.g., 2 inches), so 12 inches from tip to tip.
Step 2: Precise Miter Cuts
The quality of your frame hinges on perfect 45-degree cuts that meet cleanly to form 90-degree corners.
- Set Up Your Miter Saw: Calibrate your miter saw to precisely 45 degrees. Use scrap wood to test cuts and ensure they form a perfect 90-degree corner when joined.
- Cut the First Piece: Cut one end of your molding at a 45-degree angle.
- Measure and Cut the Opposite Side: Measure the calculated inside length of your frame piece along the inside edge of the molding (the rabbet side). Mark this point. Then, make a second 45-degree cut, ensuring the cut “leans” in the opposite direction from your first cut, creating a trapezoidal shape.
- Repeat for All Four Sides: Cut all four sides, ensuring that the two longer pieces are identical in length, and the two shorter pieces are identical.
Step 3: Frame Assembly
This is where the individual pieces come together to form a solid structure.
- Dry Fit: Always dry-fit all four pieces to ensure they form perfect corners without gaps. Adjust cuts if necessary.
- Apply Glue: Apply a thin, even coat of wood glue to both mating surfaces of one corner joint.
- Clamp and Square: Bring the two glued pieces together, aligning the miters. Use corner clamps or a band clamp to hold the joint tightly. Ensure the corner is perfectly square using a framing square or a painter’s triangle. Wipe away any excess glue with a damp cloth.
- Reinforce (Optional but Recommended): While glue alone can be strong, reinforcing the corners adds durability.
- Brad Nails: Use a brad nailer to drive one or two small brad nails through the joint, avoiding the outer edge.
- V-Nails: A specialized V-nailer drives small metal V-nails into the miter joint from the back, pulling the joint tight.
- Repeat: Assemble the remaining corners, one by one or all at once if you have enough clamps.
- Cure Time: Allow the glue to cure completely according to the manufacturer’s instructions. Do not remove clamps prematurely.
Matting and Final Assembly for Any Artwork
The mat board and final assembly steps are crucial for both protecting your artwork and presenting it professionally. A well-chosen mat can transform a piece, adding depth and visual interest. This Beginner’s Guide to Building Custom Picture Frames: Tools, Techniques, and Matting for Any Artwork wouldn’t be complete without these finishing touches.
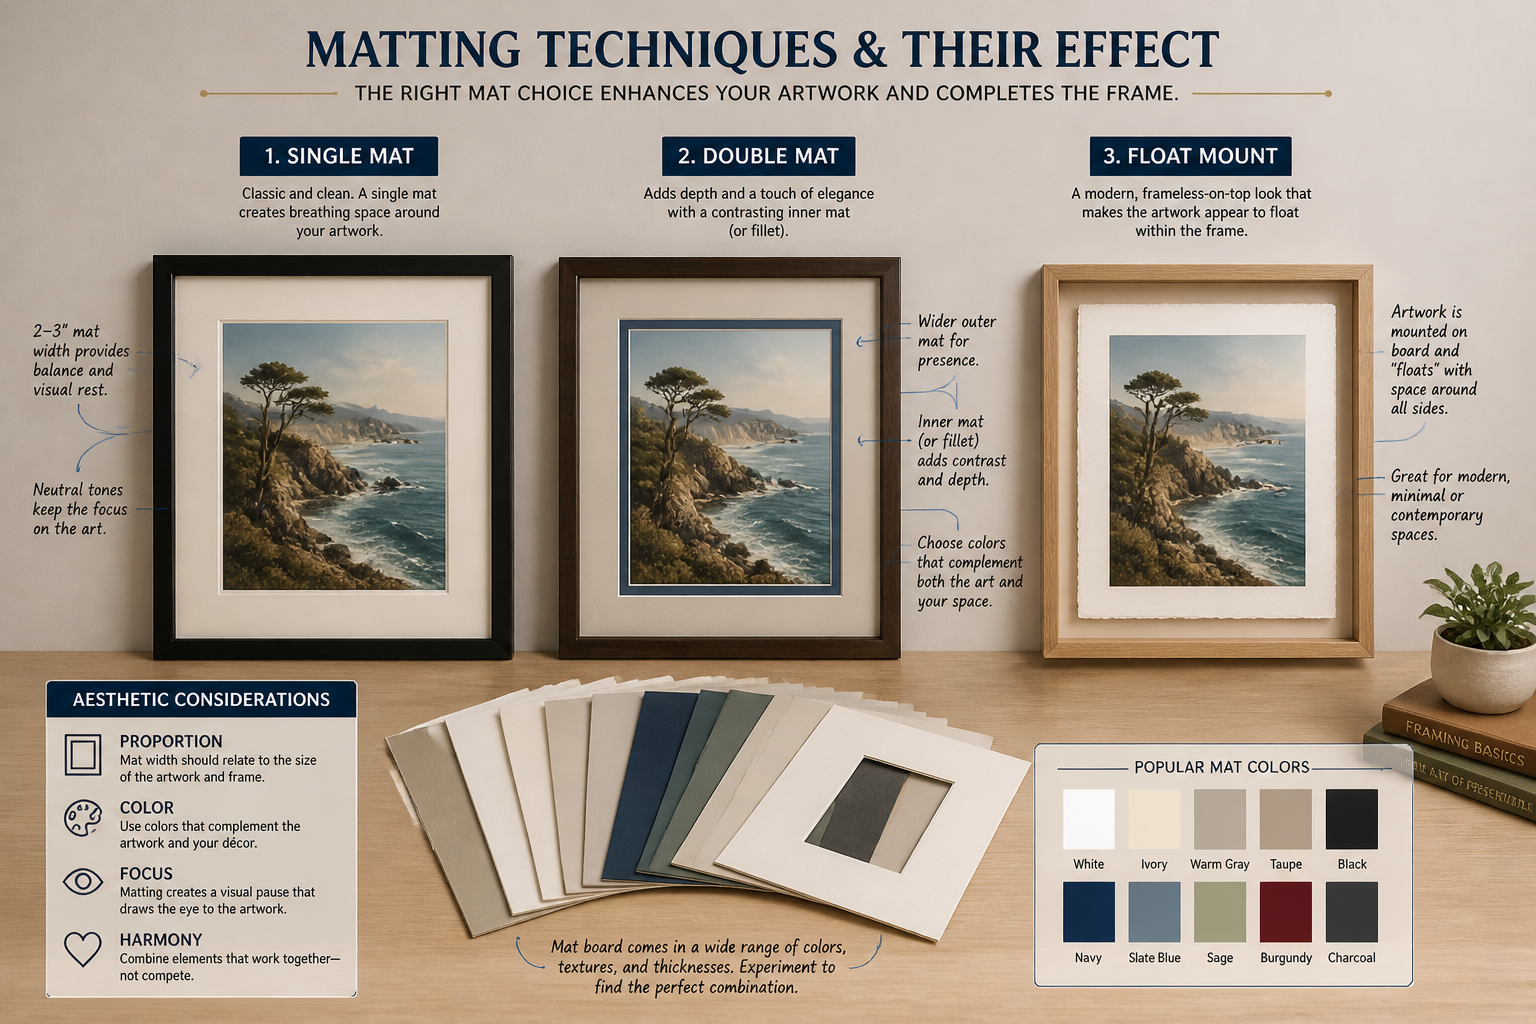
Understanding Matting: Protection and Presentation
Matting serves two primary functions:
- Protection: It creates an air gap between the artwork and the glazing (glass/acrylic), preventing condensation or the artwork sticking to the glass, which can cause damage over time. Acid-free mat board is essential to prevent acidic degradation of the artwork.
- Aesthetics: A mat draws the eye inward, highlights the artwork, and provides a visual buffer from the frame, enhancing its perceived value and impact.
Mat Board Selection
- Color: Choose a mat color that complements, rather than competes with, the artwork. Often, a neutral color (white, off-white, grey) with the same undertones as the artwork works best.
- Width: The mat width depends on the artwork size and desired aesthetic. Wider mats often lend a more professional or gallery-like feel. For smaller pieces, wider mats can make them appear more substantial. A common guideline is to have the bottom mat border slightly wider than the top and side borders (bottom weighting) to visually balance the artwork.
- Single vs. Double Mat: A single mat is standard. A double mat uses two layers of mat board, usually with a thinner, inner mat in a complementary color that creates a subtle border around the artwork.
Cutting the Mat Board
Cutting mats requires precision and a specialized mat cutter.
- Measure and Mark: Using your artwork dimensions and desired mat opening, carefully mark the back of the mat board. Remember the mat opening should be slightly smaller than the artwork.
- Use a Mat Cutter: A specialized mat cutter (either a handheld or a more advanced rail-guided model) allows you to make precise, bevel-cut edges (usually 45 degrees) that beautifully frame the artwork. Practice on scrap mat board first.
- Clean Cuts: Ensure your blade is sharp for clean, crisp cuts. Dull blades can tear the mat board.
Final Assembly of Your Custom Picture Frame
With the frame built and the mat cut, it’s time to bring all the elements together.
- Clean Glazing: Thoroughly clean both sides of your glass or acrylic glazing. Ensure it is completely free of dust and smudges.
- Layer the Components:
- Place the clean glazing into the frame’s rabbet.
- Place the mat board on top of the glazing.
- Carefully center your artwork behind the mat opening. Secure the artwork to the back of the mat board using acid-free tape (e.g., linen tape or archival tape) at the top edge. This allows the artwork to hang freely and prevents buckling.
- Place the backing board on top of the artwork.
- Secure the Back: Use offset clips or flexi-points (bendable tabs) to hold the glazing, mat, artwork, and backing board firmly within the frame’s rabbet. Space them evenly around the perimeter.
- Attach Hanging Hardware:
- D-Rings: Screw two D-rings into the side rails of the frame, approximately one-third of the way down from the top.
- Picture Wire: Thread picture wire through the D-rings, creating a hanging loop. Ensure the wire is taut enough to prevent the frame from showing above the picture hook, but with enough slack to allow some movement for leveling.
- Sawtooth Hanger: For smaller, lighter frames, a single sawtooth hanger nailed into the top center of the back of the frame can be sufficient.
- Consider where you intend to hang your custom pieces, as covered in Wall-Mounted Coat Racks: Functional Art for Entryways with H, for optimal placement.
Finishing Touches
- Frame Finishing: Before assembly, sand your frame thoroughly, starting with a coarser grit (120-150) and progressing to finer grits (180-220) until smooth. Apply your desired finish: stain, paint, wax, or clear sealant. Ensure the finish is completely dry and cured before final assembly.
- Dust Prevention: Before final assembly, use compressed air or a tack cloth to remove any dust or debris from inside the frame, on the mat, and on the artwork.
Conclusion
Building custom picture frames is a rewarding craft that combines precision woodworking with artistic presentation. This Beginner’s Guide to Building Custom Picture Frames: Tools, Techniques, and Matting for Any Artwork has outlined the essential tools, fundamental techniques, and critical matting considerations needed to get started. By focusing on accurate measurements, clean miter cuts, and careful assembly, you can create frames that not only protect your cherished pieces but also enhance their beauty and seamlessly integrate them into your home’s aesthetic in 2026.
Ready to embark on your framing journey? Start with a simple project, like a small photograph or print, to build confidence in your measuring and cutting skills. Practice your miter cuts on scrap wood until they are consistently accurate. Experiment with different wood species and finishes to find your preferred style. Remember, every project is a learning opportunity, and with each frame you build, your skills and eye for detail will sharpen. For those looking to delve deeper into various woodworking joints, our Beginner’s Guide to Essential Woodworking Joints: When to Use Which can provide additional foundational knowledge that extends beyond basic framing.

Next Steps:
- Gather Your Tools: Begin by acquiring the basic hand tools listed, focusing on a good miter box and saw.
- Choose Simple Materials: Select a straightforward wood molding profile and a standard mat board for your first project.
- Practice Cuts: Before cutting your actual frame pieces, make several test cuts on scrap wood to master the 45-degree angle.
- Start Small: Pick a small, inexpensive artwork for your inaugural custom frame project.
SEO Meta Title: Beginner’s Guide: Custom Picture Frames – Tools, Techniques & Matting SEO Meta Description: Learn to build custom picture frames in 2026 with our beginner’s guide. Discover essential tools, master cutting and assembly techniques, and learn matting for any artwork.
