

The frustrating reality for many hobbyists and professionals alike is that workshop space often shrinks faster than tool collections. A cluttered small shop, with tools buried under sawdust or stacked precariously, doesn’t just hinder workflow; it stifles creativity and can even compromise safety. The solution lies not in acquiring a larger space, but in a smarter approach to storage. This article delves into the principles and practicalities of Building a Compact Tool Cabinet: Vertical Storage Solutions and Modular Organization for Small Shops to transform any cramped workspace into an efficient, highly functional environment in 2026.
Key Takeaways
- Maximize Vertical Space: Employ wall-mounted and tall cabinet designs to utilize often-overlooked vertical dimensions in small shops.
- Embrace Modularity: Design internal components like drawers, shelves, and tool holders to be interchangeable and reconfigurable for adaptability.
- Customization is Key: Tailor storage solutions to the specific tools and workflow of your shop to ensure optimal accessibility and efficiency.
- Prioritize Accessibility: Ensure that frequently used tools are easily visible and reachable, reducing search time and frustration.
- Build for Durability: Use sturdy materials and construction techniques to create a long-lasting storage solution that protects valuable tools.
Designing Your Compact Tool Cabinet for Maximum Efficiency
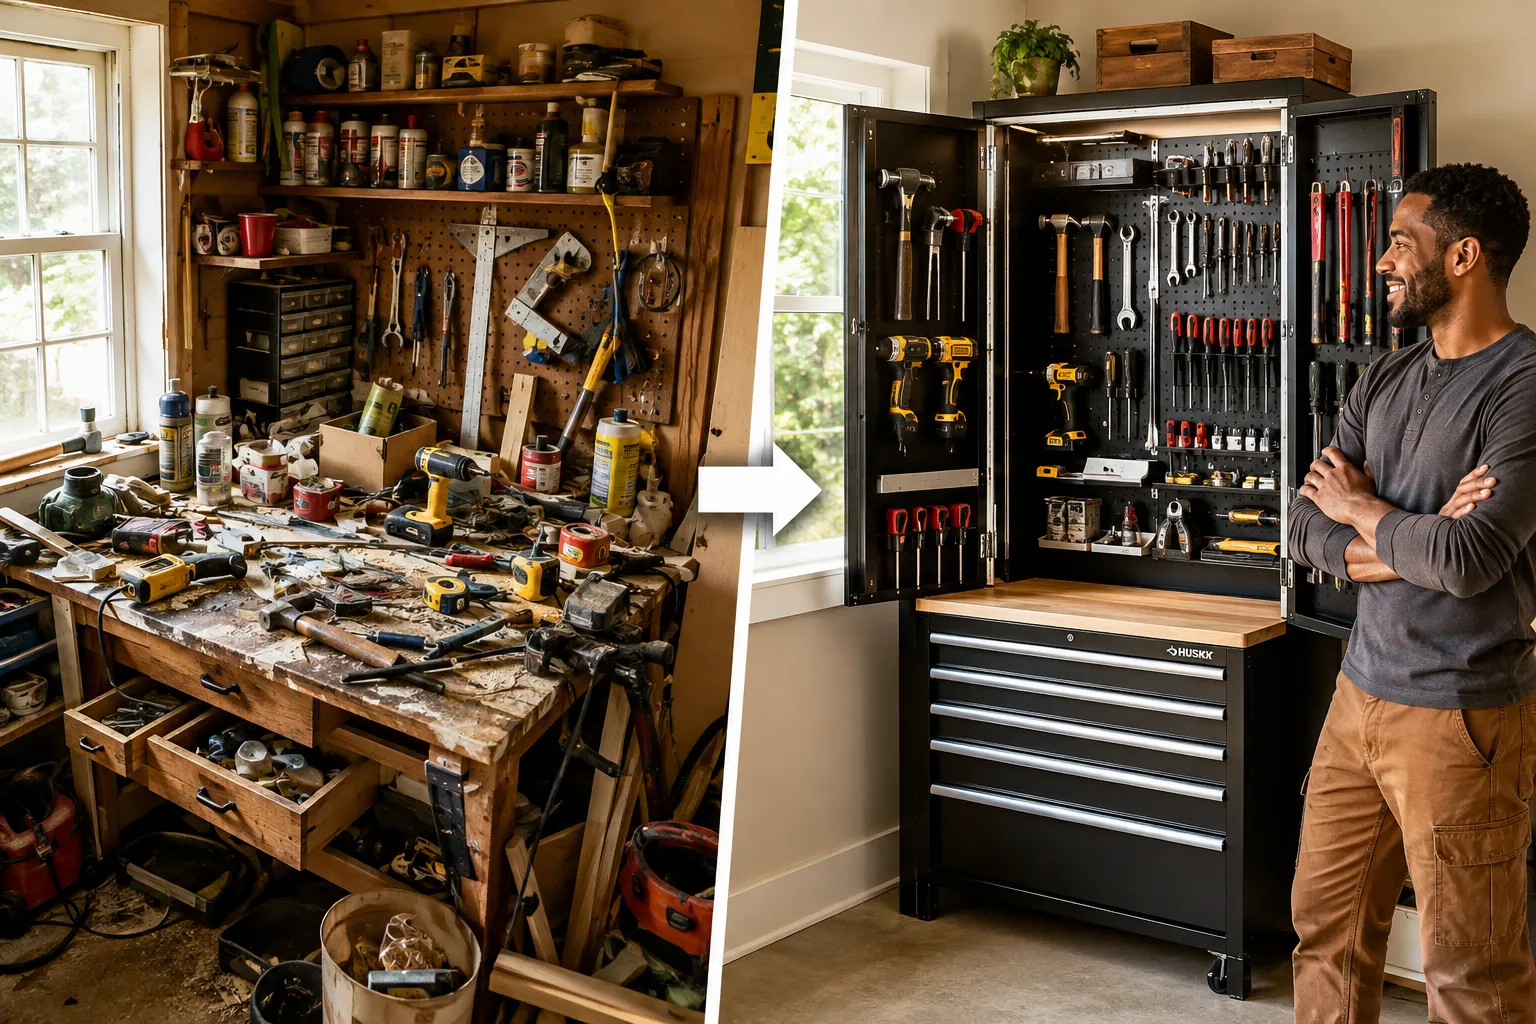
The foundation of any effective small workshop organization lies in intelligent design, particularly when it comes to a compact tool cabinet. This isn’t just about putting things away; it’s about creating a system where every tool has a designated, easily accessible home, thereby optimizing workflow and reclaiming valuable floor space. The core principles revolve around verticality, modularity, and customization.
Understanding Your Space and Needs
Before cutting the first piece of wood, a thorough assessment of your existing space and tool inventory is crucial. Measure the available wall space, considering obstructions like windows, doors, and electrical outlets. Categorize your tools: hand tools, power tools, measuring instruments, fasteners, and consumables. Note their sizes, weights, and frequency of use. This audit will dictate the cabinet’s dimensions, internal layout, and the types of storage solutions required. For insights into general workshop organization, consider exploring resources on workshop organization for high volume small project production space efficient layouts tool placement and jig systems for batch building coasters holders and organizers.
Key Design Principles
- Verticality: In a small shop, floor space is a premium. The walls, however, are often underutilized. A compact tool cabinet must extend upwards, leveraging every available inch. This means designing tall cabinets, often mounted directly to the wall or integrated into a workbench system.
- Modularity: Life in a workshop changes. New tools arrive, projects evolve, and workflow shifts. A modular design allows your cabinet to adapt. Think in terms of interchangeable components:
- Adjustable Shelves: Easily moved to accommodate different tool heights.
- Removable Drawers/Trays: Can be taken to the workbench.
- French Cleat System: Highly versatile for hanging various tool holders and can be reconfigured endlessly. For a deeper dive into expandable storage, refer to building modular and expandable workshop cabinets maximizing vertical space and reconfigurability.
- Customization: Generic storage rarely fits perfectly. Design specific slots, holders, and compartments for your most-used tools. This might include custom-cut foam inserts for delicate instruments or dedicated holders for oddly shaped power tools.
- Accessibility: Tools should be easy to see and reach. Avoid deep, dark shelves where items get lost. Consider pull-out trays, clear-fronted drawers, and open shelving for frequently accessed items.
- Durability: A tool cabinet needs to withstand the rigors of a workshop. Use robust materials like plywood and solid wood, and employ strong joinery techniques.
“A well-designed compact tool cabinet isn’t just storage; it’s an extension of your workbench, putting every tool within arm’s reach while keeping the workspace clear.”
Planning the Layout: Vertical Storage Solutions and Modular Organization for Small Shops
Consider various internal configurations:
- Top Section (Vertical Storage): Ideal for frequently used hand tools on a French cleat system, magnetic strips for small metal tools, or pegboard sections. This keeps items at eye level and easily reachable. Magnetic tool holders can be particularly effective for maximizing vertical space; learn more at crafting custom magnetic tool holders and organizers maximizing vertical storage in a small workshop.
- Middle Section (Drawers/Shelves): Best for smaller tools, fasteners, and accessories. Modular drawers with custom dividers or bins keep everything sorted. Pull-out shelves can store power tools or jigs.
- Bottom Section (Heavier Items): Designed for larger, heavier power tools, portable cases, or bulk materials. Consider casters if the cabinet needs to be moved.
Building the Cabinet: Materials, Joinery, and Internal Systems
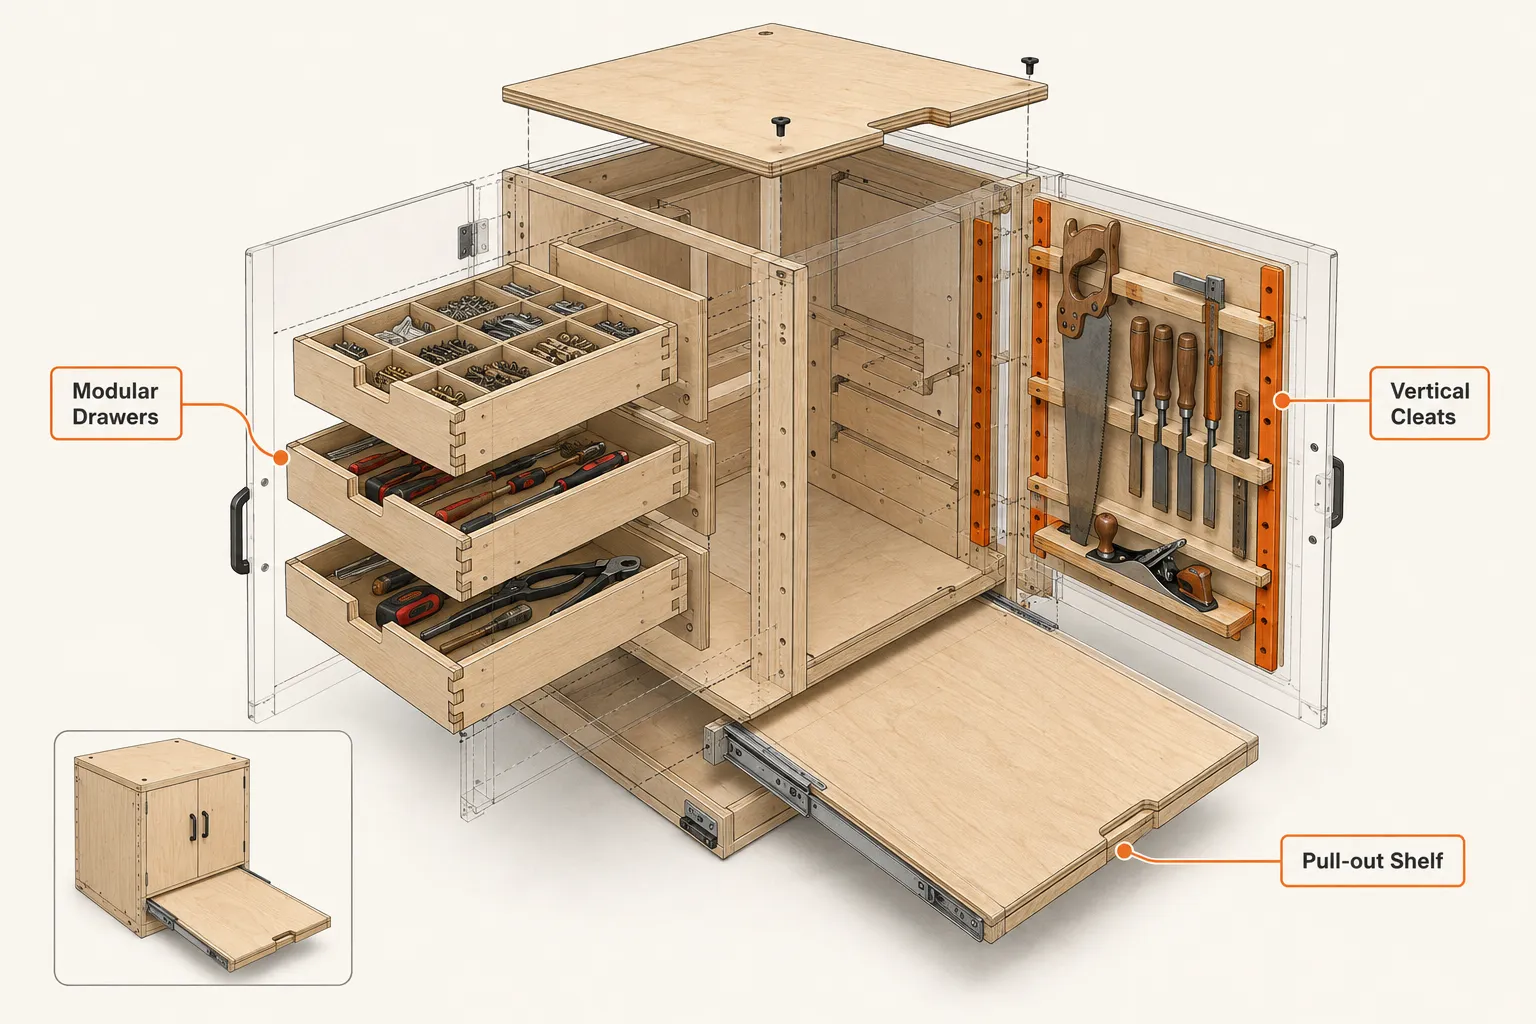
With a clear design in mind, the next step is the actual construction. Choosing the right materials and employing appropriate joinery will ensure your compact tool cabinet is both functional and long-lasting.
Material Selection
For workshop furniture, durability and stability are paramount.
- Plywood: A popular choice due to its strength, stability, and relatively low cost. Baltic birch plywood (¾” or 18mm) is excellent for the carcass and drawer boxes, offering superior void-free layers. Standard ¾” cabinet-grade plywood also works well. For more on plywood solutions, check out diy plywood storage solutions maximizing space and organization in small workshops.
- MDF (Medium Density Fiberboard): Can be used for drawer bottoms or cabinet backs where structural integrity is less critical, but it’s heavier and less moisture-resistant than plywood.
- Solid Wood: Can be used for drawer fronts, trim, or specialized tool holders for aesthetic appeal and added strength, though it adds to the cost and complexity.
Essential Tools for Construction
A few key power tools will make this project significantly easier and more precise:
- Table Saw: For accurately ripping and cross-cutting plywood sheets.
- Circular Saw with Guide Rail: An alternative to a table saw for breaking down large sheets of plywood.
- Router: For cutting dados, rabbets, and decorative edges.
- Drill/Driver: For pilot holes and fastening screws.
- Pocket Hole Jig: For strong, fast joinery, especially useful for carcass construction.
- Measuring Tools: Tape measure, combination square, marking knife.
For general advice on essential power tools, see selecting the best ryobi power tools for small workshop setup essential picks for beginners.
Joinery Techniques
The choice of joinery affects both strength and construction time.
- Dados and Rabbets: Excellent for strong, square carcass construction, especially with plywood. The router or table saw with a dado stack makes quick work of these.
- Pocket Hole Joinery: Fast and strong, suitable for cabinet carcasses and attaching face frames.
- Dovetails/Box Joints: While beautiful and incredibly strong for drawers, they are more time-consuming and require advanced skills or a specialized jig. For a compact tool cabinet, sturdy plywood butt joints reinforced with screws and glue are often sufficient.
- Wood Screws and Glue: The workhorse of cabinet construction. Always pre-drill pilot holes to prevent splitting.
Constructing the Carcass and Frame
- Cut Components: Carefully cut all plywood panels for the sides, top, bottom, and back according to your design plans.
- Assemble Carcass: Using dados, rabbets, or pocket hole joinery, assemble the main box of the cabinet. Ensure it is perfectly square.
- Add Back Panel: A strong back panel, preferably ¾” plywood, significantly increases the rigidity of the cabinet. Use screws and glue.
- Face Frame (Optional but Recommended): A face frame made from solid wood or plywood strips adds rigidity and provides a clean, finished look, as well as a surface to mount drawer slides.
| Component | Recommended Material | Joinery Method |
|---|---|---|
| Carcass (Sides/Top/Bottom) | ¾” Plywood | Dados, Rabbets, Pocket Holes |
| Back Panel | ¾” Plywood | Screws and Glue |
| Drawer Boxes | ½” or ¾” Plywood | Rabbets, Dovetails, Screws/Glue |
| Drawer Fronts | ¾” Plywood/Solid Wood | Screws to Drawer Box |
| Shelves | ¾” Plywood | Shelf Pins, Dados |
Integrating Vertical Storage and Modular Organization

The real magic of a compact tool cabinet lies in its internal organization systems. This is where verticality and modularity shine, turning what could be a simple box into a highly efficient tool workstation.
Vertical Storage Solutions
- French Cleat System: This is arguably the most versatile vertical storage solution. A French cleat consists of two pieces of wood cut at a 45-degree angle. One piece is attached to the cabinet wall (or directly to the workshop wall), and the other is attached to a tool holder. This allows tool holders to be easily moved, rearranged, or customized.
- Custom Tool Holders: Build specific holders for saws, chisels, wrenches, and other hand tools.
- Small Parts Bins: Attach small bins or trays to cleats for screws, nails, or other consumables.
- Power Tool Holders: Design robust cleat-mounted holders for drills, impact drivers, or orbital sanders.
- Magnetic Tool Strips: Ideal for small metal hand tools like chisels, screwdrivers, and pliers. Mount them directly to the cabinet interior for quick access.
- Pegboard/Perforated Hardboard: A classic for a reason. While not as robust as French cleats, it offers good flexibility for hanging various tools with hooks. Consider mounting it inside cabinet doors or on a pull-out panel.
- Sliding Tool Panels: For deeper cabinets, create thin panels that slide in and out, covered on both sides with pegboard or French cleats, effectively doubling your accessible vertical storage.
Modular Organization for Drawers and Shelves
The drawers and shelves within your compact tool cabinet are prime real estate for modular organization.
- Custom Drawer Dividers: Create plywood or hardboard dividers tailored to the size of your tools. These can be fixed or removable, allowing for future adjustments.
- Foam Inserts: For precision tools, router bits, or delicate measuring instruments, custom-cut foam inserts offer unparalleled protection and organization. Trace the tool’s outline, then carefully cut the foam.
- Small Parts Bins/Trays: Utilize off-the-shelf plastic bins or build custom wooden trays to contain fasteners, sandpaper, glue bottles, and other small items. Labeling these is critical for efficiency.
- Pull-out Trays/Shelves: Instead of fixed shelves, install full-extension drawer slides on shelves to make the entire contents accessible, particularly useful for power tools or jigs.
- Tool-Specific Modules:
- Chisel Rack: A simple block of wood with routed slots.
- Screwdriver Rack: A piece of wood with drilled holes.
- Wrench Holders: Cut-out slots or magnetic strips.
Ergonomics and Workflow Integration
When organizing your tools within the cabinet, consider ergonomics and workflow.
- Frequently Used Tools: Place these at eye level or within easy reach in the cabinet’s primary access zone (e.g., the upper vertical storage or top drawers).
- Heavier Tools: Store these in lower drawers or shelves to maintain stability and prevent strain.
- Related Tools: Group tools that are used together (e.g., drills, drill bits, and drivers) to streamline tasks.
- Lighting: Integrate LED strip lighting within the cabinet to ensure good visibility, especially in deeper sections.
By meticulously planning and implementing these vertical storage solutions and modular organization techniques, your compact tool cabinet will transform your small shop into a highly efficient and enjoyable workspace.
Maintenance and Future Expansion of Your Compact Tool Cabinet
Building a compact tool cabinet is an investment in your workshop’s efficiency. To ensure it remains effective for years to come, ongoing maintenance and planning for future expansion are crucial, especially given the dynamic nature of tool collections and woodworking projects in 2026.
Regular Maintenance for Longevity
Like any piece of workshop furniture, your tool cabinet benefits from periodic care.
- Cleanliness: Regularly dust the cabinet interior and wipe down surfaces to prevent sawdust buildup, which can hide small parts and dull tool finishes. Vacuum out drawers and cleat systems.
- Hardware Checks: Over time, screws can loosen, and drawer slides might become stiff. Periodically check all fasteners and tighten as needed. Lubricate drawer slides and hinges with appropriate products (e.g., silicone spray for slides, light oil for hinges).
- Structural Integrity: Inspect for any signs of wear, such as cracked joints or warped panels. Address these issues promptly to prevent further damage.
- Tool Placement Review: Every few months, assess if tools are still in their optimal locations. As your workflow changes, you might find that some frequently used tools have shifted to less convenient spots. Reorganize as necessary.
Planning for Future Expansion and Adaptability
The beauty of a well-designed compact tool cabinet, especially one with modular elements, is its ability to adapt.
- Modular Systems: The French cleat system is inherently designed for expansion. As you acquire new tools, you can simply build new cleat-mounted holders to integrate them seamlessly. This approach aligns with the principles of designing modular and stackable woodcraft creating wine racks plant stands spice racks and storage solutions that adapt to different spaces and customer needs.
- Empty Space Allocation: During the initial design, it’s wise to leave some intentional “flex” space. This might be an empty drawer, a few blank cleat sections, or a shelf with adjustable pins. This prevents immediate overcrowding when new tools arrive.
- Consistent Design Language: If you anticipate building additional storage units in the future, try to maintain a consistent material choice, joinery style, and finish. This creates a cohesive and professional look throughout your small shop.
- Documentation: Keep a simple log or diagram of your cabinet’s layout. This makes it easier to remember where specific tools are stored and to plan future additions.
- Dedicated Space for New Tools: When purchasing a new tool, immediately consider where it will live in your cabinet. If a custom holder is needed, prioritize building it. Avoid the “temporary spot” that often becomes permanent clutter.
By integrating these maintenance and expansion strategies, your compact tool cabinet will remain a central, effective component of your small workshop, continually supporting your craft rather than hindering it.
Conclusion
Building a Compact Tool Cabinet: Vertical Storage Solutions and Modular Organization for Small Shops is more than just a woodworking project; it’s an strategic investment in your productivity, safety, and enjoyment of your craft. By embracing verticality, prioritizing modularity, and committing to thoughtful customization, even the most confined workshop can be transformed into a highly efficient and inspiring space. In 2026, the demand for intelligent small-space solutions continues to grow, making a well-organized compact tool cabinet an indispensable asset.
Start by meticulously assessing your current tools and space, then design a cabinet that maximizes vertical dimensions and incorporates versatile modular elements like French cleats and customizable drawer inserts. Choose durable materials like plywood and employ strong joinery techniques to ensure longevity. Finally, remember that organization is an ongoing process, regular maintenance and a proactive approach to expansion will keep your shop running smoothly for years to come. Take the first step today to reclaim your workspace and elevate your woodworking experience.