

The difference between a good woodworking project and an exceptional one often hinges on a few thousandths of an inch. For many seasoned woodworkers, achieving this level of accuracy consistently isn’t about owning the most expensive machines, but rather about mastering the art of Building Custom Woodworking Jigs for Specific Power Tools: Enhancing Precision and Repeatability. This article provides detailed plans and instructions for constructing specialized jigs tailored for specific power tools, such as router sleds for flawless joinery, table saw jigs for complex angles, and drill press jigs for repeatable holes, all designed to elevate your craftsmanship to a professional standard in 2026.
Key Takeaways

- Custom jigs dramatically increase precision and repeatability, ensuring professional-quality results on every project.
- Tailoring jigs to specific power tools (routers, table saws, drill presses) unlocks their full potential for complex tasks.
- Understanding core design principles like stability, accuracy, and ease of use is crucial for effective jig construction.
- Investing time in building quality jigs saves countless hours in rework and material waste.
- Embrace an iterative design process, testing and refining jigs to perfectly match your workflow and specific project needs.
The Transformative Power of Custom Router Jigs
Routers are incredibly versatile tools, capable of shaping edges, cutting dados, and even surfacing large slabs. However, their full potential is often unlocked only when paired with well-designed custom jigs. These jigs guide the router precisely, transforming freehand cuts into perfectly straight, square, or consistently angled operations.
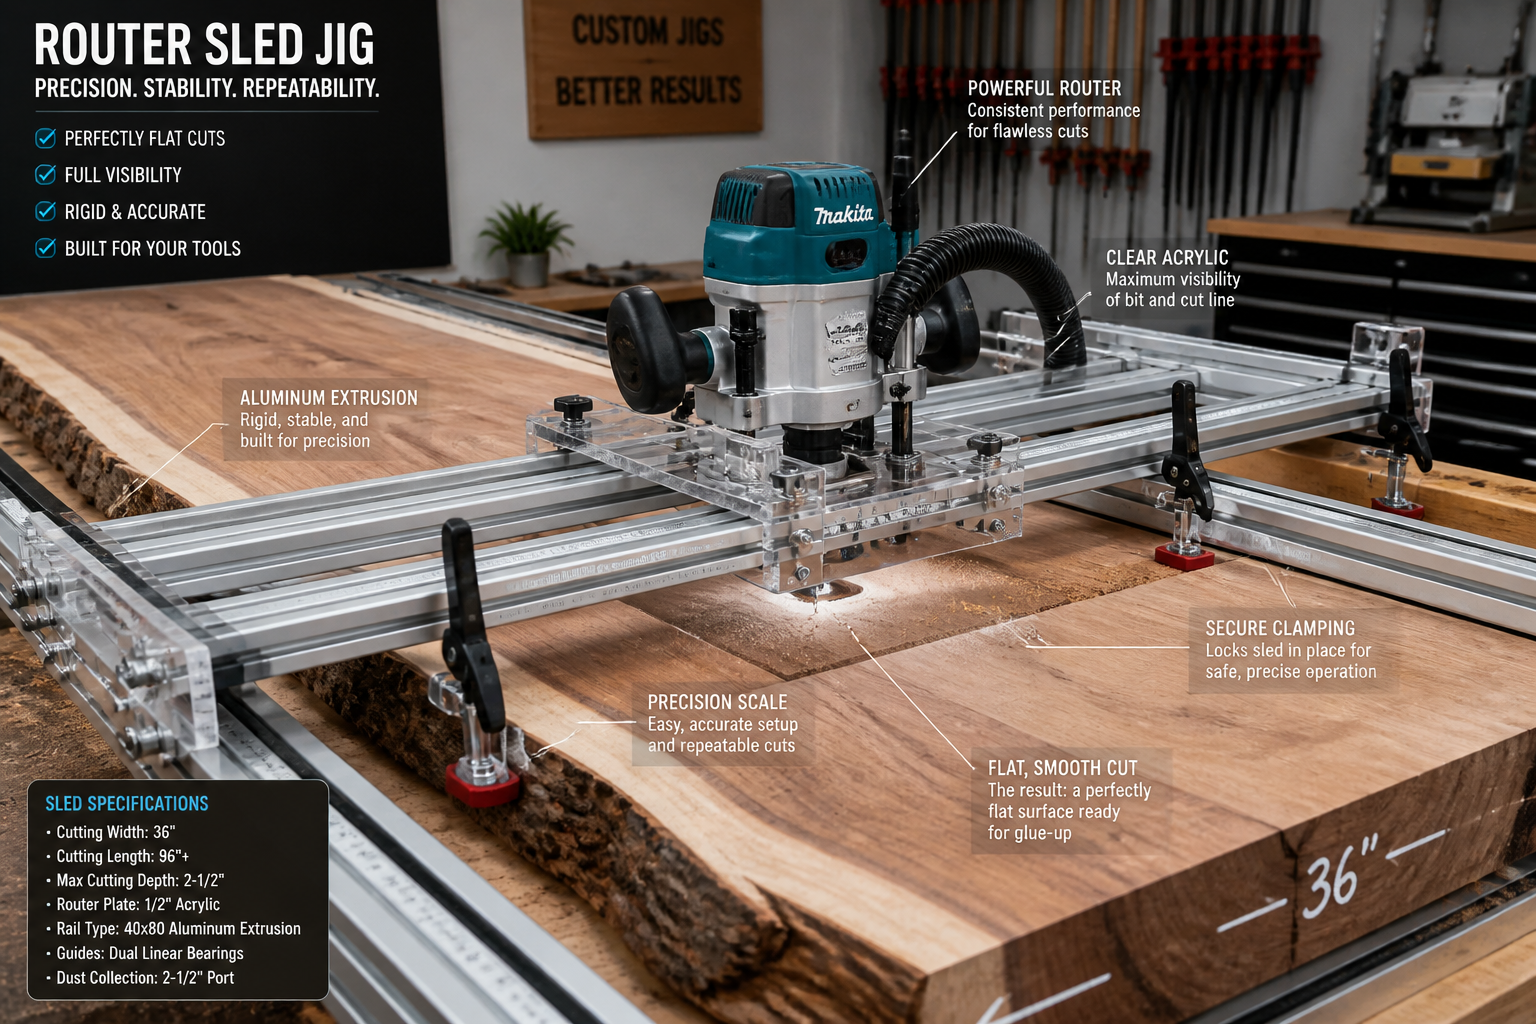
Consider the common challenge of surfacing a wide slab of wood, something too large for a planer. A custom router sled jig makes this task not only possible but straightforward, yielding a perfectly flat surface.
Anatomy of a Router Sled Jig
A typical router sled consists of several key components:
- Base Sled: A rigid platform, usually made from high-quality plywood or MDF, that the router mounts to. It should be wide enough to accommodate your router’s base.
- Rails/Runners: Two parallel rails that the base sled slides along. These rails sit on either side of your workpiece and must be perfectly parallel and level with each other.
- Support Blocks: Blocks used to elevate the rails above the workpiece, ensuring the router bit can clear the material.
- Clamping Mechanisms: Ways to secure your workpiece to your workbench or a separate sled, preventing movement during the routing process.
Building a Precision Router Sled
To build an effective router sled for flattening large panels, follow these steps:
- Material Selection: Use stable, flat material like 3/4″ Baltic birch plywood or MDF for the base sled and rails. Aluminum extrusions can also be used for the rails for ultimate precision and durability.
- Router Mounting: Create a sturdy, flush-mount system for your router in the base sled. This typically involves recessing the router base plate into the sled’s underside.
- Ensuring Parallelism: The most critical aspect is ensuring the rails are perfectly parallel and coplanar. Use a reliable straightedge and shims to achieve this. Fasten them securely to temporary support blocks.
- Adjustable Stops: Incorporate adjustable stops or clamps on the rails to control the length of the router pass, preventing accidental over-routing.
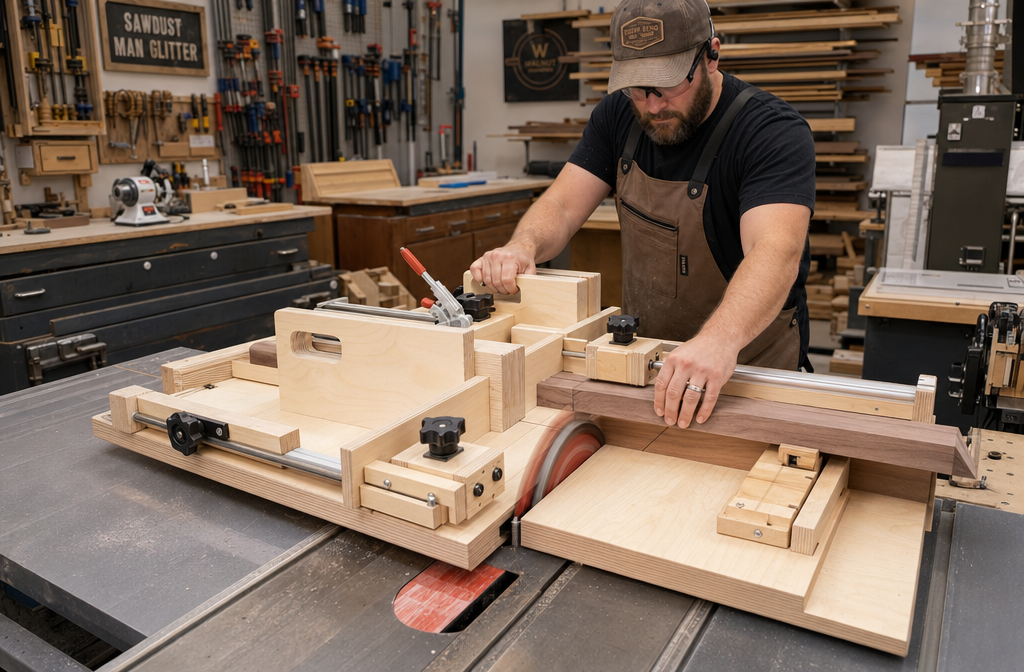
 A woodworker operates a router sled jig for precision flattening.
For intricate joinery, a jig that guides the router for specific cuts, like dovetails or mortise and tenon joints, is invaluable. For example, a simple edge-guiding jig for a router can help you achieve perfect rabbets and dados for cabinet construction, complementing skills learned from guides like Mastering Dovetail Joinery for Drawers: Hand and Router Methods.
Maximizing Table Saw Efficiency with Specialized Jigs
The table saw is the heart of most woodworking shops, but it’s often limited by its fences and miter gauges for specialized cuts. Custom jigs transform a standard table saw into a precision cutting machine, making complex operations like flawless crosscuts, accurate miters, and even compound angles repeatable and safe.
The Essential Crosscut Sled
A dedicated crosscut sled is arguably the most important jig for any table saw. It allows for perfectly square crosscuts on wide panels and enhances safety by keeping hands away from the blade.
Key Features of a Crosscut Sled:
| Feature | Description | Benefit |
|---|---|---|
| Stable Base | Large, flat plywood or MDF base that supports the workpiece fully. | Prevents tear-out and ensures squareness. |
| Runner Bars | Hardwood or UHMW plastic runners that slide smoothly in the miter slots. | Guides the sled precisely and prevents wobble. |
| Front Fence | A robust fence at the front of the sled that registers against the workpiece. | Provides a stable reference for cutting. |
| Rear Fence | A solid rear fence that prevents the workpiece from shifting. Often used for holding hold-downs. | Critical for safety and accurate registration. |
| Zero-Clearance Kerf | The blade cuts directly through the sled base, creating a perfectly matched kerf line. | Eliminates tear-out and provides a visual cutting line. |
| T-Track/Stop Blocks | Integrated T-tracks for stop blocks, allowing repeatable cuts of identical lengths. | Ensures consistency for multiple parts (e.g., when Building Robust Knife Blocks). |
Constructing a Precision Crosscut Sled:
- Cut the Base: Use 3/4″ Baltic birch plywood or MDF for the base. Ensure it’s perfectly square.
- Attach Runners: Mill hardwood runners to fit snugly in your table saw’s miter slots. Attach them to the underside of the base, ensuring they are parallel to each other and the front edge of the base.
- Install Fences: Attach the front and rear fences using glue and screws. The front fence should be perfectly square to the blade after it cuts its kerf. This can be fine-tuned using the “five-cut test.”
- Add Safety Features: Include a blade guard extension if needed and push blocks or hold-downs.
 A custom table saw sled jig for making miter cuts.
Jigs for Angled and Tapered Cuts
Beyond the standard crosscut sled, custom jigs are invaluable for creating specific angles or tapers. For instance, a simple tapering jig can be made from a piece of plywood with a cleat and toggle clamps, allowing you to cut consistent tapers for table legs or decorative elements. For more advanced techniques on using your table saw, consider resources like those on Mastering the Router Table: Beyond Basic Edges for Precision Joinery, which often highlights the synergy between various power tools.

Enhancing Drill Press Accuracy with Repeatable Jigs
While a drill press offers superior drilling precision compared to a hand drill, its full potential for repeatability is unlocked with custom jigs. These jigs ensure that holes are drilled in the exact same location, depth, and angle every single time, crucial for projects requiring precise alignment, such as dowel joinery or hardware installation.
Drill Press Table and Fence System
The foundation of any good drill press jig setup is a robust auxiliary table with an integrated fence system.
Building an Auxiliary Drill Press Table:
- Material: Use a thick piece of MDF or plywood (e.g., 1″ or two layers of 3/4″) for the table to prevent flex.
- Mounting: Design a way to quickly and securely clamp the auxiliary table to your drill press’s existing table.
- Sacrificial Insert: Incorporate a replaceable sacrificial insert in the center, directly under where the drill bit will pass. This prevents drilling into your main table and supports the workpiece to prevent tear-out.
- T-Tracks: Embed T-tracks into the table for attaching fences, stop blocks, and clamps.
Jigs for Repeatable Hole Placement
With a solid auxiliary table, you can create a variety of specialized jigs:
- Adjustable Fence with Stop Blocks: A simple fence clamped to the T-tracks on your auxiliary table, paired with movable stop blocks, allows you to drill multiple holes at precise distances from an edge or from each other. This is essential for projects like custom cabinetry or when Building Custom Woodworking Jigs for Specific Power Tools: Enhancing Precision and Repeatability.
- Dowel Drilling Jig: For perfect dowel holes, a jig that guides the drill bit precisely is critical. This might involve a block of hardwood with accurately drilled holes for guide bushings, which hold the drill bit perfectly vertical and in the correct position. A dedicated doweling jig can also be enhanced with custom stops or clamps for unique applications.
- Centering Jig: A V-block style jig is perfect for drilling precisely in the center of round or square stock.
- Mortising Jig: Although not strictly a drill press function, a drill press can be used with a mortising attachment or a jig to create clean mortises. A simple jig can hold the workpiece square and allow for repeatable plunge cuts to define the mortise.
 A drill press jig for repeatable dowel holes in action.
When Building Custom Woodworking Jigs for Specific Power Tools: Enhancing Precision and Repeatability, remember that thoughtful design in the planning stage saves significant time during construction and use. Always prioritize safety features and robust construction for longevity.
Essential Design Principles for Custom Jigs
Building effective custom woodworking jigs goes beyond simple construction; it requires a deep understanding of core design principles. Adhering to these principles ensures your jigs are not only functional but also safe, durable, and a joy to use.
Accuracy and Precision
The primary goal of any jig is to enhance accuracy. Every component must be cut and assembled with the utmost precision.
- Squareness and Flatness: All reference surfaces must be perfectly square and flat. Use accurate measuring tools and straightedges during construction.
- Zero-Clearance: Where possible, incorporate zero-clearance features, like a sacrificial insert on a table saw sled, to minimize tear-out and provide precise alignment.
- Minimal Play: Moving parts should have minimal slop or play to maintain accuracy. Fit should be snug but not binding.
Repeatability
A great jig allows you to make the same cut or drill the same hole multiple times with identical results.
- Positive Stops: Design jigs with positive stop blocks or indexing pins that allow for quick and accurate positioning of the workpiece.
- Consistent Clamping: Incorporate effective clamping mechanisms (toggle clamps, cam clamps) that hold the workpiece firmly and in the same position for each operation.
- Clear Markings: Add measurement scales or clear reference lines to assist in setup.
Safety
Jigs should always improve safety, not compromise it.
- Keep Hands Clear: Design jigs that position your hands away from blades and bits.
- Secure Workpiece: Ensure the workpiece is always firmly secured, preventing kickback or movement.
- Stable Footprint: Jigs should be stable and not prone to tipping or shifting during operation.
- Push Blocks/Handles: Integrate ergonomic handles or push blocks for safe handling and control.
Durability and Material Selection
A well-built jig should last for years, withstanding the rigors of workshop use.
- Stable Materials: Use stable, high-quality materials like Baltic birch plywood, MDF, or even solid hardwoods for core components. Avoid construction-grade plywood, which can warp.
- Hardware: Invest in quality hardware: T-bolts, knobs, toggle clamps, and durable fasteners.
- Finish: Apply a protective finish (polyurethane, shellac) to protect against moisture and wear.
Ease of Use and Setup
A complex jig that takes too long to set up defeats its purpose.

- Intuitive Design: Jigs should be straightforward to set up and operate.
- Quick Adjustments: If adjustments are necessary, they should be easy and quick to perform.
- Storage: Consider how the jig will be stored. Can it be hung? Does it store compactly? For more ideas on efficient workshop organization, check out DIY Smart Workshop Storage Solutions: Maximizing Space and Organization for Every Tool.
By consciously applying these design principles, you’ll ensure that your custom woodworking jigs are not just temporary fixes, but permanent, valuable assets in your shop that enhance your craftsmanship for years to come.
Conclusion
Building Custom Woodworking Jigs for Specific Power Tools: Enhancing Precision and Repeatability is more than just a technique; it’s a philosophy that empowers woodworkers to achieve unparalleled accuracy and consistency in their craft. In 2026, as woodworking tools and techniques continue to evolve, the ability to create bespoke solutions for specific tasks remains a hallmark of master craftsmanship. Whether you’re flattening a large slab with a router sled, cutting perfect miters on a table saw, or drilling repeatable dowel holes on a drill press, custom jigs are your pathway to professional-level results.
By understanding the design principles of accuracy, repeatability, and safety, and by applying practical construction techniques, you can transform your power tools into highly specialized, precision instruments. The initial investment of time and effort in building these jigs will be repaid many times over through reduced errors, improved project quality, and a more efficient and enjoyable woodworking experience. Start small, identify a recurring task that could benefit from a jig, and begin your journey toward unlocking a new level of precision and creativity in your workshop.
Actionable Next Steps:
- Assess Your Needs: Identify specific recurring tasks in your woodworking projects that could be improved with a custom jig (e.g., cutting multiple identical parts, complex angles, precise drilling).
- Start Simple: Begin with a fundamental jig, such as a crosscut sled for your table saw, to gain experience and confidence.
- Gather Materials: Collect stable, flat materials like Baltic birch plywood, MDF, and appropriate hardware.
- Plan and Design: Sketch out your jig ideas, considering the design principles discussed, and watch instructional videos or review plans from experienced woodworkers.
- Build and Refine: Construct your jig carefully, testing its accuracy and making adjustments as needed. Don’t be afraid to iterate and improve.
