
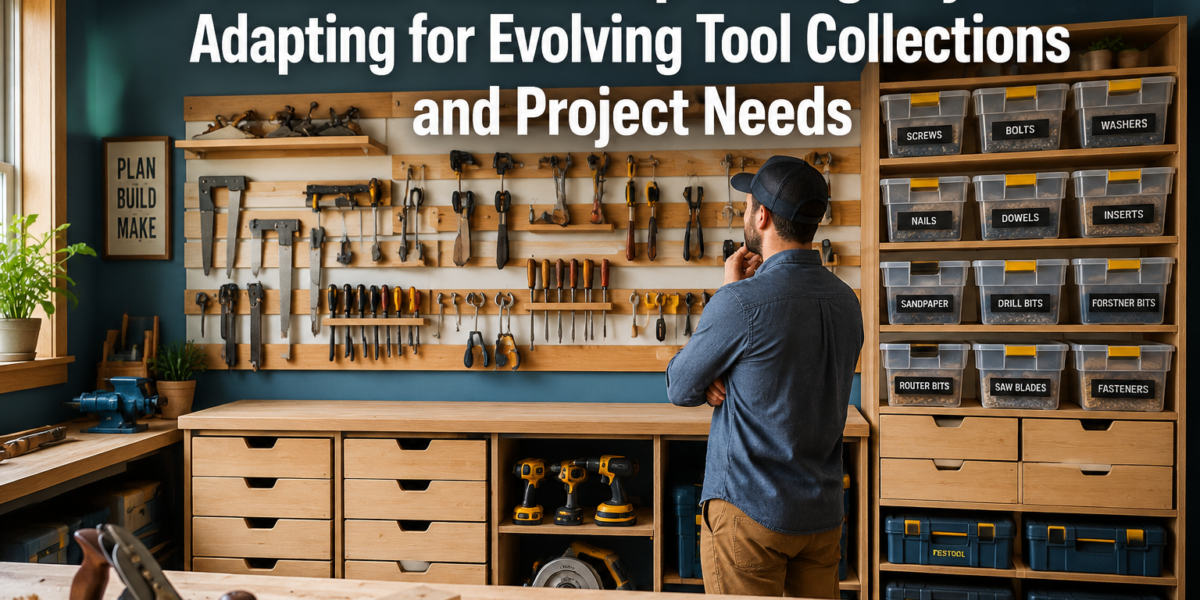

The average hobbyist woodworker accumulates tools at a surprising rate, often doubling their collection within five years. This rapid expansion, coupled with ever-changing project scopes, frequently leads to cluttered, inefficient workshop spaces that hinder productivity and dampen creative flow. The solution isn’t simply more storage, but smarter storage – specifically, DIY Modular Workshop Storage Systems: Adapting for Evolving Tool Collections and Project Needs. These flexible setups allow creators to easily reconfigure their space, ensuring every tool has a home and every project has the necessary room to flourish without a complete overhaul.
Key Takeaways
- Modular workshop storage systems are essential for accommodating growing tool collections and varied project demands.
- French cleat systems offer unparalleled flexibility for wall-mounted tools, allowing for easy repositioning and customization.
- Customizable drawer units and stackable bins provide adaptable solutions for smaller items, fasteners, and project-specific kits.
- Designing with adaptability in mind from the outset saves time, money, and frustration in the long run.
- Regular evaluation and reconfiguration of your storage system are crucial for maintaining an efficient and enjoyable workspace.
The Foundation of Flexibility: Understanding Modular Workshop Storage
A truly effective workshop isn’t just about the tools; it’s about how those tools are organized and accessed. As woodworking skills grow and new projects emerge, the demand for different tools and materials shifts. Traditional, static storage solutions quickly become obsolete, leading to disorganization and lost productivity. This is where DIY Modular Workshop Storage Systems: Adapting for Evolving Tool Collections and Project Needs shine.

Modular storage is built on the principle of interchangeable, reconfigurable units. Instead of fixed shelves or tool racks, think of components that can be easily moved, added, or removed to suit current requirements. This approach transforms a workshop from a rigid space into a dynamic, adaptable environment.
Why Go Modular? The Core Benefits
The advantages of adopting a modular mindset for your workshop are numerous:
- Adaptability: The primary benefit. As your tool collection grows or shrinks, or as you pivot from cabinetry to turning, your storage can adapt without requiring a complete rebuild.
- Space Optimization: Modular units often maximize vertical space and can be designed to fit awkward corners or under benches, making the most of every square inch.
- Enhanced Organization: By creating dedicated, flexible homes for tools and supplies, you reduce clutter and improve workflow.
- Cost-Effectiveness (Long Term): While the initial build might involve some planning, the ability to modify rather than replace storage units saves money over time.
- Customization: DIY solutions mean you tailor every aspect to your specific tools and work habits, something off-the-shelf options rarely provide.
- Improved Safety: A well-organized workshop reduces tripping hazards and ensures sharp tools are stored securely.
Consider a beginner woodworker who starts with basic hand tools and a few power tools. Over time, they might invest in a router table, a band saw, and a lathe. A modular system allows for the integration of new tool storage without disrupting existing arrangements. For instance, new router bits might require a dedicated drawer insert, while turning chisels might need a custom cleat holder on the wall. This organic growth is the hallmark of a successful modular system.
Common Modular Components for Your Workshop
The beauty of DIY modular systems is the vast array of components you can create and integrate. Here are some popular options:
- French Cleat Systems: A highly popular wall-mounted solution that uses angled cleats to hang various tool holders, shelves, and cabinets.
- Stackable Drawer Units: Individual or multi-drawer boxes that can be stacked, rearranged, or moved to different work surfaces.
- Mobile Cabinets/Carts: Units on casters that can be rolled to where they are needed, providing flexible storage and workspace.
- Pegboard/Slatwall Systems: While less flexible than French cleats, they offer good options for hanging smaller tools and accessories.
- Customized Bins and Organizers: Often made from wood or repurposed containers, these fit into drawers or onto shelves for small parts.

Designing Your DIY Modular Workshop Storage Systems: Adapting for Evolving Tool Collections and Project Needs
The planning phase is paramount when building flexible storage. Haphazard construction will only lead to future frustration. A thoughtful design considers current needs while anticipating future expansion and changes in your woodworking journey.
Step 1: Inventory and Assess Your Current Collection
Before cutting any wood, take stock. What tools do you have? How often do you use them? Group similar tools together.
- Hand Tools: Chisels, planes, saws, screwdrivers, wrenches.
- Power Tools: Drills, sanders, routers, circular saws, jigsaws.
- Stationary Tools: Table saw, band saw, miter saw (consider their dedicated space and if accessories need modular storage nearby).
- Consumables: Sandpaper, fasteners, glue, finishes.
- Project-Specific Items: Jigs, templates, specialized hardware.
Consider the “home” for each item. Does it need to be easily accessible, or can it be stored away? What are its dimensions? This assessment forms the blueprint for your modular units.
Step 2: Choose Your Core Modular System
While a hybrid approach is often best, selecting a primary system (or two) will guide your design.
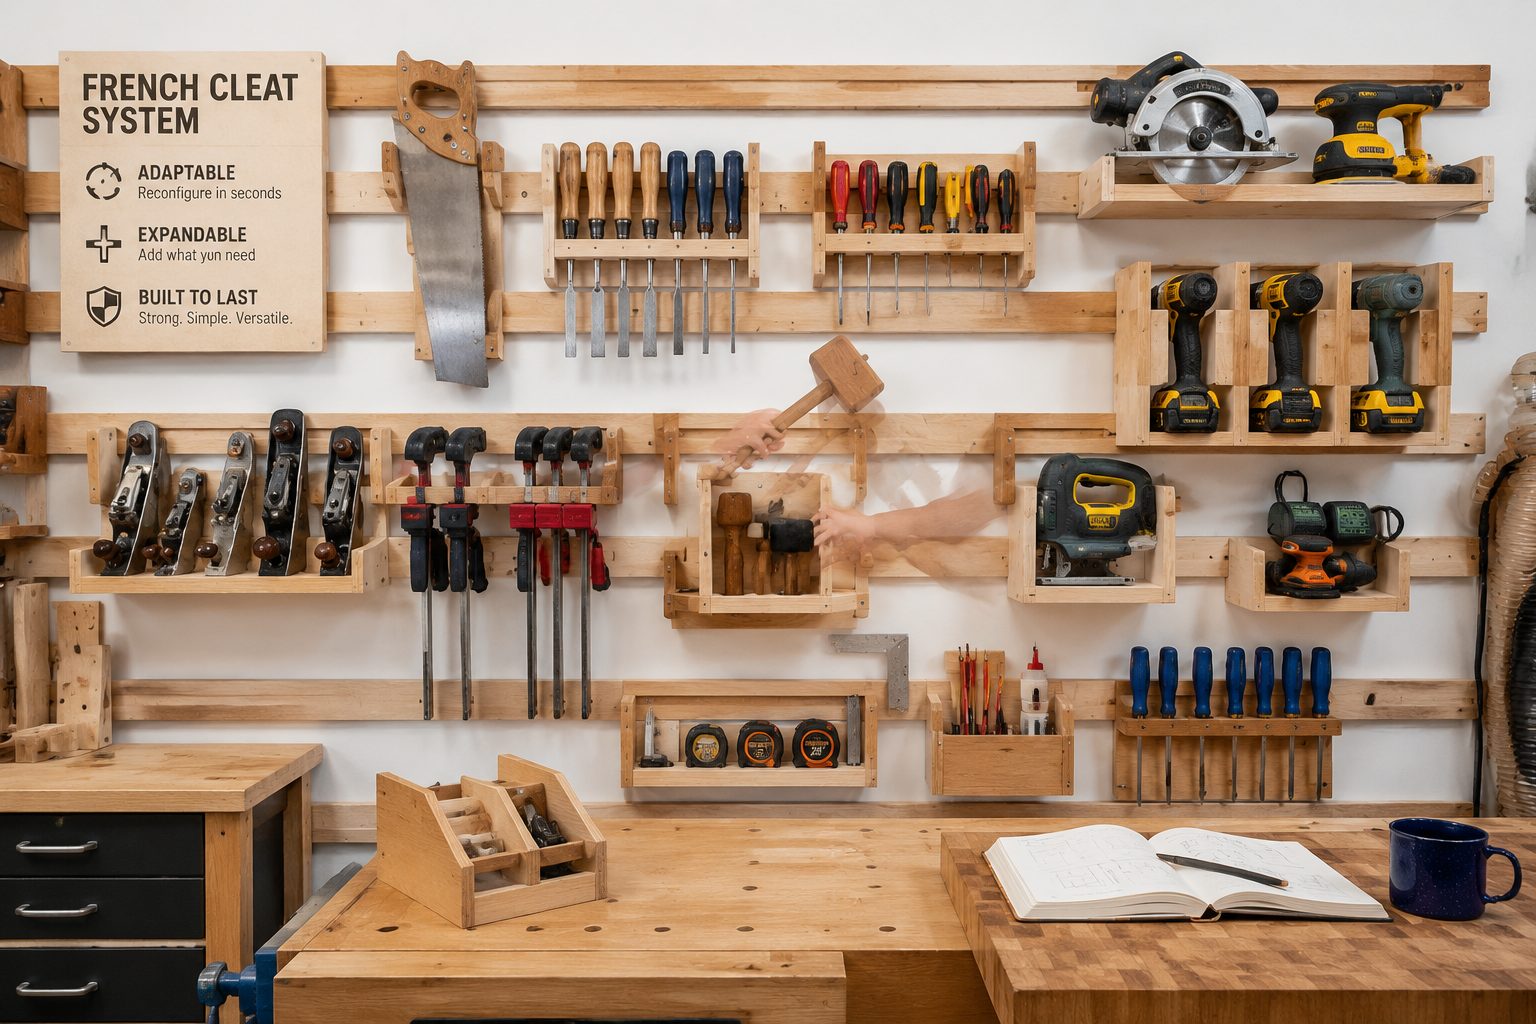
French Cleat Systems: The Ultimate in Wall Adaptability
For wall-mounted tools, French cleats are hard to beat. They consist of a wall-mounted strip with a 45-degree bevel and corresponding tool holders with a matching bevel. The holders simply hook onto the wall cleat and can be moved anywhere along the strip.
Advantages:
- Incredible flexibility: Move holders instantly.
- Space-saving: Utilizes vertical wall space effectively.
- Visibility: Tools are out in the open, easy to find.
- Customization: You can build specific holders for any tool imaginable.
Construction Tips:
- Use good quality plywood (e.g., 3/4-inch birch or maple) for the wall cleats and tool holders.
- Ensure accurate 45-degree cuts for a secure fit.
- Mount wall cleats firmly into studs for heavy tools.
- Start with basic holders (shelves, peg holders) and expand as needed.
- For more detailed guidance on specific projects like building a simple wooden bookshelf, consider how modular storage for your measuring and cutting tools could support such endeavors.
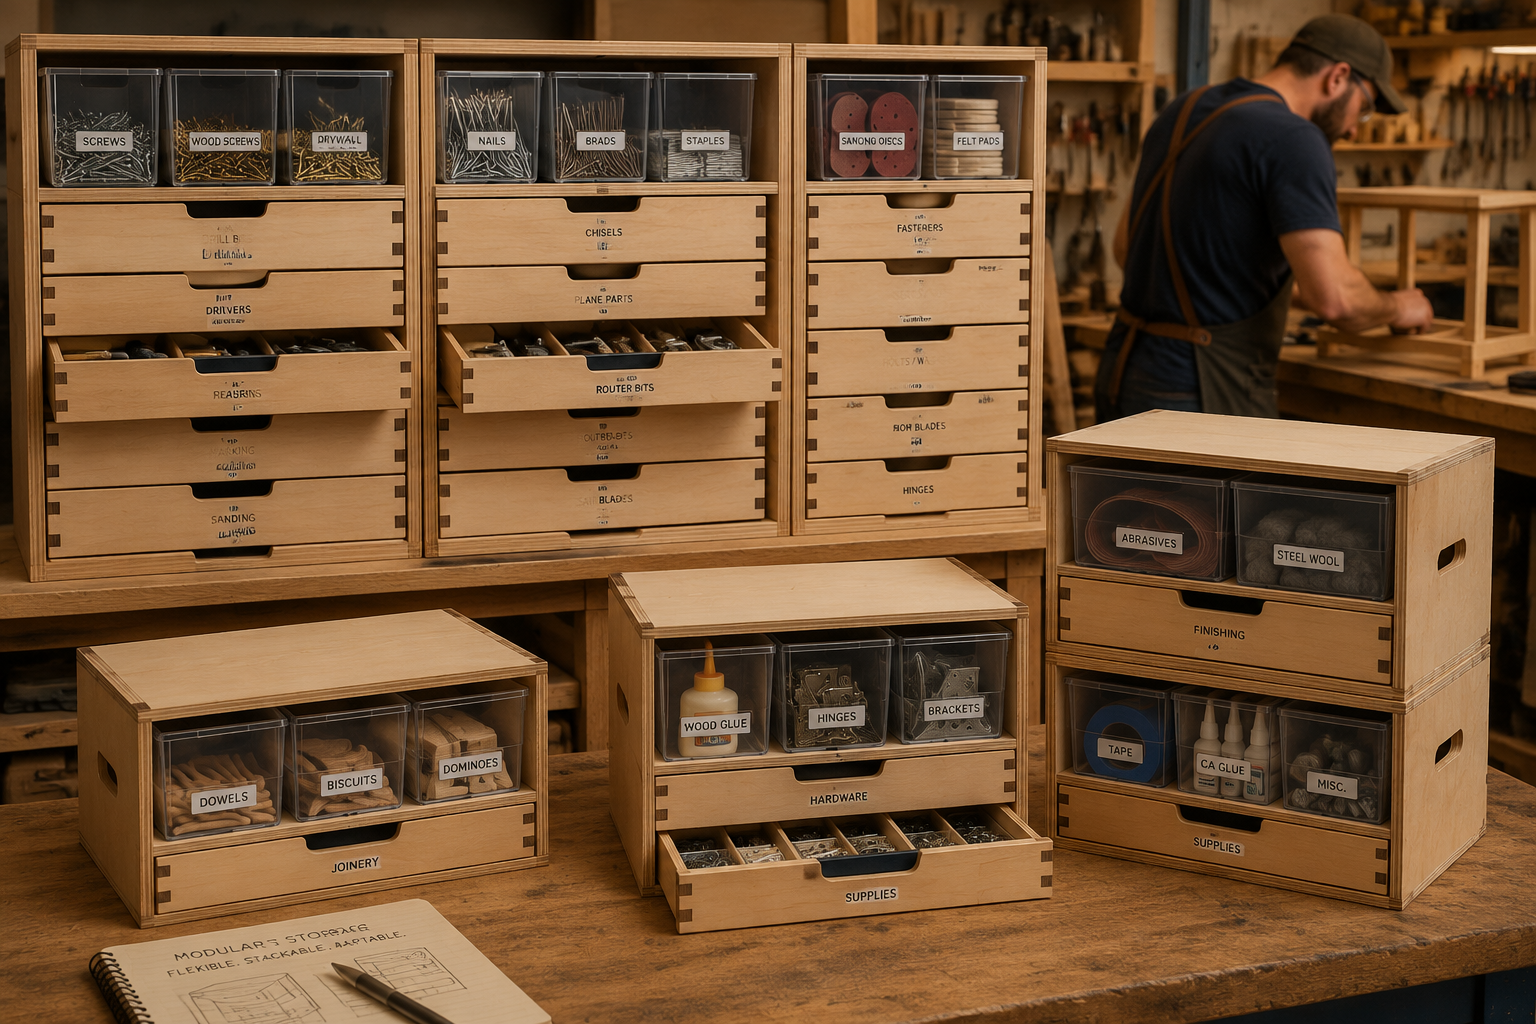
Customizable Drawer Units and Stackable Bins
For smaller items, fasteners, and project-specific kits, drawer units and bins offer excellent modularity.

Drawer Unit Considerations:
- Standardized Sizes: Design drawers to fit common dimensions so they can be interchanged or stacked easily.
- Drawer Inserts: Create removable dividers, small trays, or custom-fit foam inserts for specific tools or collections of fasteners. This allows you to reconfigure the drawer’s interior without rebuilding the entire unit.
- Mobility: Add casters to the bottom units or create standalone mobile cabinets. For instance, a mobile cart with drawers could hold all your sanding supplies, rolling right to your workbench when needed.
- For those working on detailed projects, DIY Modular Desk Organizers can provide inspiration for smaller, intricate storage solutions.
Stackable Bins:
- Clear Bins: Allow for quick identification of contents.
- Labeled: Essential for any bin system.
- Modular Dimensions: Choose or build bins that stack securely and can be arranged in various configurations on shelves or within cabinets.
- Dedicated Use: Design bins for specific project types (e.g., “electrical components,” “furniture hardware,” “scrap wood pieces” – even maximizing profit from scrap wood requires organized material!).

Step 3: Plan for Growth and Future Adaptations
The core principle of DIY Modular Workshop Storage Systems: Adapting for Evolving Tool Collections and Project Needs is future-proofing.
- Leave Room to Expand: Don’t fill every available wall or shelf immediately. Leave some empty wall cleat space, or design cabinets with future empty slots for more drawers.
- Standardized Dimensions: Where possible, standardize the width and depth of your modular units. This allows for easier swapping and rearrangement.
- Think “System,” Not “Singular Projects”: Each storage unit you build should be part of a larger, cohesive system. For example, if you build a mobile router table, consider how its integrated storage complements your wall cleats or drawer units.
- Consider Future Tools: If you anticipate purchasing a new major tool (e.g., a planer or joiner), mentally reserve a space for its accessories and related hand tools.
Step 4: Material Selection and Construction
Plywood is often the material of choice for modular workshop storage due to its stability, strength, and ease of workability. MDF can be used for drawer bottoms or less critical components, but avoid it for high-stress areas like cleat systems.
Joinery: Simple butt joints with screws and glue are often sufficient for workshop furniture. For more robust or aesthetically pleasing units, consider basic joinery like dadoes or rabbets, or even simpler techniques like pocket hole joinery. The ultimate guide to wood glue can help you select the best adhesive.
Finishing: A simple coat of polyurethane or paint will protect the wood from dust, grime, and moisture, making cleanup easier. For inspiration on finishes, exploring natural wood finishing techniques or rustic wood finishing techniques might be useful.
Implementing and Evolving Your Modular Storage System in 2026
Building the components is only half the battle. The true power of a modular system lies in its implementation and the ongoing process of adaptation.
Initial Setup and Organization
Once your modular components are built, it’s time to arrange them strategically.
- Zone Your Workshop: Group tools by function or project type. For instance, all measuring and marking tools in one section, cutting tools in another, and finishing supplies near a dedicated workbench.
- Frequency of Use: Place frequently used tools (drills, measuring tape, pencils) in the most accessible locations. Less frequently used tools (specialty planes, carving chisels) can be higher up or in deeper storage.
- Safety First: Ensure sharp or heavy tools are stored securely to prevent accidents. Power tools should have easily accessible power outlets.
- Label Everything: Clear labels on drawers, bins, and even specific cleat holders save immense time and reduce frustration. Consider using a label maker for consistency.
Adapting for Evolving Tool Collections
As your woodworking skills develop, so too will your tool arsenal.
- New Power Tool: Acquired a new jigsaw? Design a custom cleat holder for it, and perhaps a small drawer for its blades. Or, if it’s a larger tool, consider building a mobile cart with integrated storage.
- Specialized Hand Tools: Started doing intricate joinery? Your new set of dovetail saws and chisels might need a dedicated section on your French cleat wall, or a custom insert within a drawer unit. Mastering modern hand-cut joinery highlights the need for specialized tool organization.
- Bulk Consumables: If you start buying fasteners or sandpaper in larger quantities, you might need to build larger, dedicated bins or drawer units to accommodate them.
Adapting for Evolving Project Needs
Projects change. One month you might be building high-demand woodworking projects for 2026, and the next, children’s woodwork projects.
- Project-Specific Kits: Create “kits” in stackable bins or dedicated drawers. For example, a “Finishing Kit” could contain sandpaper, rags, gloves, and specific finishes. A “Dovetail Jig Kit” could hold the jig, specialized router bits, and setup blocks. These kits can be pulled out when needed and stored away cleanly.
- Temporary Work Zones: The beauty of mobile modular units is the ability to create temporary work zones. Roll your assembly table with integrated storage to the center of the shop, or bring your sanding station closer to your project.
- Seasonal Changes: If you engage in seasonal projects (e.g., outdoor furniture in summer, indoor decorative items in winter), you can easily reconfigure your storage to prioritize tools and materials relevant to the current season.
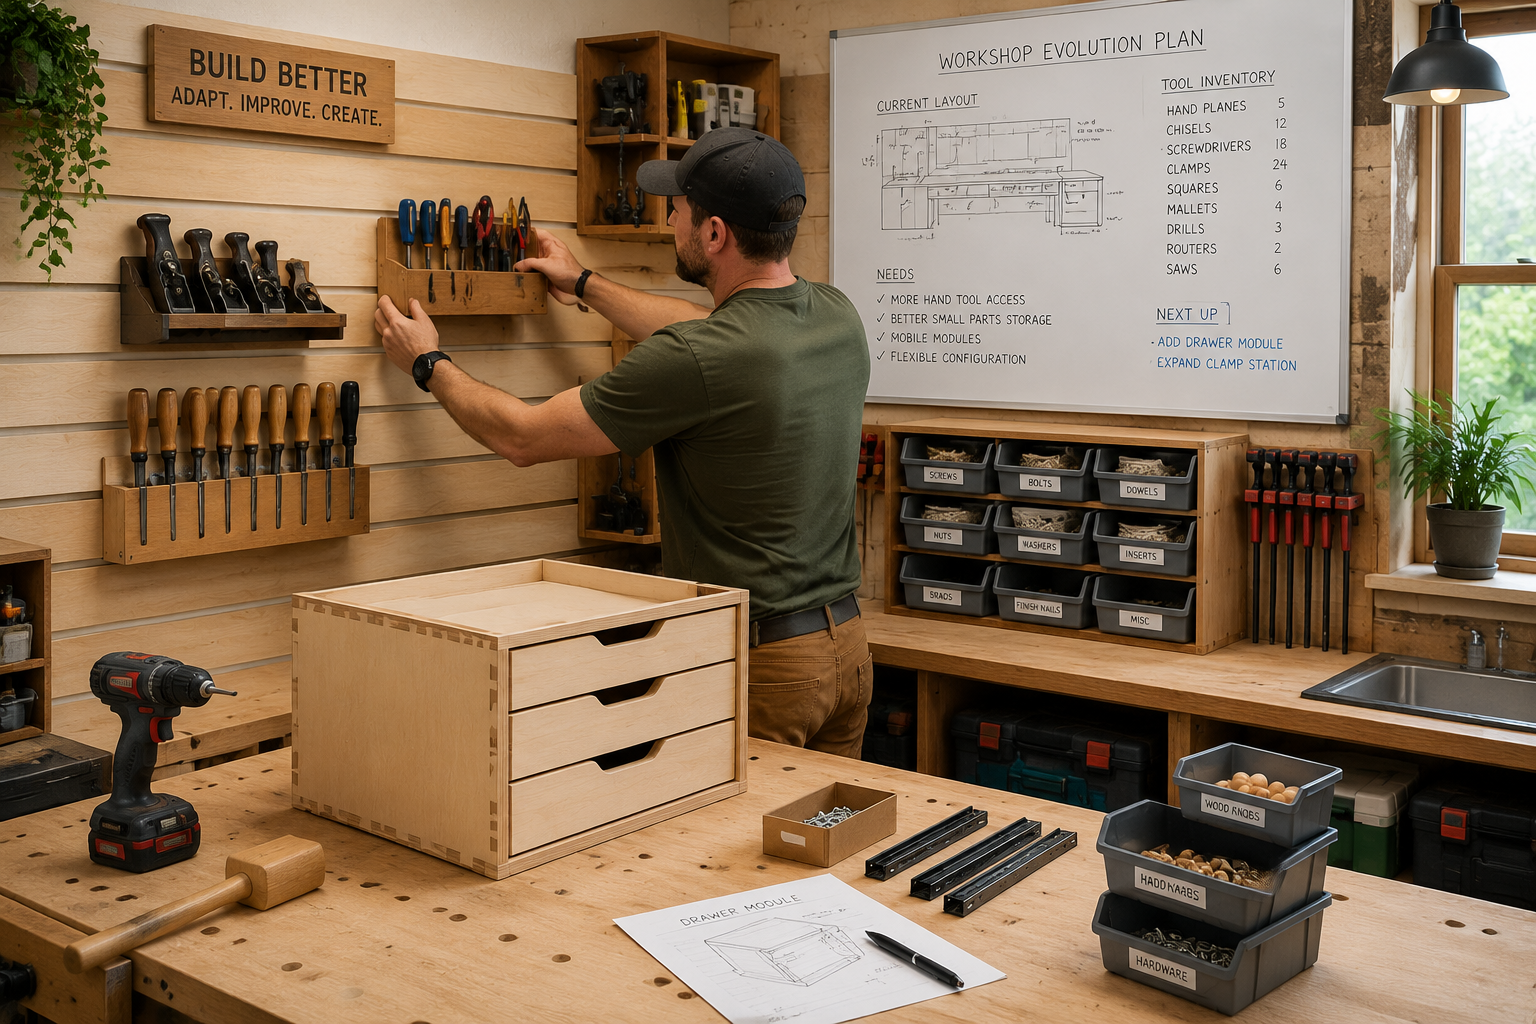
Regular Review and Refinement
Your modular system is not a set-it-and-forget-it solution. Schedule periodic reviews (e.g., quarterly or semi-annually) to assess its effectiveness.

- What’s working?
- What’s not? Is a tool always out of place? Does a particular process feel inefficient due to tool accessibility?
- What new tools have I acquired?
- What types of projects am I focusing on now?
Based on this review, make adjustments. Move cleat holders, rearrange drawers, build new inserts, or construct entirely new modules. This iterative process ensures your workshop remains a highly efficient and enjoyable place to create. You might even find inspiration from modular furniture design for woodworkers for larger-scale modularity.

Conclusion
The journey of a woodworker is one of continuous learning, acquiring new skills, and inevitably, new tools. A static workshop, designed for an earlier stage, will eventually become a bottleneck. By embracing DIY Modular Workshop Storage Systems: Adapting for Evolving Tool Collections and Project Needs, woodworkers can build a workspace that is as dynamic and adaptable as their craft. From flexible French cleat walls to versatile stackable drawer units and mobile carts, the principles of modularity empower you to create a personalized, efficient, and future-proof environment. Start by inventorying your tools, planning your core components, and then commit to the ongoing process of review and refinement. Your future self, surrounded by an organized and highly functional workshop, will thank you.
Actionable Next Steps:
- Inventory Your Tools: Create a detailed list of all your tools and materials.
- Sketch Your Layout: Draw a rough plan of your workshop, identifying potential zones for different tool types.
- Choose a Starting Point: Decide whether you’ll begin with a French cleat wall, a set of mobile drawer units, or stackable bins.
- Build Your First Module: Start small, build one or two modular units, and get comfortable with the concept.
- Iterate and Expand: Over time, continue to build, adapt, and refine your system, letting your workshop evolve with your skills and projects.
