


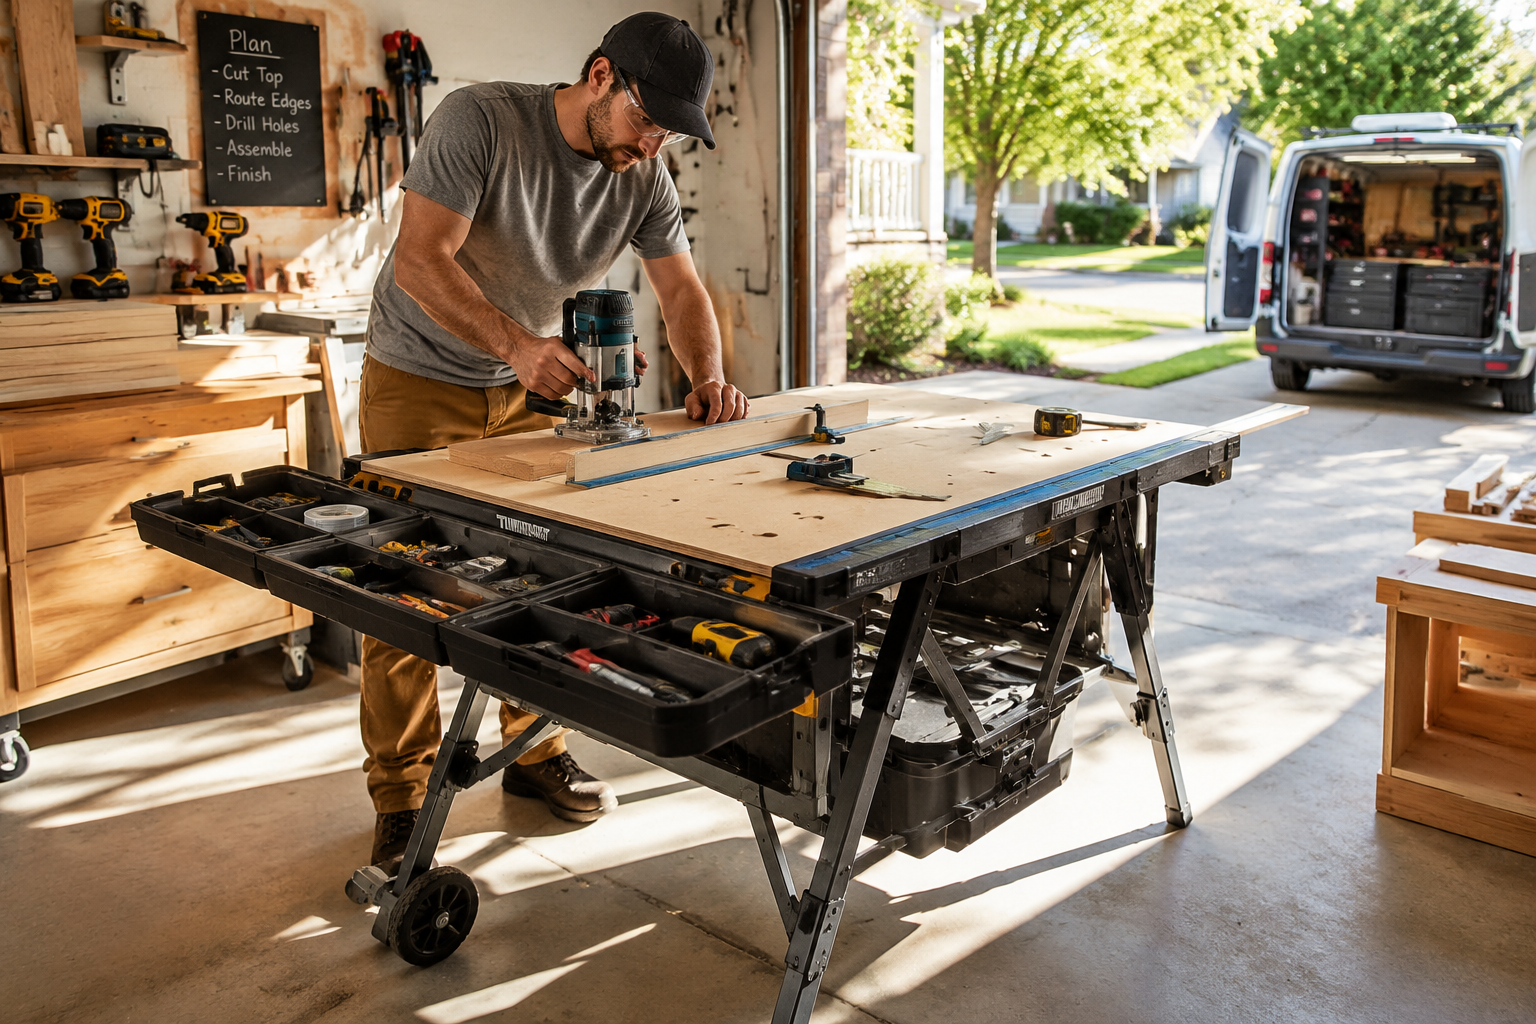
The average garage workshop in 2026 is often a multi-purpose space, shared with vehicles, seasonal storage, and other family demands. For woodworkers, this reality often means constantly setting up and breaking down equipment, leading to lost time and inefficient workflows. The solution? A thoughtfully designed portable folding workbench with integrated storage. This article explores how to design and construct a versatile, collapsible workbench that offers ample work surface, essential clamping options, and smart integrated storage, making it perfect for woodworkers who need to maximize space or work on-site, effectively transforming a space-constraint into a functional advantage.
Key Takeaways

- A portable folding workbench maximizes limited workshop space and enables on-site work.
- Integrated storage keeps essential tools organized and accessible, improving workflow.
- Key design elements include a robust folding mechanism, durable construction materials, and versatile clamping options.
- Careful material selection and joinery techniques ensure stability and longevity.
- Customization with accessories enhances functionality and adaptability for various woodworking tasks.
The Foundation: Designing Your Portable Folding Workbench with Integrated Storage
The true utility of a portable folding workbench lies in its design, which must balance strength, stability, portability, and storage capacity. Before cutting any lumber, a detailed plan is crucial. Consider the primary functions: a sturdy work surface, secure clamping, and organized tool storage.
Core Design Principles for Mobile Woodworkers
When embarking on the journey of Building a Portable Folding Workbench with Integrated Storage: Space-Saving Solutions for Mobile Woodworkers, several principles should guide your design process:
- Stability First: Even a portable workbench must be rock-solid during use. Focus on robust leg mechanisms, secure locking hinges, and a design that resists racking.
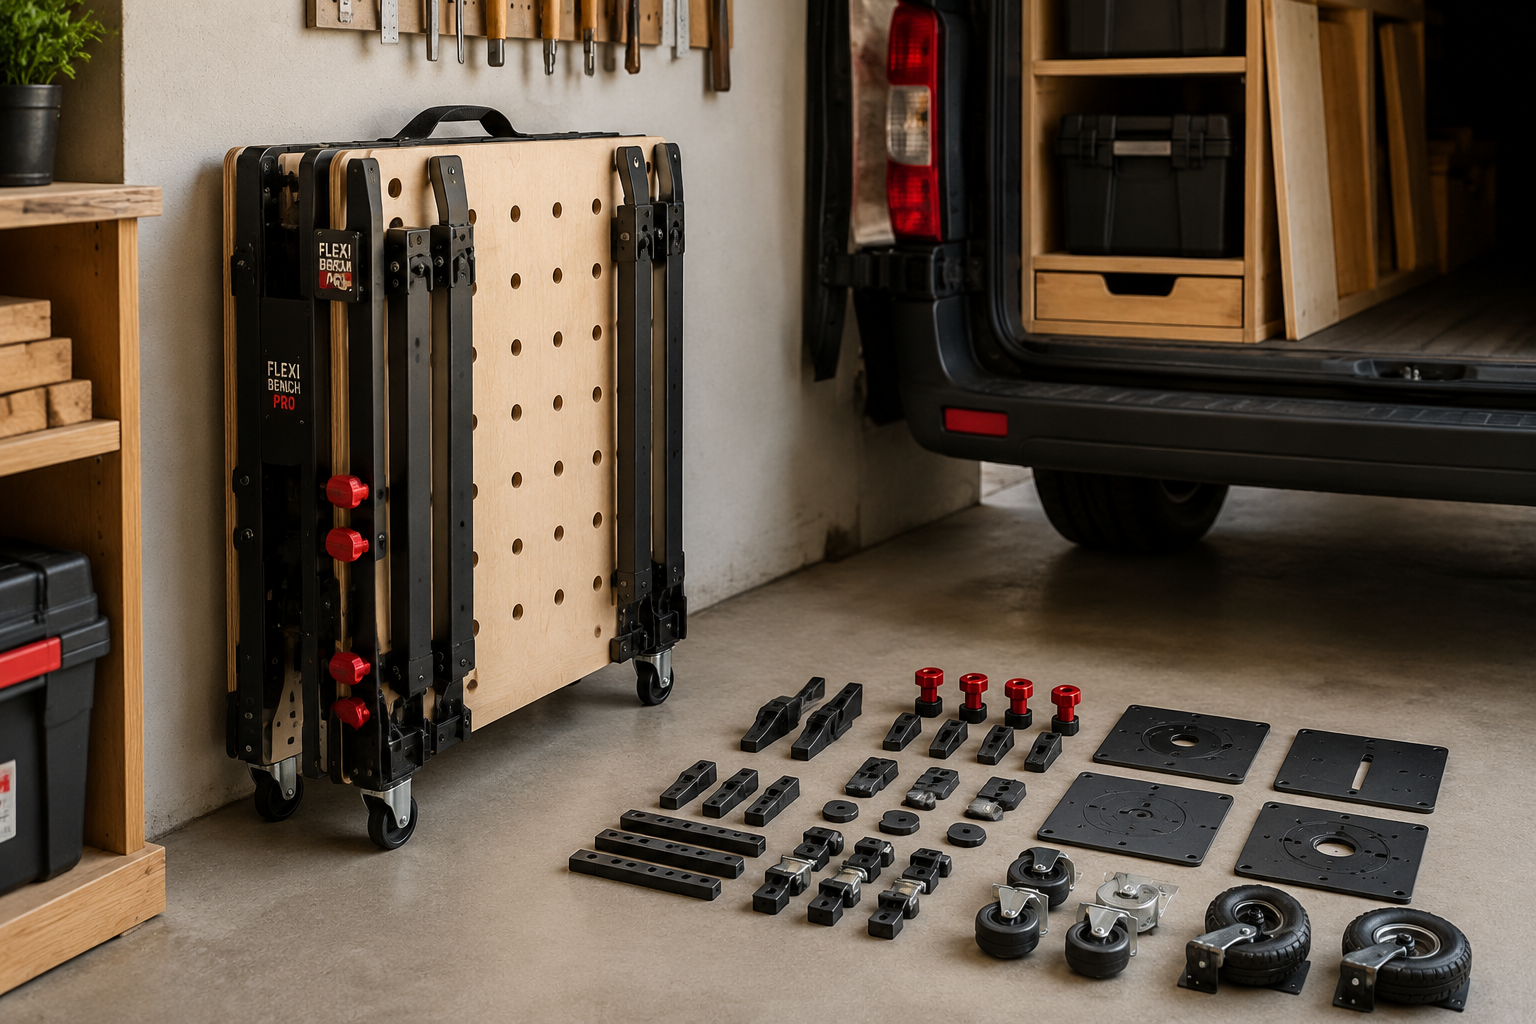
- Compact Foldability: The essence of “folding” means minimizing its footprint when not in use. This involves careful consideration of hinge placement and how components collapse.
- Integrated Storage: This is where efficiency shines. Think beyond a simple shelf. Incorporate drawers, cubbies, pegboards, or specific slots for frequently used tools like chisels, hand planes, and measuring devices. This eliminates the need for separate toolboxes and ensures everything is within arm’s reach.
- Work Surface Versatility: The top should accommodate various tasks. Consider a material that can withstand abuse, yet also be smooth enough for fine work. Dog holes are a must for clamping flexibility.
- Ergonomics: The working height should be comfortable for you, reducing strain during long periods of work. Adjustable height features can be a significant advantage.
Material Selection: Durability Meets Portability
Choosing the right materials is paramount for a workbench that endures while remaining manageable to move.
- Plywood (Baltic Birch or High-Grade Hardwood Plywood): Excellent for the top and cabinet components due to its stability, strength, and relatively light weight compared to solid lumber. A minimum of 3/4-inch thickness is recommended for the top.
- Solid Hardwood (Maple, Ash, Oak): Ideal for legs, rails, and any parts requiring maximum rigidity and wear resistance. These add strength but also weight, so use judiciously.
- Hardware: Heavy-duty locking hinges (folding leg braces), robust casters (two fixed, two swivel with brakes), drawer slides, and fasteners are critical. Do not skimp on hardware quality.

A potential design could involve a central cabinet structure that houses drawers and shelves, with two hinged work surfaces extending from the sides. The legs would also be hinged, folding inward to tuck beneath the main cabinet when collapsed. For inspiration on maximizing small spaces, consider strategies discussed in “Smart Workshop Storage Solutions: Maximizing Small Spaces with Modular Systems and DIY Organizers” (Smart Workshop Storage Solutions: Maximizing Small Spaces with).
Table: Workbench Material Considerations
| Component | Recommended Material | Key Benefits |
|---|---|---|
| Workbench Top | 3/4″ Baltic Birch Plywood | Stable, flat, durable, good screw retention |
| Cabinet Carcass | 3/4″ Hardwood Plywood | Strong, stable, less prone to warping |
| Legs/Frame | Solid Hardwood (Maple/Ash) | Maximum rigidity, wear resistance, impact proof |
| Drawers | 1/2″ or 5/8″ Plywood | Lightweight, stable, easy to work with |
| Hardware | Heavy-Duty Steel Hinges, Casters | Longevity, smooth operation, secure locking |
Construction Techniques for a Stable and Collapsible Workbench
Once the design is finalized, the construction phase demands precision and careful execution to ensure a stable yet easily collapsible workbench.
Building the Workbench Top and Frame
The work surface is the heart of the workbench. It needs to be flat, durable, and ready for clamping.
- Cutting the Top: Cut two pieces of 3/4-inch plywood for the main work surface and a smaller piece for the central fixed section if using a split-top design. Laminate two pieces of plywood for a thicker, more rigid top (e.g., 1.5 inches total) for enhanced durability.
- Adding Dog Holes: Precisely drill 3/4-inch dog holes into the workbench top, typically on a 4-inch grid. These allow for versatile clamping with bench dogs and holdfasts.
- Constructing the Frame: Build a sturdy frame for the workbench top using solid hardwood or robust plywood. This frame will house the folding leg mechanisms and provide attachment points for the main cabinet. Strong joinery, such as mortise and tenon or robust pocket screw joinery reinforced with glue, is crucial here. For durable joinery, referencing resources like “Mastering Dovetail Joints with Hand Tools: A Step-by-Step Guide for Flawless Wood Joinery” (Mastering Dovetail Joints with Hand Tools: A Step-by-Step Guide for) can be beneficial.
Integrating Storage: Drawers, Shelves, and Compartments
The “integrated storage” aspect is what truly differentiates this workbench.
- Central Cabinet: Construct a central cabinet from plywood, sized to fit underneath the main work surface. This cabinet will be the anchor for your storage.
- Drawers: Install smooth-gliding drawer slides for tool drawers. Consider full-extension slides for easy access. Customize drawer inserts with dividers or foam cutouts for specific tools.
- Shelves and Cubbies: Create adjustable shelves or fixed cubbies for larger items, bins, or power tools. A small section of pegboard on one side of the cabinet can also add flexible storage for frequently used hand tools.
- Dedicated Tool Slots: Design specific slots or compartments for tools like saws, squares, or long rulers to keep them secure during transport.
“A well-designed portable workbench doesn’t just hold your project; it organizes your entire workflow, making every cut and joint more efficient.”
The Folding Mechanism and Mobility
The folding legs are key to portability.
- Leg Construction: Build sturdy leg assemblies, ideally from solid hardwood, using strong joinery. Each leg assembly should be designed to pivot smoothly.
- Hinge System: Attach heavy-duty locking hinges (folding leg brackets) to the legs and the workbench frame. Ensure these hinges lock securely in both the open and closed positions to prevent accidental collapse.
- Casters: Install robust casters on one side of the leg assemblies or directly on the cabinet base. Two fixed casters and two swivel casters with brakes provide excellent mobility and stability when locked. For advice on optimizing your workshop setup for mobility, see “Creating Ergonomic Workshop Furniture: Building Custom Workbenches,” (Creating Ergonomic Workshop Furniture: Building Custom Workbenches,).
Customization and Enhancements for Your Mobile Woodworking Needs
Once the basic structure is complete, customizing your portable folding workbench elevates its functionality for your specific woodworking style.
Maximizing Clamping Options
Beyond the standard dog holes, consider these enhancements:
- Front Vise: While adding complexity, a small, quick-release front vise can be a game-changer for hand tool work. Ensure its mounting doesn’t interfere with the folding mechanism.
- Veritas-style Holdfasts: These are invaluable for quick clamping on dog-holed tops.
- Bench Dogs with Different Profiles: Round, square, and adjustable bench dogs expand clamping capabilities.
Tool Organization Within the Integrated Storage
The true benefit of integrated storage is optimizing accessibility.
- Custom Drawer Inserts: Use plywood or foam to create custom compartments for chisels, screwdrivers, wrenches, and other small hand tools. This protects them and makes them easy to find.
- Magnetic Strips: Install magnetic strips inside cabinet doors or on the sides of drawers for holding small metal tools, drill bits, or fasteners.
- Bit and Fastener Organizers: Dedicate specific drawers or sections for drill bits, screws, nails, and other consumables, perhaps using small plastic bins or custom-made wooden trays.
Portability and Durability Enhancements
To ensure your workbench withstands the rigors of mobile use:

- Protective Finish: Apply a durable finish to all surfaces, especially the workbench top. Multiple coats of polyurethane or epoxy will protect against spills, scratches, and dings.
- Edge Banding: Apply sturdy edge banding to all plywood edges for added durability and a professional look.
- Heavy-Duty Handles: Install robust handles on the main cabinet or workbench sides for easier lifting and maneuvering when folded.
- Leveling Feet: If not using casters or for added stability, adjustable leveling feet can compensate for uneven surfaces.
Building a Portable Folding Workbench with Integrated Storage: A Project for the Future
This type of workbench is more than just a surface; it’s a mobile command center for your woodworking. By carefully considering your needs, selecting quality materials, and applying sound construction techniques, you can create a tool that not only saves space but also enhances your efficiency and enjoyment of woodworking, whether in a compact home workshop or on a client’s site. For more advanced workshop improvements, explore concepts in “DIY Smart Workshop Storage Solutions: Maximizing Space and Organization for Every Tool” (DIY Smart Workshop Storage Solutions: Maximizing Space and). This project aligns perfectly with the trend of maximizing utility in smaller footprints, a common theme in modern woodworking and DIY culture, even seen in projects like “Building a Custom Murphy Bed with Integrated Desk: Space-Saving” (Building a Custom Murphy Bed with Integrated Desk: Space-Saving).
Conclusion
Building a portable folding workbench with integrated storage is a transformative project for any woodworker facing space constraints or requiring on-site mobility. The effort invested in thoughtful design, careful material selection, and precise construction yields a highly functional tool that not only provides a stable work surface and efficient storage but also adapts seamlessly to various working environments. By incorporating robust folding mechanisms, versatile clamping options, and custom tool organization, you create a workbench that is a true extension of your craft. This investment in your workshop infrastructure will enhance productivity, minimize setup time, and ultimately allow you to focus more on the joy of woodworking. Start planning your custom build today to unlock a more organized and flexible woodworking future in 2026.
SEO Meta Title: Build a Portable Folding Workbench with Integrated Storage
SEO Meta Description: Maximize space & efficiency! Learn to build a portable folding workbench with integrated storage for mobile woodworkers in 2026.
