

The average household in the United States dedicates approximately 2,000 square feet to living space, yet the demand for craftsmanship in spaces a thousand times smaller continues to grow exponentially. This pursuit of precision in minuscule dimensions defines the niche of “minicraft” woodworking, a domain where every cut, joint, and finish demands exacting attention. Mastering Small-Scale Woodworking: Precision Techniques for Miniature Furniture and Dollhouse Builds is not merely a hobby; it is a discipline that refines a woodworker’s skills to an unprecedented degree, translating into exquisite, detailed creations for miniature furniture and dollhouse builds. This article will delve into the essential tools, advanced joinery, and specialized finishing techniques required to excel in this captivating craft, ensuring your tiny projects possess monumental quality in 2026.
Key Takeaways
- Specialized Tools are Essential: Standard woodworking tools are too large; micro-sized hand tools, precision measuring devices, and specialized power tools like small CNC machines are crucial.
- Precision Joinery is Paramount: Traditional joinery techniques are scaled down, requiring meticulous marking, cutting, and assembly to create strong, seamless miniature connections.
- Material Selection Matters: Choosing appropriate wood species (e.g., basswood, balsa, fine-grained hardwoods) and understanding their characteristics is vital for stability and workability at small scales.
- Finishing Requires Finesse: Applying finishes to miniature pieces demands careful technique, often involving multiple thin coats and specialized applicators to achieve a flawless, scaled appearance.
- Patience and Practice: Mastery in small-scale woodworking comes from an iterative process of learning, practicing, and refining techniques, embracing the challenges of working in miniature.
Essential Tools for Mastering Small-Scale Woodworking: Precision Techniques for Miniature Furniture and Dollhouse Builds
Embarking on miniature woodworking requires a fundamentally different approach to tools compared to full-scale projects. The sheer reduction in size necessitates specialized equipment designed for accuracy and delicate handling. Without the right implements, achieving the precision demanded by miniature furniture and dollhouse builds becomes an exercise in frustration.
Firstly, cutting tools are paramount. A jeweler’s saw or a fine-toothed razor saw is indispensable for making clean, precise cuts in thin stock. These saws feature incredibly thin blades that minimize kerf, crucial for maintaining dimensional accuracy in tiny components. Scalpels and craft knives with various blade shapes are also vital for trimming, paring, and shaping details that larger chisels cannot address. When working on intricate designs, consider a scroll saw with very fine blades for detailed curve cutting. For those looking to explore digital fabrication in miniature, Small CNC and Laser Cutter Mastery Jigs Templates and Detail Work For Home Workshops can revolutionize precision and repeatability.
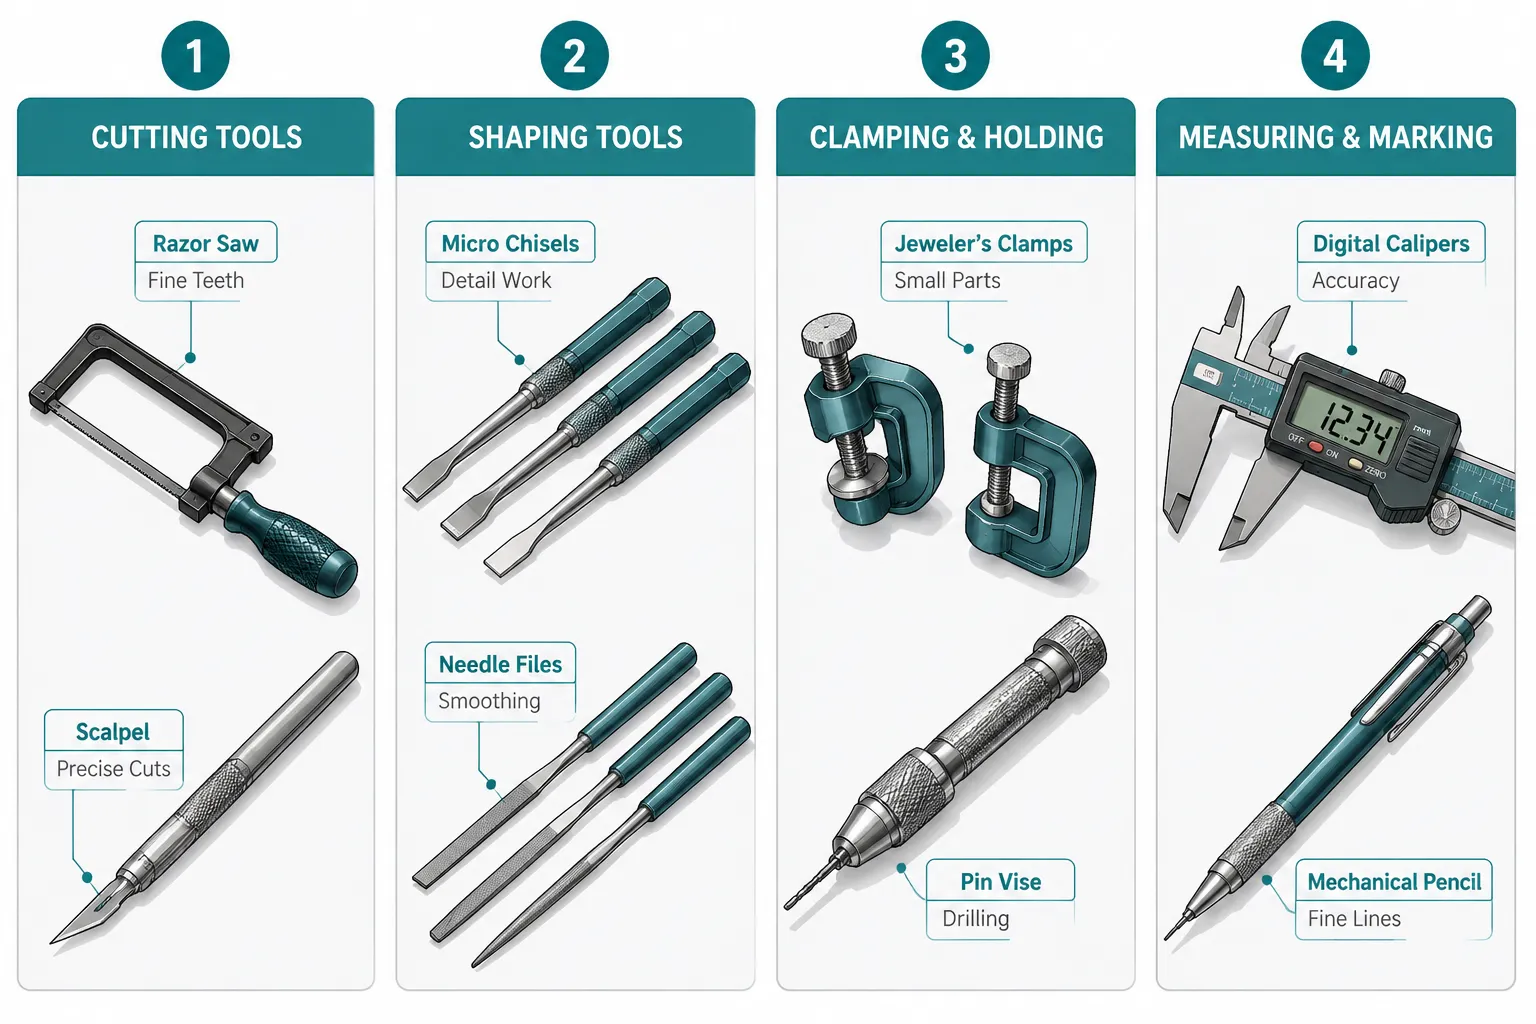
Shaping and carving tools transition from robust chisels to delicate micro-chisels and carving tools. Sets often include gouges, V-tools, and straight chisels scaled down to fractions of an inch, allowing for intricate detailing on chair legs, moldings, or decorative elements. Needle files, in various profiles (round, half-round, square, flat, triangular), are essential for refining edges, smoothing surfaces, and shaping tiny curves.
Measuring and marking tools demand absolute precision. Standard tape measures are useless here. Instead, invest in a good set of digital calipers, capable of measuring down to 0.001 inches (or 0.01 mm), along with a machinist’s rule or a flexible metal ruler marked in 64ths or 128ths of an inch. A sharp mechanical pencil with very fine lead (0.3mm or 0.5mm) is necessary for marking precise cut lines that disappear easily with light sanding. A magnifying lamp or jeweler’s loupe is also highly beneficial for inspecting your work.
Clamping and holding mechanisms are equally critical. Traditional bar clamps are overkill. Miniature clamps, often resembling jeweler’s clamps or spring clamps with padded jaws, are perfect for securing tiny assemblies while glue dries. Pin vises and specialized miniature vises allow you to hold small pieces securely for drilling or detailed work. These small workshop accessories are critical for maintaining stability during delicate operations.
Finally, sanding and finishing tools include a range of fine-grit sandpaper (from 220 up to 2000 grit) often cut into tiny strips or wrapped around small sanding sticks. Micro-brushes, cotton swabs, and toothpicks become your primary applicators for stains, paints, and clear finishes, allowing for controlled application in tight spaces. A dust collection system, even a small, localized one, is crucial for maintaining a clean workspace and protecting delicate finishes from dust particles. Check out guides on DIY Compact Dust Collection System for Small Workshops: Building Cyclone Separators and Portable Collectors for ideas on how to manage this in a compact setup.
| Tool Category | Specific Tools | Key Feature for Miniature Work |
|---|---|---|
| Cutting | Jeweler’s saw, razor saw, scalpel, craft knife | Fine teeth, thin blades for minimal kerf |
| Shaping/Carving | Micro-chisels, needle files, mini carving tools | Small size, precise control for fine details |
| Measuring/Marking | Digital calipers, machinist’s rule, fine pencil | High accuracy (0.001″), fine lines |
| Clamping/Holding | Miniature clamps, pin vise, miniature vise | Gentle, secure grip on tiny parts |
| Sanding/Finishing | Fine-grit sandpaper, micro-brushes, cotton swabs | Abrasive variety, controlled application |
Advanced Joinery for Miniature Furniture and Dollhouse Builds
Achieving structural integrity and aesthetic perfection in small-scale woodworking hinges on mastering joinery techniques. While the principles remain the same as full-size furniture, the execution requires amplified precision and often, a magnifying glass. When Mastering Small-Scale Woodworking: Precision Techniques for Miniature Furniture and Dollhouse Builds, traditional joinery is scaled down, demanding a meticulous hand.
Mortise and Tenon Joints are a cornerstone of robust furniture construction, even in miniature. For miniature chair legs or table aprons, these joints provide exceptional strength. The challenge lies in cutting the tiny mortises and tenons accurately. Use a fine-toothed razor saw for the tenon cheeks and a micro-chisel to pare out the mortise. Drilling pilot holes with a pin vise can help initiate the mortise, but the final shaping must be done with extreme care. Learning to build your first mortise and tenon joints by hand, even at full scale, provides an invaluable foundation for miniature work. You can explore a Building Your First Mortise and Tenon Joints by Hand: Step-by-Step Techniques for Heirloom-Quality Furniture guide for detailed instruction.
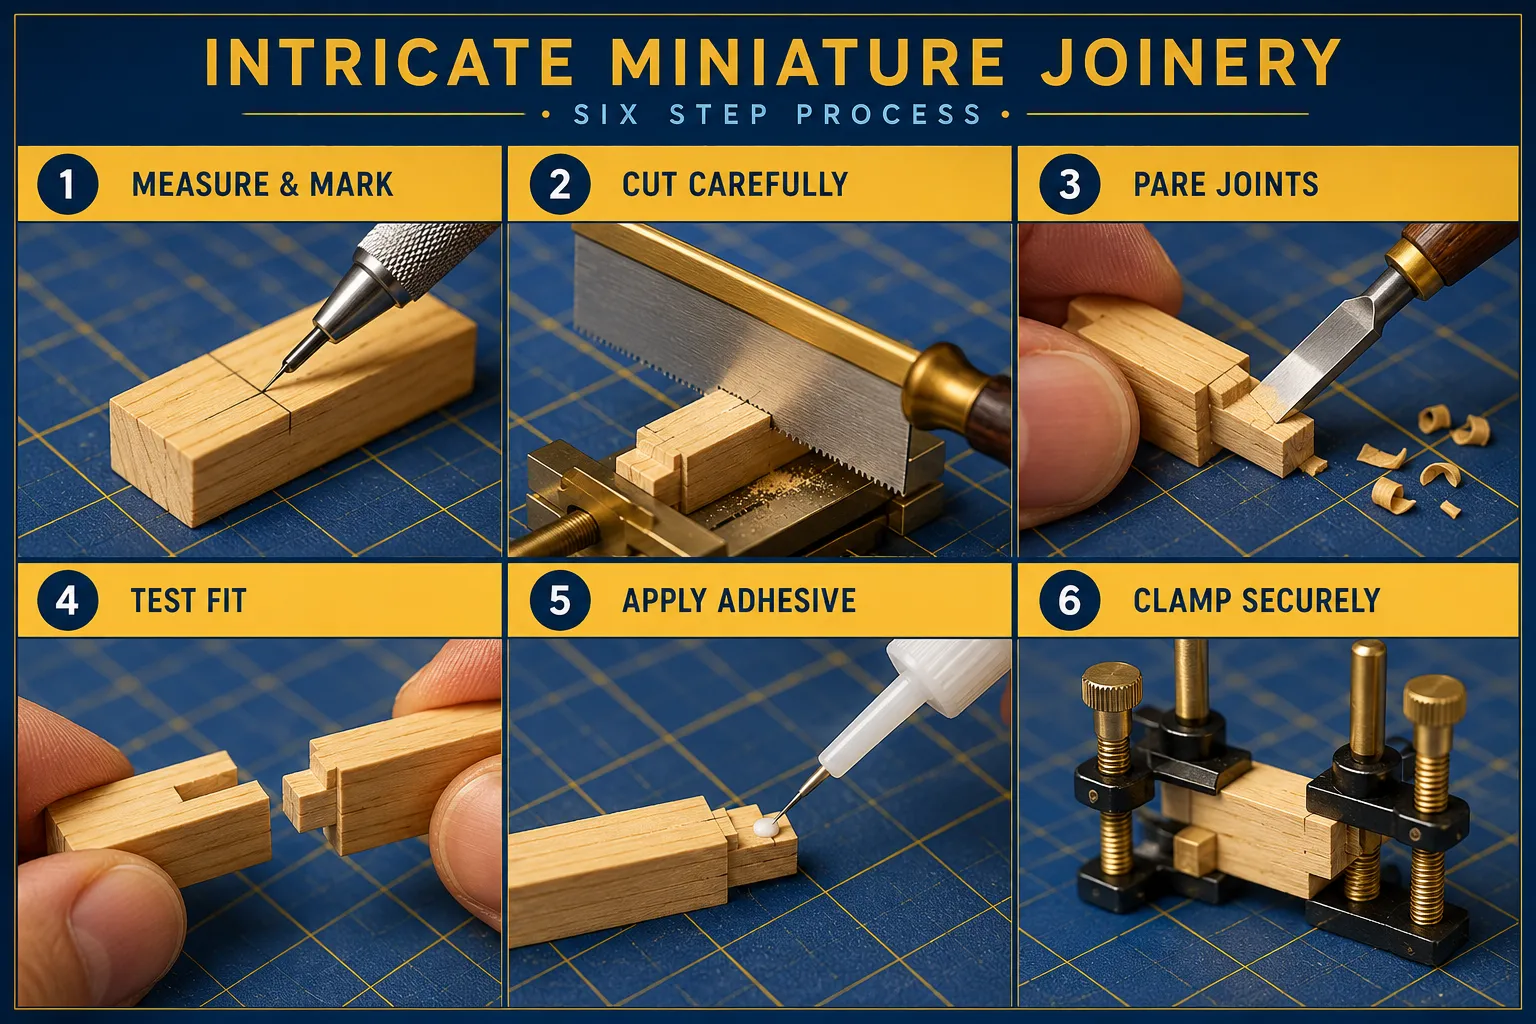
Dovetail Joints are a hallmark of fine craftsmanship and are stunning in miniature drawer boxes or cabinet carcases. Cutting miniature dovetails is perhaps one of the most demanding tasks in small-scale woodworking. A jeweler’s saw or a very thin dovetail saw, paired with a sharp scalpel for marking, is essential. The pins and tails must be cut with incredible accuracy to ensure a tight, seamless fit. Practice on scrap pieces of basswood or balsa first, as these woods are more forgiving.
Miter Joints are often used for picture frames, box corners, or decorative molding in dollhouse interiors. Achieving a perfectly seamless 45-degree angle on tiny pieces is critical. A miniature miter box and a razor saw can assist, but the final fit often relies on careful paring with a sharp craft knife or scalpel. The use of a specialized glue with a longer open time can be beneficial for making slight adjustments before clamping.
Lap Joints (half-lap, cross-lap) are simpler to execute than mortise and tenons or dovetails but still require precision. They are excellent for creating grid patterns in windows or decorative panels. Mark the depth and width with a fine pencil and cut with a razor saw, then carefully remove the waste with a micro-chisel. The aim is for the surfaces to be perfectly flush when assembled.
Biscuits and Dowels, while common in full-scale work, are often too large for true miniature projects. However, micro-dowels (often toothpicks or bamboo skewers cut down) can be used as hidden reinforcement in butt joints or as decorative elements. Miniature “biscuits” can be fashioned from thin veneer, but their strength contribution at this scale is limited compared to traditional joinery.
Glue selection is crucial. Tacky glues or fast-setting PVA glues are often preferred for their quick grip, but they also offer less open time for adjustments. For complex assemblies, a slower-setting PVA or even a CA (cyanoacrylate) glue with an accelerator can be beneficial, provided care is taken with its rapid bond. Apply glue sparingly using a toothpick or a micro-brush to avoid squeeze-out, which can be challenging to clean from miniature components.
Finishing Techniques for Authentic Miniature Furniture and Dollhouse Builds
The finish of a miniature piece is just as critical as its construction. A flawless, scaled finish elevates a miniature from a mere model to a work of art, enhancing its realism and bringing it to life. Mastering Small-Scale Woodworking: Precision Techniques for Miniature Furniture and Dollhouse Builds extends to achieving finishes that replicate the look and feel of full-sized furniture.
Surface Preparation: This stage is paramount. Any imperfections visible at full scale will be glaring in miniature. Begin with progressively finer grits of sandpaper, typically starting at 220 grit and moving up through 320, 400, 600, and even 1000 grit. Use tiny sanding blocks or wrapped sandpaper on small sticks to ensure flat surfaces and crisp edges. A magnifying lamp is invaluable for inspecting the surface for scratches or inconsistencies. After sanding, thoroughly clean the piece to remove all dust, using compressed air or a tack cloth specifically designed for fine particles.
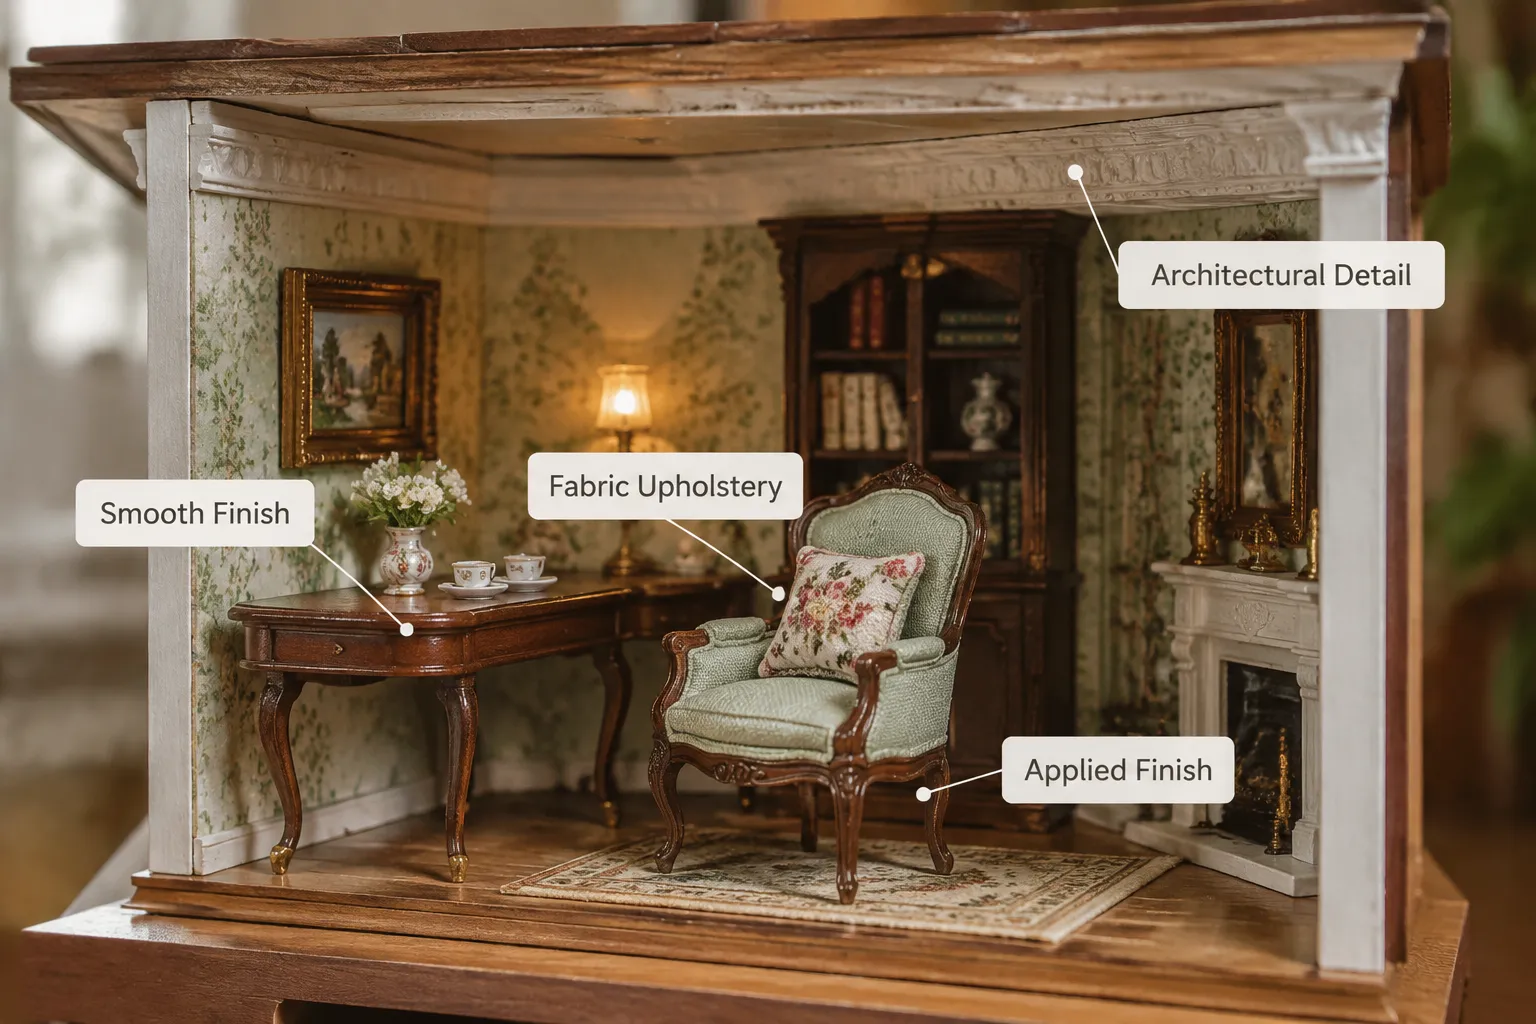
Stains and Dyes: Applying stains to miniature pieces requires a light touch. Wood often absorbs stain differently at such small scales, potentially appearing darker than expected. Test your stain on a scrap piece of the same wood first. Apply thin coats using a micro-brush, cotton swab, or even a toothpick for very small details. Wipe off excess immediately to prevent blotching. Water-based dyes can offer more control as they penetrate evenly and can be layered for desired depth of color.
Paints: For painted finishes, choose high-quality acrylic or enamel hobby paints. Primer is essential, especially on porous woods or for achieving a smooth, opaque finish. Apply paint in multiple thin coats rather than one thick one. This prevents brush marks and maintains the crisp details of the miniature. Micro-brushes are ideal, and for a truly professional, smooth finish, an airbrush can deliver exceptional results with very fine control.
Clear Coats and Topcoats: These finishes protect the wood and provide a realistic sheen. Options include polyurethane, lacquer, shellac, and various oils. For miniatures, the key is thinness and multiple applications.
- Polyurethane: A durable option, but it can build up quickly. Use a satin or semi-gloss for a more realistic scaled appearance. Apply with a very fine brush, allowing ample drying time between thin coats. Polyurethane Spray vs Brush: Pros, Cons, and Choosing the Right Method offers insights into application methods, though spraying is generally preferred for miniature consistency if possible.
- Lacquer: Dries quickly and builds to a beautiful, clear finish. It can be challenging to apply without runs at this scale, but its quick drying time allows for multiple thin coats in a shorter period.
- Shellac: A traditional finish that provides a warm glow. It’s easy to apply with a cotton pad (known as French polishing) in tiny layers, building depth and sheen.
- Oils (Tung, Linseed): These penetrate the wood, enhancing its natural beauty. They offer a very natural, low-sheen finish, which can be very effective for replicating antique furniture. Apply with a lint-free cloth or cotton swab, wiping off all excess after a short penetration time.
Distressing and Antiquing: To create a sense of age, techniques like light sanding on edges, subtle scratching, or applying thin washes of dark stain can simulate wear and tear. This requires an artistic eye and a very delicate hand to avoid overdoing it. Weathering powders or very diluted paints can add realistic dust or grime effects, bringing another layer of authenticity to your dollhouse builds.
| Finishing Step | Key Technique | Recommended Tool/Material |
|---|---|---|
| Surface Prep | Progressive sanding, meticulous dust removal | Fine-grit sandpaper (220-1000), magnifying lamp, tack cloth |
| Staining/Dyeing | Thin coats, test on scrap, wipe excess | Micro-brushes, cotton swabs, water-based dyes |
| Painting | Primer, multiple thin coats, smooth application | High-quality hobby paints, airbrush (optional) |
| Clear Coats | Thin layers, chosen sheen (satin/semi-gloss) | Fine brushes, polyurethane, lacquer, shellac |
| Distressing/Antiquing | Subtle wear, washes, weathering powders | Fine sandpaper, diluted stain/paint |
Conclusion
Mastering Small-Scale Woodworking: Precision Techniques for Miniature Furniture and Dollhouse Builds is a journey that demands patience, meticulous attention to detail, and a specialized skill set. From selecting the appropriate micro-tools and executing impossibly tiny joints to applying a flawless, scaled-down finish, every step is a testament to dedication and craftsmanship. The satisfaction of creating a miniature masterpiece, whether it’s an intricate dollhouse armoire or a perfectly proportioned tiny chair, is immense. This niche not only hones fundamental woodworking skills to their sharpest edge but also opens up a world of creative expression in exquisite detail.
Actionable Next Steps:
- Invest in Quality Micro-Tools: Begin by acquiring the essential precision cutting, shaping, and measuring tools outlined in this article. Quality tools are an investment that will pay dividends in accuracy and enjoyment.
- Practice on Scrap Wood: Before tackling a complex project, dedicate time to practicing fundamental cuts and joinery techniques on small pieces of basswood or balsa. Focus on achieving perfect 90-degree cuts and tight-fitting joints.
- Start Simple: Don’t aim for a full dollhouse immediately. Begin with a single piece of miniature furniture, like a small table or chair, to build confidence and refine your techniques.
- Study Full-Scale Techniques: Many miniature techniques are scaled versions of their full-size counterparts. Understanding the mechanics of traditional joinery will enhance your miniature work.
- Join a Community: Connect with other miniature woodworkers online or in local clubs. Sharing knowledge and experiences can accelerate your learning and provide inspiration.
Meta Title: Precision Miniature Woodworking: Dollhouse Furniture & Techniques Meta Description: Master small-scale woodworking for miniature furniture and dollhouse builds in 2026. Learn precision tools, joinery, and finishing techniques.