

The unforgiving nature of a misaligned joint or an imprecise edge can transform a meticulously planned woodworking project into a frustrating endeavor. While many woodworkers relegate their router to handheld tasks, the true potential of this versatile tool blossoms when integrated with a router table. This comprehensive guide, Mastering the Router Table: Essential Jigs, Techniques, and Safety for Precision Woodworking, will unlock the router table’s full capabilities, transforming your workflow and elevating the quality of your craft in 2026.
Key Takeaways

- Router tables enhance precision, safety, and repeatability for a wide array of woodworking tasks.
- Essential jigs like featherboards, push blocks, and sleds are critical for safe and accurate operation.
- Mastering diverse techniques, from joinery to edge profiling, expands project possibilities.
- Prioritizing dust collection, proper bit selection, and personal protective equipment is non-negotiable for safety.
- Consistent practice and adherence to best practices are key to unlocking advanced router table mastery.
Building a Foundation: Essential Jigs for Precision and Safety
Precision woodworking hinges on consistency and control, and the router table, when equipped with the right jigs, delivers both. These essential accessories are not merely add-ons; they are fundamental to achieving repeatable, accurate results and ensuring operator safety. Understanding and utilizing these jigs will be your first step in Mastering the Router Table: Essential Jigs, Techniques, and Safety for Precision Woodworking.
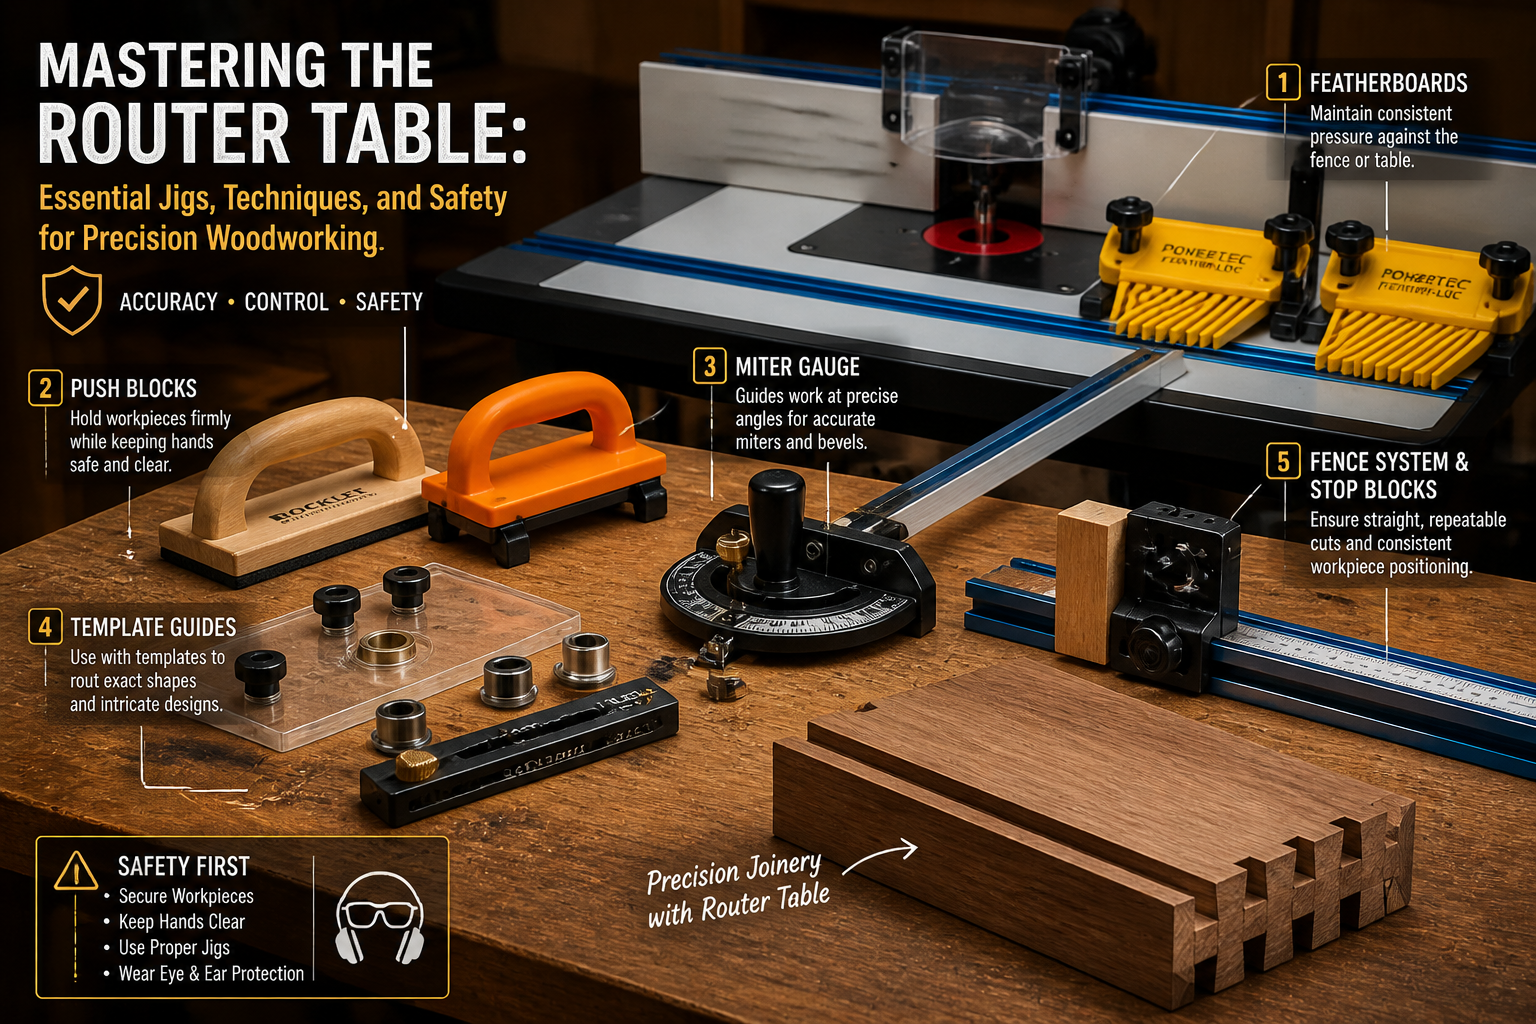
Featherboards: The Unsung Heroes of Router Table Safety
Featherboards are arguably the most crucial safety and precision jig for any router table. They apply constant, even pressure against your workpiece, keeping it firmly against the fence or table surface. This prevents workpiece movement, kickback, and greatly improves cut quality by reducing chatter.
Types of Featherboards:
- Standard Featherboards: Typically made from wood or plastic, they clamp into miter slots or to the fence.
- Magnetic Featherboards: Offer quick setup and repositioning on cast iron or steel tables, ideal for repetitive tasks.
Proper Use: Mount featherboards to apply pressure in the direction of the cut, ensuring the “feathers” flex slightly against the material. For optimal control, use two featherboards: one on the table surface to hold the workpiece down, and another on the fence to hold it against the fence.
Push Blocks and Sticks: Protecting Your Digits
Never feed a workpiece through a router bit with your bare hands. Push blocks and sticks are indispensable for maintaining control and keeping your hands a safe distance from the spinning bit.
Key Benefits:
- Enhanced Safety: Eliminates direct hand contact with the bit.
- Improved Control: Provides a firm grip, especially on smaller workpieces.
- Reduced Kickback Risk: Helps maintain downward and forward pressure.
Selection Tips: Look for push blocks with a non-slip rubber base and an ergonomic handle. For narrow stock, push sticks are ideal.
Router Table Sleds: Precision for Cross-Grain Routing
When cutting tenons, raised panels, or other cross-grain operations, a router table sled provides unparalleled control and accuracy. It keeps the workpiece square to the fence and stable throughout the cut.
Common Sled Designs:
- Basic Panel Sled: Guides a panel across the bit for raised panel cuts.
- Tenoning Sled: Holds a workpiece vertically to cut accurate tenons.
- Dovetail Sleds: Specific jigs designed to guide material for dovetail joints. For those looking to create intricate joinery, explore Mastering Dovetail Joinery for Drawers: Hand and Router Methods for Cabinet Builders.
Using a sled eliminates the danger of freehand routing across the grain and ensures consistent results, crucial for furniture making and cabinetry.
Miter Gauges and Coping Sleds: Angle Accuracy
While often associated with table saws, a miter gauge can be adapted for router table use, particularly for angled cuts or for creating coping joints. A dedicated coping sled is even better, designed specifically to hold rails vertically for precise coping cuts when making cabinet doors.
Jig Checklist for Your Router Table:
| Jig Type | Primary Function | Safety Benefit |
|---|---|---|
| Featherboards | Hold workpiece against fence/table | Prevents kickback, improves control |
| Push Blocks | Safely feed small/narrow workpieces | Keeps hands clear of bit |
| Router Sleds | Guide cross-grain cuts (e.g., tenons) | Stable workpiece, accurate cuts |
| Coping Sleds | Hold rails for coping cuts | Secure vertical workpiece |
| Router Table Fence | Guides straight cuts (essential) | Improves accuracy, repeatability |
A well-equipped router table, supported by these fundamental jigs, transforms from a mere power tool into a precision woodworking station. To further enhance your workshop’s capabilities, consider building custom jigs for specific tasks. Our Beginner’s Guide to Essential Woodworking Jigs: Improve Accuracy and Safety offers a great starting point.

Mastering Router Table Techniques: Beyond the Basics
Once you’re comfortable with the essential jigs and safety practices, it’s time to dive into the vast array of techniques possible with a router table. Mastering the Router Table: Essential Jigs, Techniques, and Safety for Precision Woodworking involves understanding how to manipulate wood to create intricate joinery, decorative edges, and perfect dados.
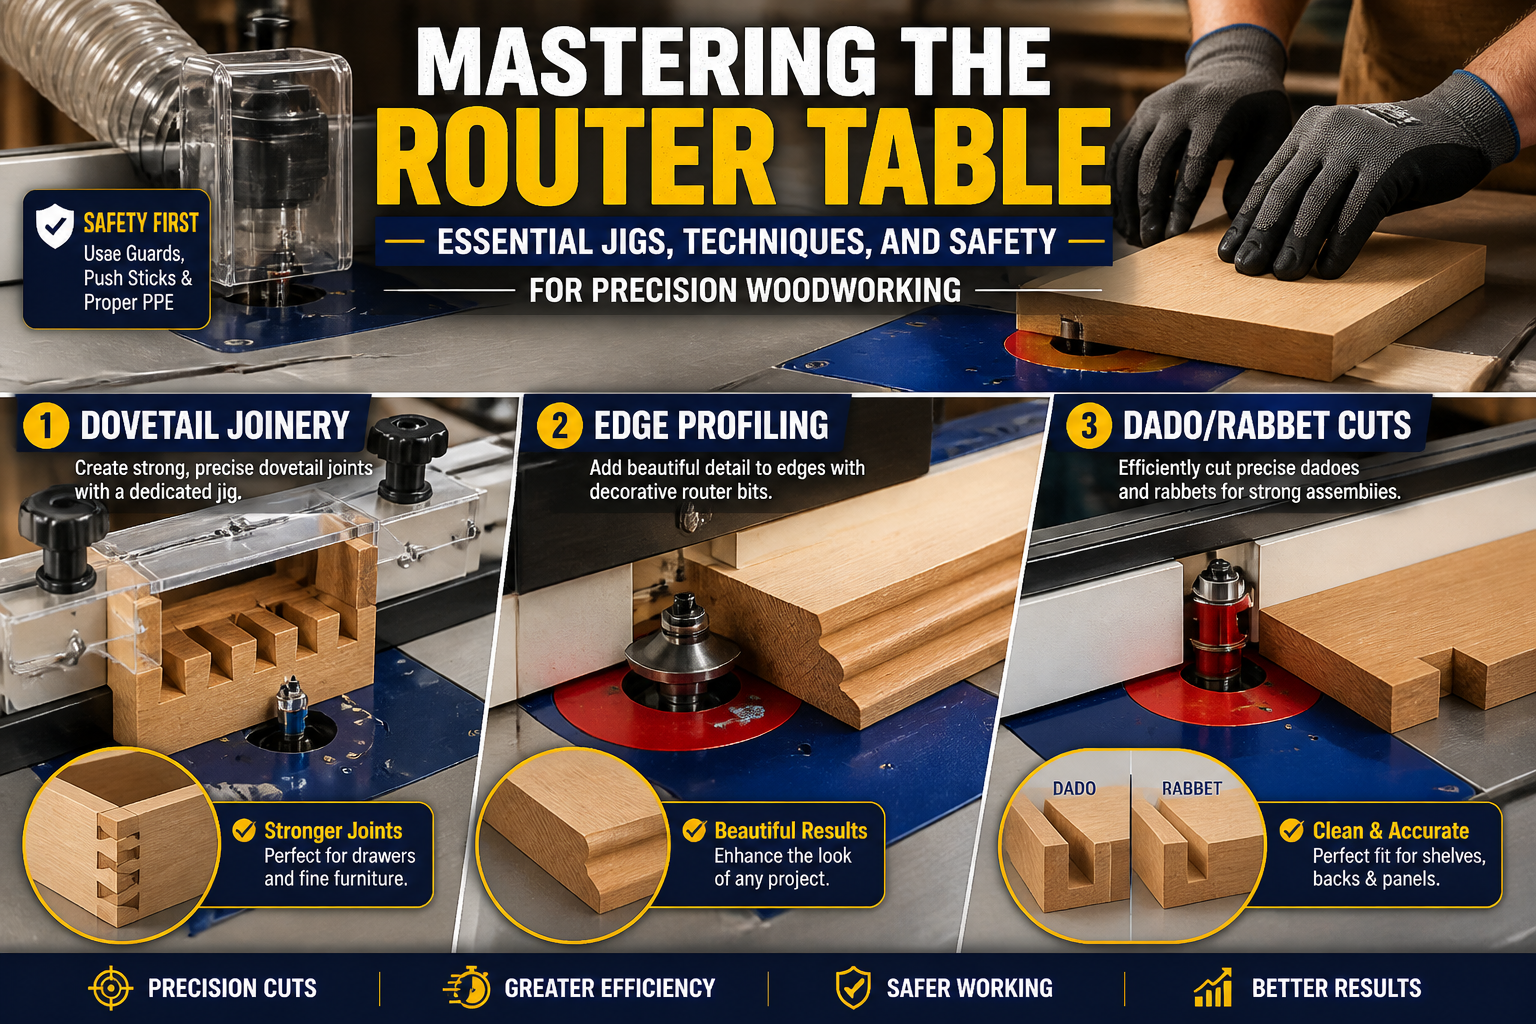
Joinery: Stronger Connections, Cleaner Finishes
The router table excels at creating precise and strong wood joints.
- Dadoes and Rabbets: These are fundamental for carcass construction, shelving, and drawer bottoms. The router table makes them incredibly easy to cut accurately and repeatedly. Set the fence to control the width and depth, and run your workpiece through.
- Tongue and Groove: Perfect for flooring, paneling, and tabletops. Dedicated tongue and groove bit sets allow for quick, consistent cuts, creating strong mechanical joints.
- Dovetail Joints: While often associated with hand tools, router table jigs can create stunning dovetail and half-blind dovetail joints with relative ease, especially for production work. Check out our detailed guide on Mastering Dovetail Drawers for Cabinets: Hand-Cut and Router for in-depth techniques.
- Mortise and Tenon (with a jig): While more commonly done with a mortiser, a router table can form tenons and even mortises with specific jigs and techniques, offering an alternative for strong frame-and-panel construction.
Edge Profiling and Decorative Bits
One of the most satisfying applications of a router table is the creation of custom edge profiles. From simple chamfers and roundovers to complex ogees and cove cuts, the router table offers immense design flexibility.
Tips for Edge Profiling:
- Multiple Passes: For large or deep profiles, make several shallow passes. This reduces strain on the router, prevents tear-out, and results in a smoother finish.
- Climb Cut (First Pass): For the first, shallow pass on difficult grain, a climb cut (feeding against the normal direction) can help reduce tear-out. Always use extreme caution with climb cuts and only take very shallow passes.
- Grain Direction: Always consider the wood grain. Routing with the grain prevents tear-out. Route end grain first, then long grain.
Raised Panels and Door Construction
Creating professional-looking raised panel doors for cabinets or furniture is a hallmark of router table mastery. Specialized raised panel bits, used in conjunction with a coping and sticking bit set, allow woodworkers to craft elegant door frames and decorative panels with efficiency.
Sequential Steps for a Raised Panel Door:
- Cut stiles and rails to length.
- Route the coping profile on the ends of the rails.
- Route the sticking profile on the edges of all stiles and rails.
- Cut the panel to size.
- Route the raised profile on the panel edges.
- Assemble the door.
These techniques, when practiced and perfected, will significantly expand your woodworking repertoire, allowing you to tackle more complex and refined projects.
Safety First: Essential Practices for Router Table Operation
The power and precision of a router table come with inherent risks. Prioritizing safety is paramount for Mastering the Router Table: Essential Jigs, Techniques, and Safety for Precision Woodworking. Ignoring safety can lead to severe injury, damaged workpieces, and a less enjoyable woodworking experience.
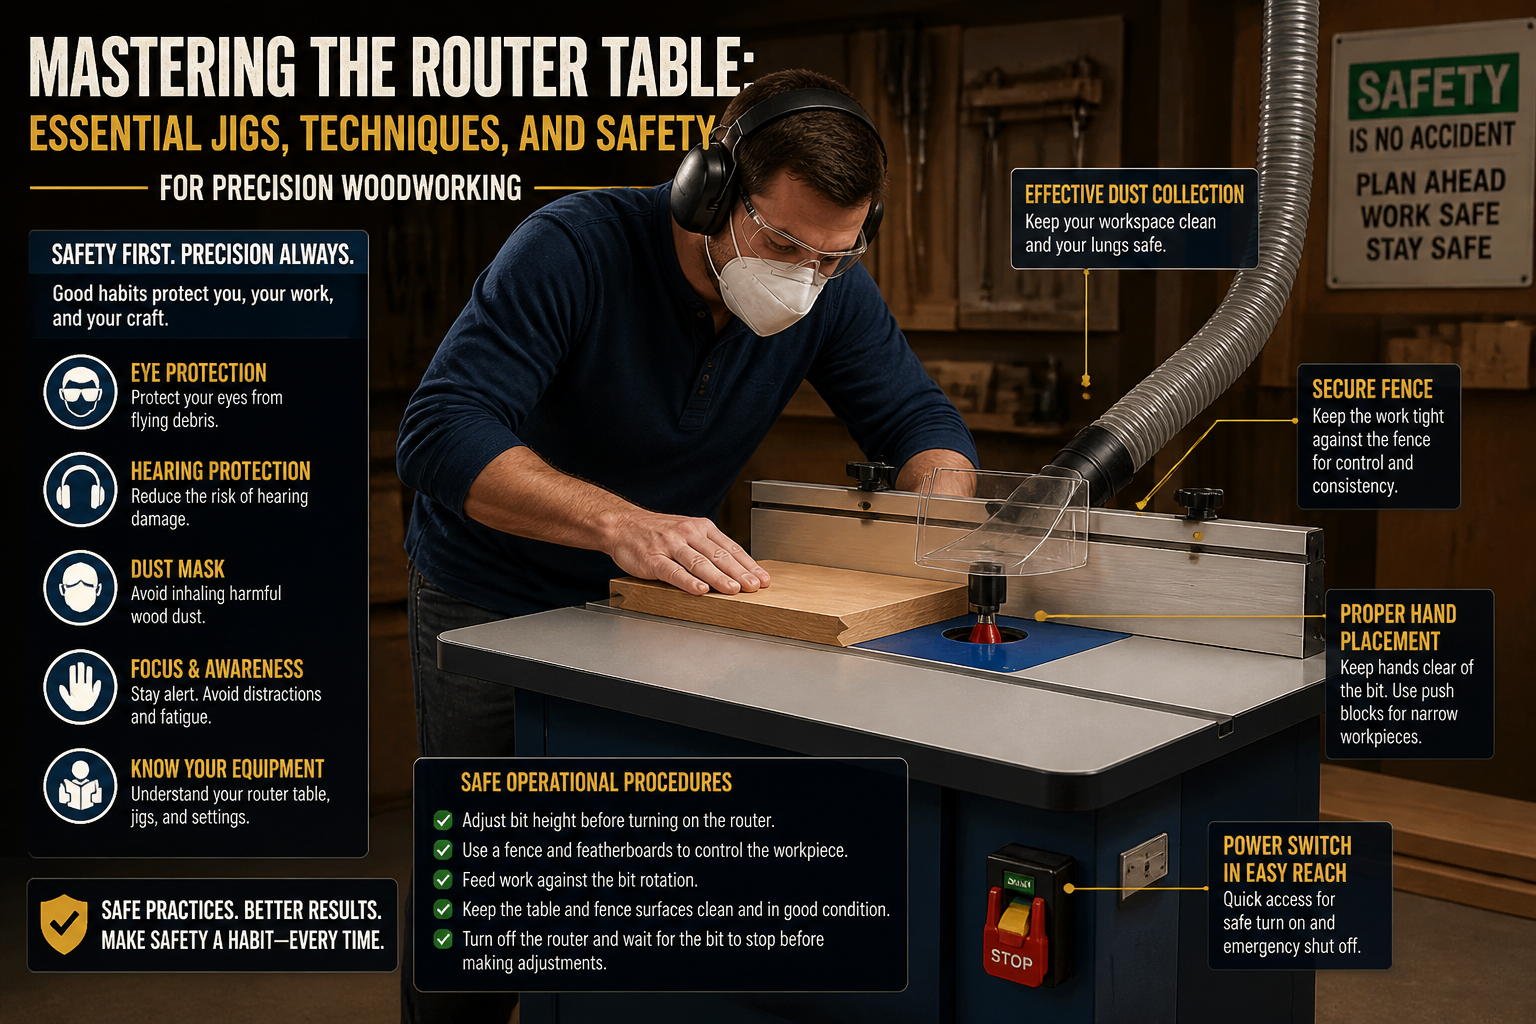
Personal Protective Equipment (PPE)
Never operate a router table without the correct PPE.
- Eye Protection: Safety glasses or a face shield are mandatory. A router bit spinning at thousands of RPM can launch wood chips and dust at high speeds.
- Hearing Protection: Routers are loud. Earmuffs or earplugs are crucial to prevent long-term hearing damage.
- Dust Mask/Respirator: Fine wood dust is a serious respiratory hazard. A good quality dust mask or respirator is essential, especially when routing hardwoods or MDF.
- Gloves (Caution!): While some advise against gloves due to snagging risks, thin, close-fitting gloves can offer some protection against splinters. However, ensure they fit snugly and don’t interfere with grip or control.
Workpiece Handling and Control
- Always Use Jigs: As discussed, featherboards, push blocks, and sleds are your best friends for control and safety. Never freehand small or narrow pieces.
- Feed Direction: Always feed the workpiece against the rotation of the router bit. For standard router tables, this means feeding from right to left. Feeding with the rotation (a climb cut) can cause the router to grab the workpiece and launch it (kickback), a very dangerous situation.
- Proper Stance: Stand to the side of the router table, not directly in line with the workpiece. This provides a safer position in case of kickback.
- Small Pieces: For very small workpieces, use a dedicated small-piece sled or template. If a piece is too small to safely hold or jig, consider alternative methods or a larger sacrificial piece that can be cut down later.
Router Bit Selection and Maintenance
- Sharp Bits: Dull bits generate more heat, cause tear-out, and increase the risk of kickback. Keep your bits sharp.
- Correct Bit for the Job: Use the appropriate bit type and size for the task. Oversized bits can put excessive strain on your router.
- Proper Installation: Ensure router bits are inserted at least two-thirds of the shank length into the collet and tightened securely. An improperly seated bit can come loose during operation.
- Inspection: Before each use, inspect bits for damage, cracks, or excessive wear.
Dust Collection
Fine wood dust poses both a respiratory and fire hazard. A robust dust collection system is critical.
- Integrated Dust Port: Most router tables and fences include a dust port. Connect it to a shop vac or dedicated dust collector.
- Minimize Airborne Dust: Good dust collection not only improves visibility and reduces cleanup but also captures hazardous particulates before they become airborne.
Emergency Preparedness
- Know Your E-Stop: Familiarize yourself with the location of your router table’s emergency stop switch.
- First Aid: Keep a well-stocked first-aid kit readily accessible in your workshop.
By rigorously adhering to these safety practices, you can confidently and effectively engage in Mastering the Router Table: Essential Jigs, Techniques, and Safety for Precision Woodworking, ensuring a safe and productive experience. For more insights on general workshop safety and efficiency, explore our article on Creating Ergonomic Workshop Furniture.
Router Table Maintenance and Setup for Optimal Performance
Achieving consistent results on your router table also depends on proper setup and regular maintenance. A well-tuned machine not only performs better but is also safer.

Table and Fence Alignment
- Flatness: Ensure your router table surface is perfectly flat. Any discrepancies can lead to uneven cuts.
- Fence Squareness: The fence must be square to the table and parallel to the miter slot. Use a reliable square to check and adjust as needed. Even a slight misalignment can result in tapered cuts or improper joinery.
- Outfeed Support: For long stock, ensure adequate outfeed support. This can be achieved with roller stands or a well-placed workbench. Consider solutions like a Building a Custom Wood Workbench for stable support.
Router and Bit Care
- Cleanliness: Regularly clean your router and bits. Resin and pitch buildup on bits can cause friction, burning, and dullness. Use a dedicated bit cleaner and a brass brush.
- Lubrication: Follow your router’s manufacturer guidelines for any necessary lubrication.
- Collet Inspection: Inspect the router collet for wear or damage. A worn collet can lead to bit run-out or bits slipping during operation.
Dust Management Beyond the Collector
While a dust collector is essential, a well-placed air filter and regular shop cleaning are also vital to minimize airborne dust accumulation, further improving air quality and reducing hazards in your workspace.
Conclusion
The router table is an indispensable tool for any woodworker seeking to elevate their craft. By diligently applying the knowledge of essential jigs, mastering diverse techniques, and rigorously adhering to safety protocols outlined in Mastering the Router Table: Essential Jigs, Techniques, and Safety for Precision Woodworking, you can unlock unparalleled precision and efficiency in your projects.
In 2026, the demand for finely crafted wooden pieces, from intricate furniture to bespoke cabinetry, remains strong. By confidently wielding your router table, you’re not just making cuts; you’re crafting excellence. Start by investing in quality jigs, practice with scrap wood, and always, always prioritize safety. The journey to router table mastery is a rewarding one, yielding superior results and broadening your creative horizons.
