


The relentless, invisible force that governs every piece of wood, from a simple cutting board to a grand dining table, is its inherent tendency to move. Neglect this fundamental principle, and even the most meticulously crafted woodworking project will eventually succumb to cracking, warping, or joint failure, revealing structural weaknesses over time. This foundational understanding of wood movement, coupled with essential joinery and design principles, is the cornerstone for creating durable, heirloom-quality pieces that withstand the test of time and environmental shifts. In 2026, as woodworking techniques evolve, the core challenge of accommodating wood’s natural behavior remains unchanged.
Key Takeaways
- Wood is hygroscopic, meaning it absorbs and releases moisture, causing it to expand and contract.
- Movement occurs primarily across the grain (tangential and radial), with minimal change along the grain (longitudinal).
- Properly seasoned and acclimated wood is crucial to minimize excessive movement.
- Joinery techniques like frame-and-panel, breadboard ends, and sliding dovetails are designed to allow for natural wood movement.
- Designing with grain orientation and balancing opposing forces prevents cracking and warping in finished projects.
The Science Behind Wood Movement: Understanding Hygroscopicity and Anisotropy
At its core, wood is a natural, organic material composed of countless cells. These cells, much like tiny sponges, readily absorb moisture from the air when humidity levels are high and release it when conditions become drier. This constant exchange of moisture is known as hygroscopicity. As wood gains moisture, its cells swell, causing the wood to expand; conversely, as it loses moisture, the cells shrink, leading to contraction. This inherent characteristic is the primary driver of wood movement.

However, wood doesn’t expand or contract uniformly in all directions. This directional dependency is called anisotropy, and it’s critical to understanding wood movement: essential joinery and design principles to prevent cracking and warping. Wood moves significantly more across its growth rings (tangentially) and slightly less across the rings but perpendicular to them (radially). Movement along the length of the grain (longitudinally) is practically negligible, usually less than 0.1% for most species.
Directions of Wood Movement: A Closer Look
- Tangential: The greatest amount of movement occurs in this direction, parallel to the growth rings. Imagine cutting a board from the side of a log; the tangential face will show the most expansion and contraction.
- Radial: Movement in this direction is perpendicular to the growth rings, but still across the width of the board. This movement is typically about half to two-thirds of the tangential movement.
- Longitudinal: Movement along the length of the board, parallel to the grain, is minimal and usually disregarded in design.
The amount of movement a specific piece of wood will exhibit depends on several factors: the species of wood (some are more stable than others), the initial moisture content, the final moisture content, and the method of milling (flat-sawn vs. quarter-sawn). Quarter-sawn lumber, where the growth rings are perpendicular to the face of the board, tends to be more stable, exhibiting less tangential movement because that movement direction is “standing up” rather than “lying down” across the board’s width.

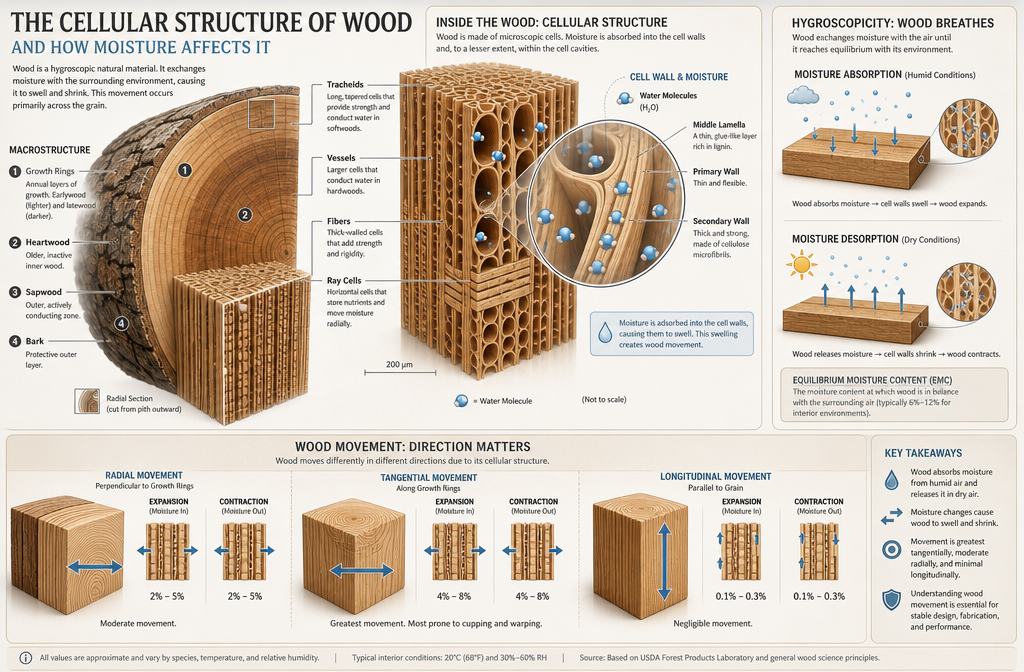
A crucial first step in any woodworking project is proper wood seasoning and acclimation. Seasoning (kiln drying or air drying) reduces the wood’s initial moisture content, while acclimation allows the wood to stabilize to the relative humidity of its intended environment. Bringing wood into your workshop and letting it sit for several weeks, or even months, ensures it reaches equilibrium moisture content (EMC) before you begin cutting and joining. This significantly reduces the likelihood of problems later on. For more insights on sourcing and preparing materials, consider exploring articles on live edge slab selection and preparation: from raw material.
Essential Joinery Techniques to Accommodate Wood Movement
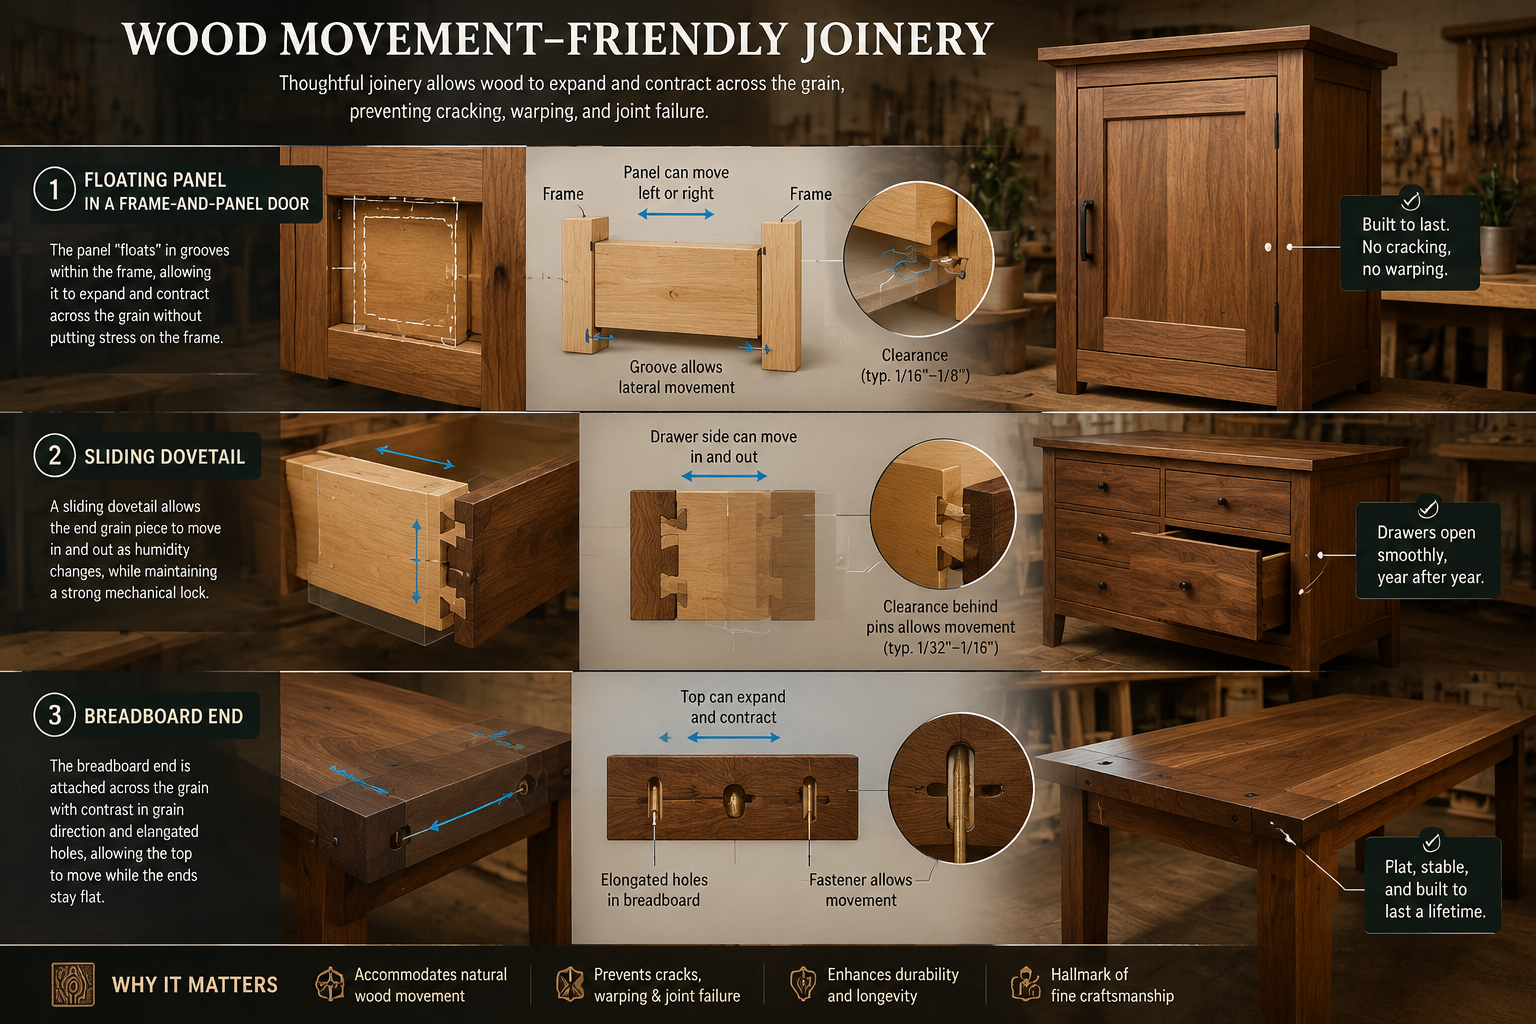
Once the principles of wood movement are understood, the next critical step is to employ joinery and design strategies that allow for this movement, rather than fighting against it. Forcing wood to remain static when it naturally wants to move will inevitably lead to splits, cracks, and failed joints. Mastering these techniques is central to understanding wood movement: essential joinery and design principles to prevent cracking and warping.
Frame and Panel Construction
One of the most classic and effective methods for accommodating movement, particularly in doors, cabinet sides, and large panels, is frame and panel construction. The central panel, typically made of solid wood, is allowed to “float” within a rigid frame.
- How it works: The panel is cut slightly smaller than the opening in the frame and has a chamfered or beveled edge that fits into a groove routed around the inside of the frame members (stiles and rails). The panel is not glued to the frame; instead, space is left within the groove to allow the panel to expand and contract freely without stressing the frame. Small rubber balls or space balls are often inserted into the grooves to keep the panel centered while still allowing movement.
- Application: Ideal for kitchen cabinet doors, dresser sides, and any large solid wood surface. For projects like custom floating shelves, understanding panel movement helps in designing the support structure.
Breadboard Ends
Breadboard ends are solid wood pieces attached to the ends of a table or desk top, running perpendicular to the main grain direction of the top itself. They serve multiple purposes: protecting the end grain from damage, keeping the top flat, and preventing cupping.
- How it works: The breadboard end is typically joined to the tabletop using a tongue and groove, or a mortise and tenon joint. Crucially, while the center of the breadboard end might be glued or tightly pinned to the center of the tabletop, the outer edges are only attached with screws or dowels that pass through elongated slots in the breadboard. These slots allow the main tabletop to expand and contract across its width, while the breadboard end itself remains stable along its length.
- Application: Commonly used on tabletops, desk surfaces, and workbench tops. This technique is indispensable for crafting durable pieces like a woodworking dining chair or a sturdy master your craft: building the ultimate woodworking storage bench in 2026.
Sliding Dovetails and Batten Systems
For applications requiring strong, mechanical joints that still permit movement, sliding dovetails can be adapted. Similarly, batten systems offer an elegant solution.
- Sliding Dovetails: While a standard sliding dovetail might be tight, a modified version can be designed where the tail (on the moving piece) is slightly narrower or the socket (on the stable piece) is slightly wider, allowing for subtle movement. This is less common for large-scale movement but useful for securing smaller components.
- Batten Systems: For wide tabletops or large panels where breadboard ends aren’t desired, battens (strips of wood) can be fastened to the underside. These battens are typically screwed to the panel through oversized, elongated holes, similar to breadboard ends, allowing the panel to move relative to the battens. This helps prevent cupping without external visible joinery.

When choosing joinery, always consider the direction of the grain for each component and how it interacts with its mating piece. A common mistake is gluing components with opposing grain directions tightly together, leading to guaranteed failure. For more advanced joinery considerations, see beyond the basic box: advanced joinery for unique wooden gift boxes.
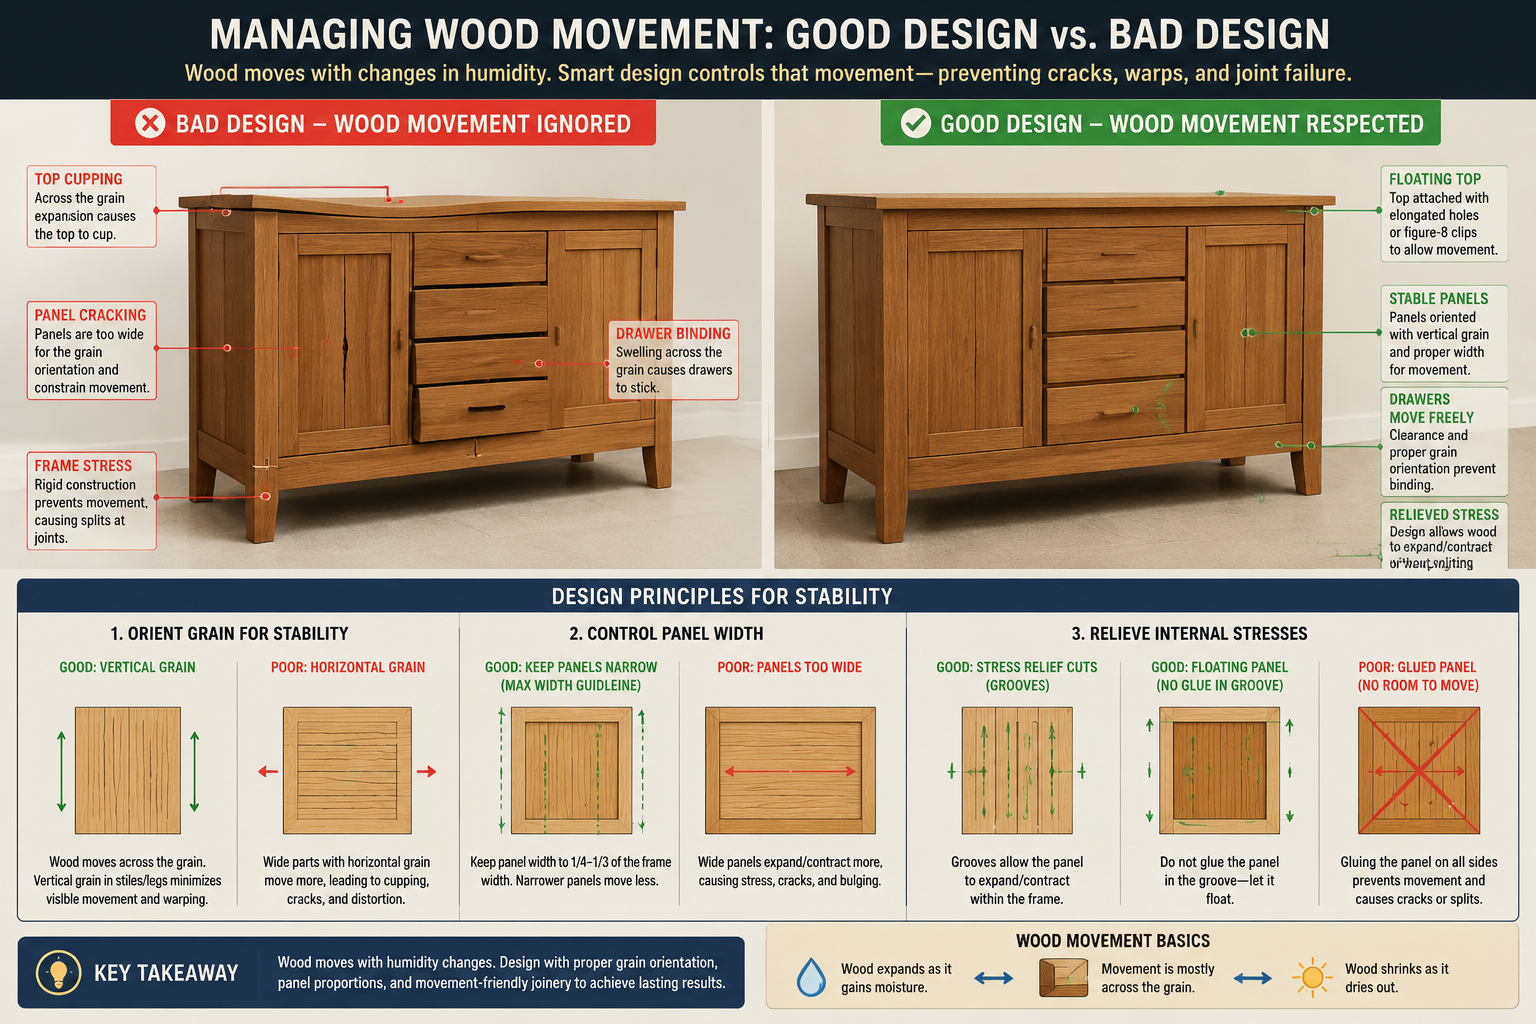
Design Principles to Prevent Cracking and Warping
Beyond specific joinery, overarching design principles are vital for creating stable woodworking projects. These principles are not just about aesthetics but are deeply rooted in understanding wood movement: essential joinery and design principles to prevent cracking and warping.
Grain Orientation and Stability
The way wood is sawn and how you orient its grain within a project dramatically impacts its stability.
- Quarter-sawn vs. Flat-sawn: Quarter-sawn lumber is inherently more stable due to its growth rings being oriented more perpendicular to the board’s face. This results in less tangential movement across the board’s width. Flat-sawn lumber, while often showing more figure, will expand and contract more across its width and is more prone to cupping.
- Alternating Grain: When gluing up panels from multiple boards, alternate the end grain (the “smiley face” vs. “frowning face” orientation) of adjacent boards. This helps balance the internal stresses and reduces the tendency for the panel to cup in one direction.
- Mitered Corners: Be cautious with large mitered joints on wide panels. As the panel expands and contracts, the miter joint can open and close significantly. Better to use reinforced miter joints or consider alternative joinery that accounts for movement.
Mitigating Stress and Balancing Forces
Good design anticipates stress points and introduces features that either relieve stress or balance opposing forces.

- Kerf Cuts/Relief Cuts: In certain situations, making shallow saw cuts (kerf cuts) on the hidden side of a board can relieve internal stresses and reduce the likelihood of cupping or warping. This is a common technique for wide shelving or table aprons.
- Floating Tabletops: For dining tables or coffee tables, tops are rarely glued directly to the apron. Instead, they are typically attached with tabletop fasteners, Z-clips, or figure-8 fasteners. These allow the tabletop to expand and contract across its width while still being securely held to the base. This principle is vital for projects like DIY coffee table plans: 15 beginner-friendly designs for your home in 2025.
- Avoid Trapping Movement: Never glue or rigidly fasten a wide solid wood board to another component along its entire length if their grain directions are perpendicular. For example, don’t glue a wide solid wood panel into a fixed dado without allowing for movement; instead, use cleats or buttons.
Environmental Control and Finish Selection
While design and joinery address the how of movement, environmental control and the right finish address the why and what happens next.
- Consistent Environment: Maintaining a stable temperature and humidity in the environment where the woodworking piece resides is ideal. This minimizes the fluctuations that drive wood movement.
- Balanced Finish: Apply a finish to all surfaces of the wood, including the underside of tabletops or the inside of cabinet doors. An unbalanced finish (e.g., only finishing the top surface) can lead to moisture absorption differences between surfaces, causing cupping. While finishes slow down moisture exchange, they don’t stop it entirely.

By integrating these design principles and utilizing appropriate joinery, woodworkers can create projects that not only look beautiful but also possess the structural integrity to last for generations. Whether you’re building a simple cutting board or a complex cabinet, applying these fundamentals will elevate your craft. For those exploring more advanced aesthetics, understanding these principles is key even in styles like warm minimalism in woodworking: balancing clean lines with tactile wood materials.
Conclusion
The journey of understanding wood movement: essential joinery and design principles to prevent cracking and warping is fundamental to achieving excellence in woodworking. Wood is a dynamic material, constantly responding to its environment, and a master woodworker learns to work with this nature, not against it. By comprehending the science of hygroscopicity and anisotropy, employing time-honored joinery techniques that allow for movement, and integrating thoughtful design principles, craftsmen can build pieces that endure.
In 2026, the principles remain the same: respect the wood, anticipate its movement, and design accordingly. The result will be not just furniture or objects, but lasting legacies that stand as testaments to careful planning and skilled execution, free from the common pitfalls of cracking and warping.
Actionable Next Steps:
- Educate Yourself Further: Dive deeper into specific wood species and their movement characteristics.
- Acclimate Your Stock: Always allow new lumber to acclimate in your workshop for several weeks before starting a project.
- Practice Joinery: Experiment with frame-and-panel, breadboard ends, and floating tabletop fasteners on scrap pieces to master the techniques.
- Analyze Existing Furniture: Look at well-made antique and modern wooden furniture to identify how their designers and builders managed wood movement.
- Refine Your Designs: Before cutting, carefully plan your grain orientation and movement allowances in every component of your next project.
