


Unleashing the full potential of your workshop means more than just having the right tools; it’s about having a system that makes every tool accessible, every project flow smoothly, and every inch of space work for you. In 2026, the demand for efficient and organized workspaces continues to grow, driving many woodworkers and DIY enthusiasts to seek out innovative solutions. This comprehensive guide will explore various DIY Smart Workshop Storage Solutions: Maximizing Space and Organization for Every Tool, helping you transform chaos into a productive, inspiring environment. From clever wall-mounted systems to customized mobile units, discover how to reclaim your workshop and elevate your craft.
Key Takeaways
- Strategic Planning is Essential: Before building, assess your current tools, space, and workflow to design storage that truly meets your needs.
- Vertical Space is Your Ally: Walls, ceilings, and the often-overlooked areas above your workbench offer prime real estate for maximizing storage.
- Modularity and Mobility Offer Flexibility: Create storage solutions that can adapt to changing tool collections and project requirements, allowing for a dynamic workspace.
- Customization Enhances Efficiency: Tailor storage for specific tools, ensuring easy access, protection, and a clear home for everything.
- Embrace Digital Tools for Design: Utilize 3D modeling software and online resources to plan and visualize your storage projects before cutting a single board.
Leveraging Vertical Space with Wall-Mounted Systems
The walls of your workshop are often an underutilized asset, offering vast potential for storage that keeps tools visible and within reach. Implementing effective wall-mounted systems is a cornerstone of DIY Smart Workshop Storage Solutions: Maximizing Space and Organization for Every Tool. These solutions free up valuable floor space, making your workshop feel larger and more navigable.

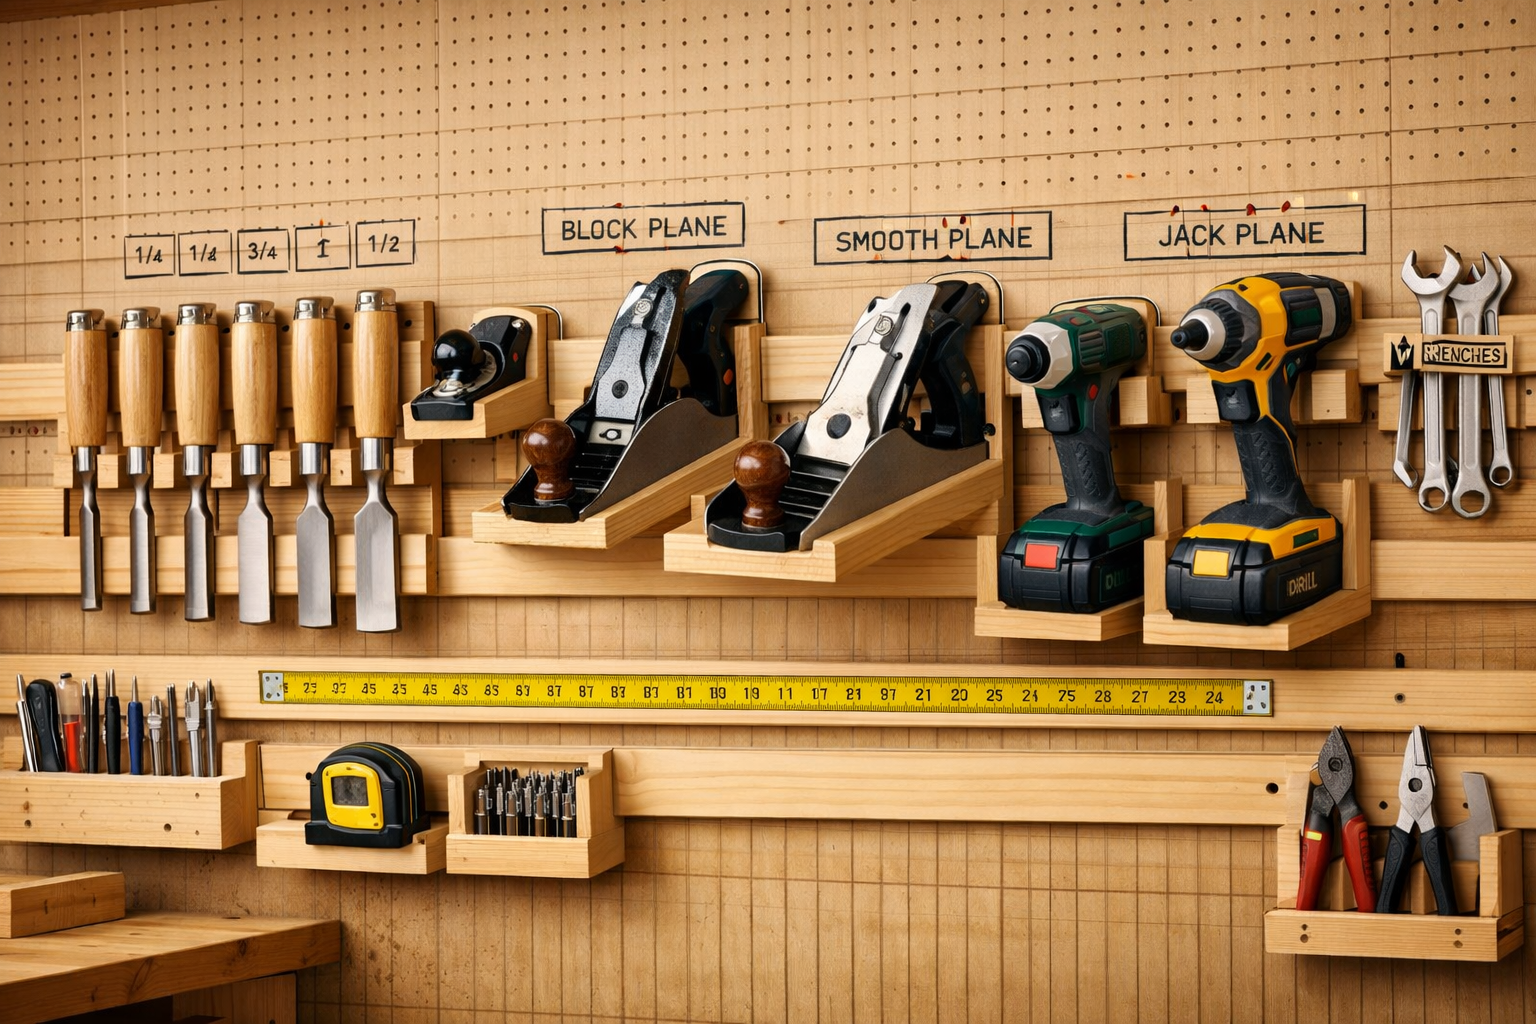
French Cleat Systems: The Ultimate Adaptable Storage
A French cleat system is a game-changer for workshop organization due to its incredible versatility. It consists of a series of horizontal strips of wood attached to the wall, angled upwards. Corresponding cleat strips are then attached to tool holders, shelves, or cabinets, allowing them to hook securely onto the wall cleats. This design means you can easily rearrange, add, or remove storage modules as your tool collection evolves.
Why French Cleats are a Smart Choice:
- Adaptability: Modules can be moved horizontally or vertically without permanent fixtures.
- Strength: The interlocking wedge design provides surprising load-bearing capacity.
- Customization: You can design specific holders for virtually any tool.
- Visibility: Keeps tools out in the open, reducing time spent searching.
Building Your French Cleat System:
- Material Selection: Plywood (1/2″ or 3/4″ thick) is ideal for cleats and modules due to its stability.
- Cleat Strips: Cut plywood strips at a 45-degree angle. Attach one half to the wall, making sure it’s level.
- Module Cleats: Attach the corresponding angled half to the back of your custom tool holders.
- Design Custom Holders:
- Power Tool Holders: Create boxes or cradles for drills, impact drivers, and sanders.
- Hand Tool Racks: Design specific slots or hooks for chisels, screwdrivers, and wrenches. For example, a custom rack for your hand tool mastery for detail work can ensure they are always protected and accessible.
- Small Parts Bins: Build small, open-top boxes for screws, nails, and fittings.
Pro Tip: Consider painting outlines of your tools on the cleat wall after they’re hung. This “shadow board” technique makes it obvious when a tool is missing and ensures everything goes back to its designated spot.
Robust Floating Shelves and Pegboards
Beyond French cleats, traditional wall-mounted solutions like floating shelves and pegboards remain incredibly effective for workshop organization.
- Floating Shelves: These provide clean, strong horizontal surfaces perfect for storing larger items, bins, or frequently used power tools. When designing, consider the weight capacity and integrate them seamlessly into your overall workshop aesthetic. Building robust floating shelves can drastically increase your storage volume without cluttering the floor.
- Pegboards: An enduring classic, pegboards offer unparalleled flexibility for hanging a multitude of tools. With various hooks, bins, and accessories available, you can customize them for anything from wrenches to router bits.
| Storage Solution | Best For | Pros | Cons |
|---|---|---|---|
| French Cleats | Hand tools, power tools, small cabinets | Highly adaptable, strong, easy to reconfigure, professional look | Requires more initial build time |
| Floating Shelves | Boxes, bins, larger tools, materials | Clean aesthetic, high weight capacity (if built right), easy access | Less flexible for individual tools, fixed position |
| Pegboards | Hand tools, small power tools, accessories | Extremely versatile, inexpensive, easy to install, clear visibility | Can look cluttered, hooks can fall out occasionally |
Modular Cabinets and Mobile Workstations
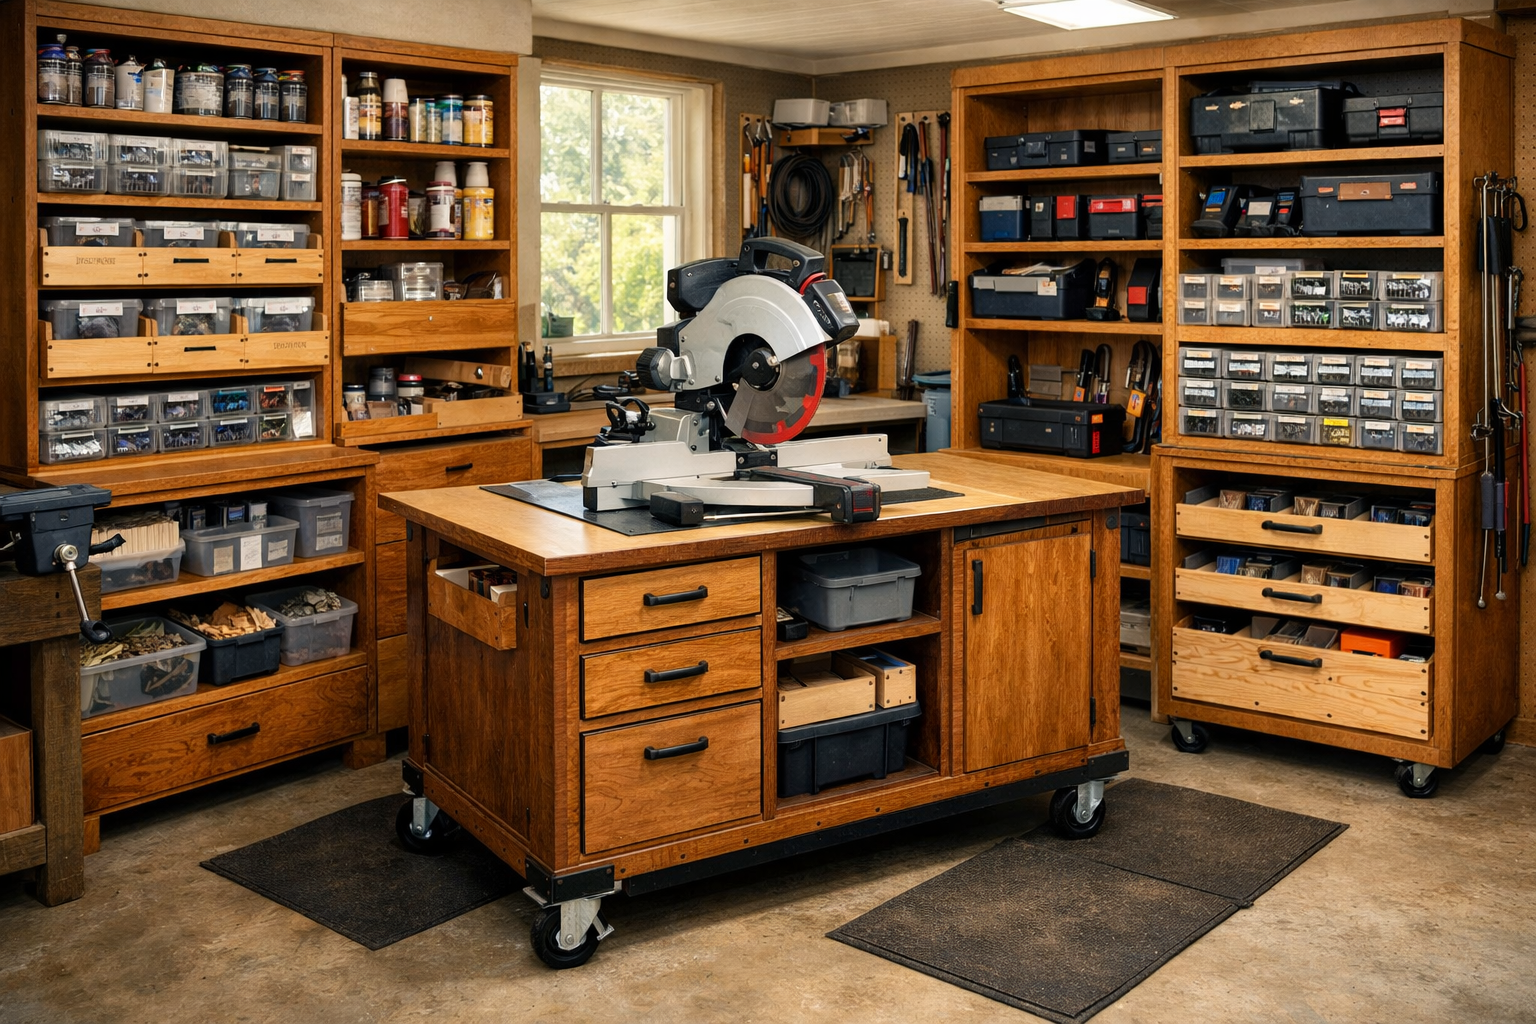
While wall storage is excellent, floor space also needs smart solutions. Modular cabinets and mobile workstations are vital components of DIY Smart Workshop Storage Solutions: Maximizing Space and Organization for Every Tool, offering robust storage and incredible flexibility.
Building Modular Cabinetry
Modular cabinets allow you to create custom storage units that fit your exact needs and can be reconfigured or expanded over time. Using joinery techniques such as dovetail drawers ensures durability and a professional finish, making them ideal for housing everything from power tools to fasteners. For instance, mastering dovetail drawers for cabinets can significantly enhance the functionality and longevity of your storage.
Key Design Considerations:
- Plywood Construction: Plywood is a strong, stable, and cost-effective material for cabinet carcasses.
- Adjustable Shelving: Incorporate shelf pin holes to allow for flexible shelf heights.
- Drawer Solutions: Drawers are crucial for organizing smaller items, keeping dust out, and providing specialized storage for specific tool sets. Consider building specific wooden jewelry organizers for precision tools, adapting the concept to your workshop needs.
- Door Types: Opt for simple plywood doors or even clear acrylic doors to keep dust out while still allowing visibility.
Smart Cabinet Features:
- Built-in Charging Stations: Design a cabinet section with power strips for charging cordless tool batteries.
- Specialized Inserts: Create custom foam inserts or wooden dividers within drawers for delicate tools or router bits.
- Integrated Dust Collection: If possible, incorporate ports for your dust collection system into your cabinet design, especially for stationary tools.
Mobile Tool Carts and Workbenches
Mobility is a game-changer in a small or multi-purpose workshop. Mobile tool carts and workbenches allow you to bring your tools directly to your project, then tuck them away when not in use.
- Portable Tool Carts: Build heavy-duty carts on locking casters. These can hold specific sets of tools, like a “sanding station” with sanders, sandpaper, and dust collection accessories, or a “router station” for various router bits and jigs.
- Mobile Workbenches: A workbench on wheels can transform your workspace. You can move it to access all sides of a project or push it against a wall when not needed. Consider adding built-in storage drawers or shelves to the workbench itself, much like the concepts explored in kitchen islands from scratch.
- Flip-Top Workstations: For tools like a planer or miter saw, a flip-top cart allows two tools to occupy the same footprint, rotating to bring the desired tool into position.
Overhead Storage and Specialized Organizers
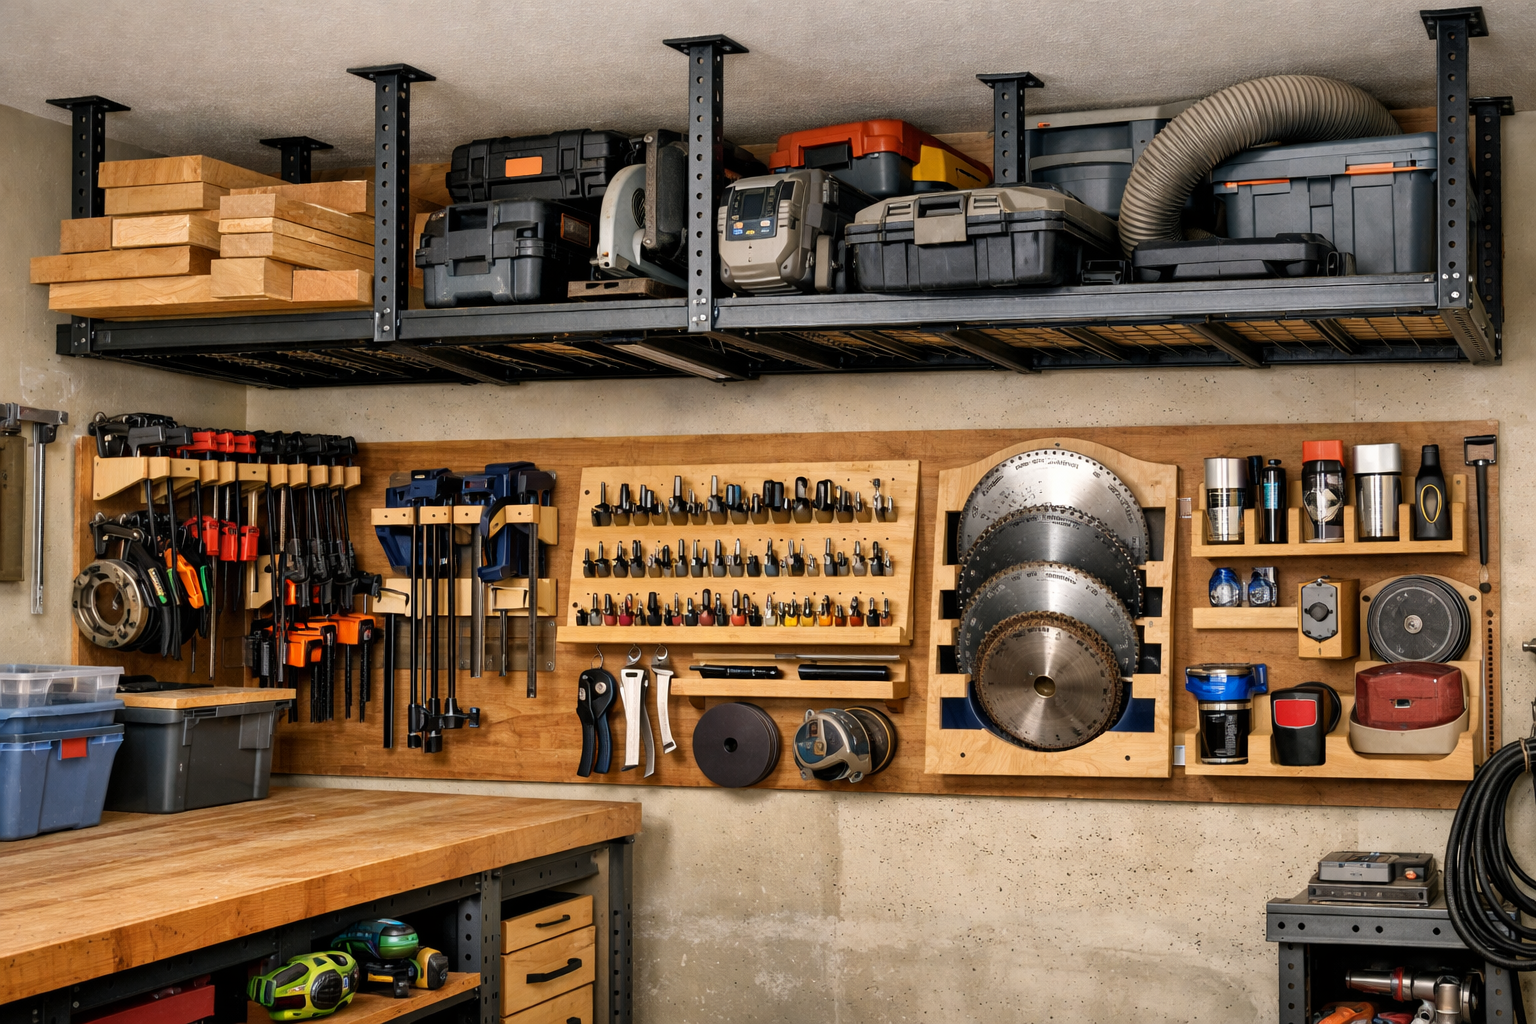
Don’t forget the ceiling! Overhead space often goes completely unused, yet it offers immense potential for storing larger, less frequently accessed items. Alongside this, specialized organizers ensure that every unique tool has its perfect home, completing the vision of DIY Smart Workshop Storage Solutions: Maximizing Space and Organization for Every Tool.
Maximizing Overhead Space
Overhead storage is ideal for lumber, sheet goods, and bulky items that don’t need to be accessed daily.
- Ceiling-Mounted Lumber Racks: Construct sturdy racks from 2x4s or similar lumber. These are perfect for storing long pieces of wood, keeping them flat and out of the way. Ensure they are securely fastened into ceiling joists.
- Plywood Storage: Create vertical or horizontal racks along the ceiling or high on walls for sheet goods like plywood or MDF. This prevents warping and saves significant floor space.
- Pulley Systems: For very heavy items, or for seasonal storage, a simple pulley system can lift items to the ceiling with ease.
Safety Note: Always ensure overhead storage is properly constructed and securely anchored to support the weight of its contents. Overloading can lead to dangerous situations.

Tailored Solutions for Unique Tools
Some tools require specific storage solutions that generic shelves or drawers simply can’t provide.
- Clamp Racks: Clamps are essential but bulky. Wall-mounted racks that hold clamps vertically by their jaws are a great space-saving option.
- Router Bit Organizers: A custom wooden block with drilled holes for each bit keeps them safe, sharp, and easy to find.
- Drill Bit Index: Similar to router bits, a dedicated storage solution for drill bits, perhaps a small drawer insert or a flip-up panel, is highly efficient.
- Specialized Power Tool Caddies: For portable power tools, design caddies that hold the tool, its accessories, and charger in one grab-and-go unit. This is especially useful for tools like a circular saw or jig saw.
Integrating Scrap Wood and Offcuts into Storage
Even your workshop’s waste products can contribute to organization!
- Scrap Wood Bins: Build dedicated bins to sort scrap wood by size or species. This encourages reuse and prevents clutter. You can even use smaller offcuts to create organizers themselves. For ideas on turning these into functional pieces, explore turning shop scraps into design features.
- Offcut Organizers: Small blocks and cut-offs can be repurposed into drawer dividers, custom tool rests, or even jigs for specific tasks. This truly embraces the “DIY” aspect of your storage solutions.
Planning Your DIY Smart Workshop Storage Solutions
Effective planning is the foundation of successful DIY Smart Workshop Storage Solutions: Maximizing Space and Organization for Every Tool. Without a clear strategy, even the best intentions can lead to new forms of clutter.
Assess Your Current Workflow and Tools
Before building anything, take inventory.
- Declutter and Categorize: Remove anything that doesn’t belong. Group similar tools together (e.g., all hand planes, all drilling accessories).
- Evaluate Usage Frequency: Which tools do you use daily, weekly, or rarely? Frequently used tools should be most accessible.
- Identify Bottlenecks: Where do you currently waste time searching for tools or materials? These are prime areas for storage improvement.
- Measure Your Space: Accurately measure walls, available floor space, and ceiling height. Don’t forget doorways and window clearances.
Design with Digital Tools
In 2026, there are numerous digital tools that can help you plan your workshop layout and storage solutions.
- SketchUp: A popular 3D modeling software that’s relatively easy to learn, allowing you to visualize your workshop and design custom storage modules.
- CAD Software: More advanced options exist for precise planning if you have the experience.
- Graph Paper and Pencil: Don’t underestimate the power of traditional methods for sketching initial ideas.
Considerations During Design:
- Safety: Ensure clear pathways, proper clearance around machinery, and safe storage for sharp tools or hazardous materials.
- Dust Control: Design storage to minimize dust accumulation and integrate dust collection systems where possible. For example, consider the placement of your shop vac near high-dust tools, like a 14 Gal Ridgid Shop Vac.
- Lighting: Plan storage to avoid blocking existing light sources and consider adding task lighting where needed.
- Expandability: Design systems that can grow with your needs, perhaps leaving a section of your French cleat wall free for future additions.
Material Selection and Budgeting
Your choice of materials will impact durability, appearance, and cost.
- Plywood: Excellent for general construction, shelves, and cabinets. Available in various grades and wood species.
- MDF (Medium-Density Fiberboard): Good for painted surfaces and jigs, but not as strong or moisture-resistant as plywood.
- Solid Wood: Can be used for cleat systems, trim, or specialized tool holders for a premium look and feel.
- PVC Pipe: Great for cheap and effective storage of long items like clamps or sanding sticks.
- Hardware: Don’t skimp on quality casters, drawer slides, and hinges. They make a huge difference in functionality and longevity.
Budgeting: List all materials and hardware, estimate quantities, and research prices. Don’t forget fasteners, glue, and finishes. Look for opportunities to use reclaimed wood or offcuts to save money, tying back to the concept of 3 profitable scrap wood projects that sell in 2026, many of which start with small, organized pieces.
Conclusion
Creating effective DIY Smart Workshop Storage Solutions: Maximizing Space and Organization for Every Tool is an ongoing journey, but a deeply rewarding one. By strategically utilizing vertical space with French cleat systems and robust shelving, incorporating modular cabinets and mobile workstations, and leveraging often-overlooked overhead areas, you can transform your workshop into a highly efficient and enjoyable place to create. Remember that customization is key; tailor your solutions to your specific tools and workflow.
Start by assessing your current situation, plan your designs carefully, and consider the longevity and adaptability of your chosen materials. Whether you’re building custom holders for your hand tools or a mobile workbench for your power tools, every step you take towards better organization contributes to a safer, more productive, and more inspiring woodworking environment. Embrace the DIY spirit, and watch your workshop become a true extension of your craftsmanship in 2026 and beyond.
Actionable Next Steps:
- Conduct a Workshop Audit: Dedicate an afternoon to going through every tool and material in your workshop. Categorize, declutter, and identify what needs a “home.”
- Sketch Your Ideal Layout: Grab some graph paper or open a simple design app. Draw your workshop and experiment with different placements for zones, benches, and storage systems.
- Start Small: Pick one area of your workshop that causes the most frustration (e.g., hand tool storage) and build a single French cleat module or a simple drawer organizer. Celebrate that small victory and build momentum.
- Gather Materials: Begin collecting plywood scraps, offcuts, or even repurposing old furniture components to kickstart your first storage project.
