

Woodworkers inhabiting small or evolving workshop spaces often face a critical dilemma: how to maximize functionality without sacrificing precious square footage. While many contemplate fixed benches or wall-mounted solutions, a mobile woodworking island workbench presents a compelling, often superior alternative. This article delves into the detailed plans and considerations for building such a versatile, movable workspace, emphasizing modularity, smart tool integration, and practical space-saving features tailored for woodworkers navigating limited or changing workshop layouts in 2026. This approach offers unparalleled flexibility, allowing a single workstation to serve multiple purposes and adapt to various project demands, a true game-changer for efficient woodworking.
Key Takeaways
- A mobile woodworking island workbench offers crucial flexibility for small or evolving workshops, transforming single spaces into multi-functional zones.
- Customizable designs allow for modular expansion, incorporating specific tool mounts, storage solutions, and specialized work surfaces as needs change.
- Heavy-duty locking casters are essential for safe and easy mobility, while a robust framework ensures stability during demanding tasks.
- Integrating features like dog holes, T-tracks, router table inserts, and dust collection ports maximizes the bench’s utility and efficiency.
- Thoughtful material selection, joinery, and finishing contribute to the workbench’s durability and longevity.
Understanding the Need for a Mobile Woodworking Island Workbench: Customizable Designs for Small and Evolving Workshops
The modern woodworker often operates in constrained environments, a corner of a garage, a basement nook, or even a shared space. In such scenarios, a static workbench can quickly become a bottleneck, dictating workflow rather than facilitating it. A mobile woodworking island workbench addresses this directly, offering the ability to reconfigure your workspace on the fly. This adaptability is not just about convenience; it’s about efficiency, safety, and maximizing output within limited confines.
Consider a scenario where you need to dimension large sheets of plywood. A mobile workbench can be rolled into position to act as an outfeed table for your table saw, then moved aside to create space for assembly, and finally repositioned for sanding or finishing. This fluid movement allows for a dynamic workshop layout that responds to the specific needs of each project, rather than forcing projects to conform to a rigid setup. The ability to customize the bench with specific features, from integrated vises to dedicated storage, makes it an indispensable asset.
Why Mobility Matters
Mobility fundamentally redefines how a small workshop functions. It allows you to:
- Adapt Layouts: Easily move your primary workspace to accommodate large stock, multiple concurrent projects, or the movement of other tools.
- Improve Access: Position your work closer to natural light, power outlets, or dust collection points as needed.
- Optimize Space: When not in use, a mobile workbench can be pushed against a wall or into a corner, freeing up floor space for other activities or storage. This can be especially useful for those who might also explore building a DIY wall-mounted fold-down workbench for supplementary surface area.
- Enhance Safety: Clear pathways and designated work zones can be established or removed dynamically, reducing trip hazards and improving overall safety.
- Facilitate Cleaning: Rolling the bench out of the way makes sweeping or vacuuming sawdust a simpler task, especially when paired with an efficient DIY compact dust collection system.
The core principle here is versatility. Your workbench isn’t just a surface; it’s a dynamic hub that integrates with your tools and your workflow, making it a central component of an evolving workshop strategy.
Essential Design Principles for Your Mobile Island Workbench
When embarking on building a mobile woodworking island workbench, several foundational design principles should guide your construction:
- Stability First: Despite its mobility, the workbench must remain rock-solid during use. This requires robust construction, adequate mass, and high-quality locking casters.
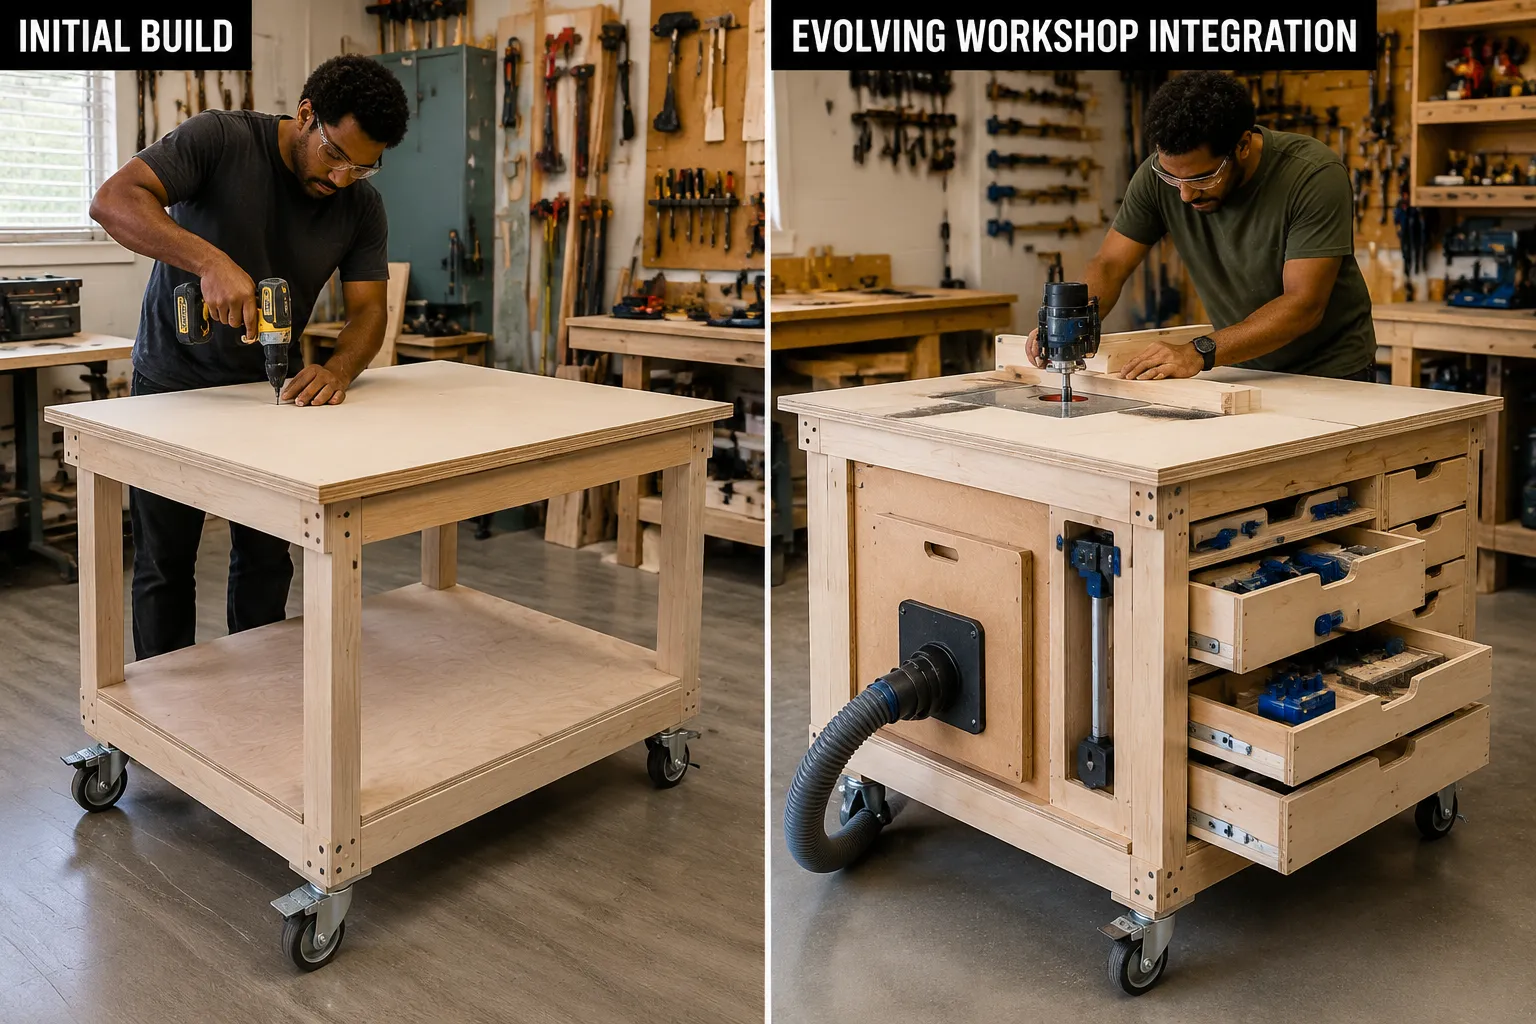
- Modularity: Design the workbench in sections or with adaptable features. This allows for future upgrades, modifications, or the integration of new tools without rebuilding the entire unit. Think of it as a base platform upon which various modules can be added or swapped.
- Ergonomics: The height of your workbench should be comfortable for you, whether standing or sitting, for the majority of tasks you perform. Consider incorporating adjustable height features if your work varies greatly.
- Integrated Storage: Small workshops benefit immensely from smart storage. Design for drawers, shelves, or cabinets that can hold tools, jigs, and materials, keeping everything within reach. For more ideas on maximizing tool storage, consider options like building a DIY wall-mounted tool cabinet with French cleats.
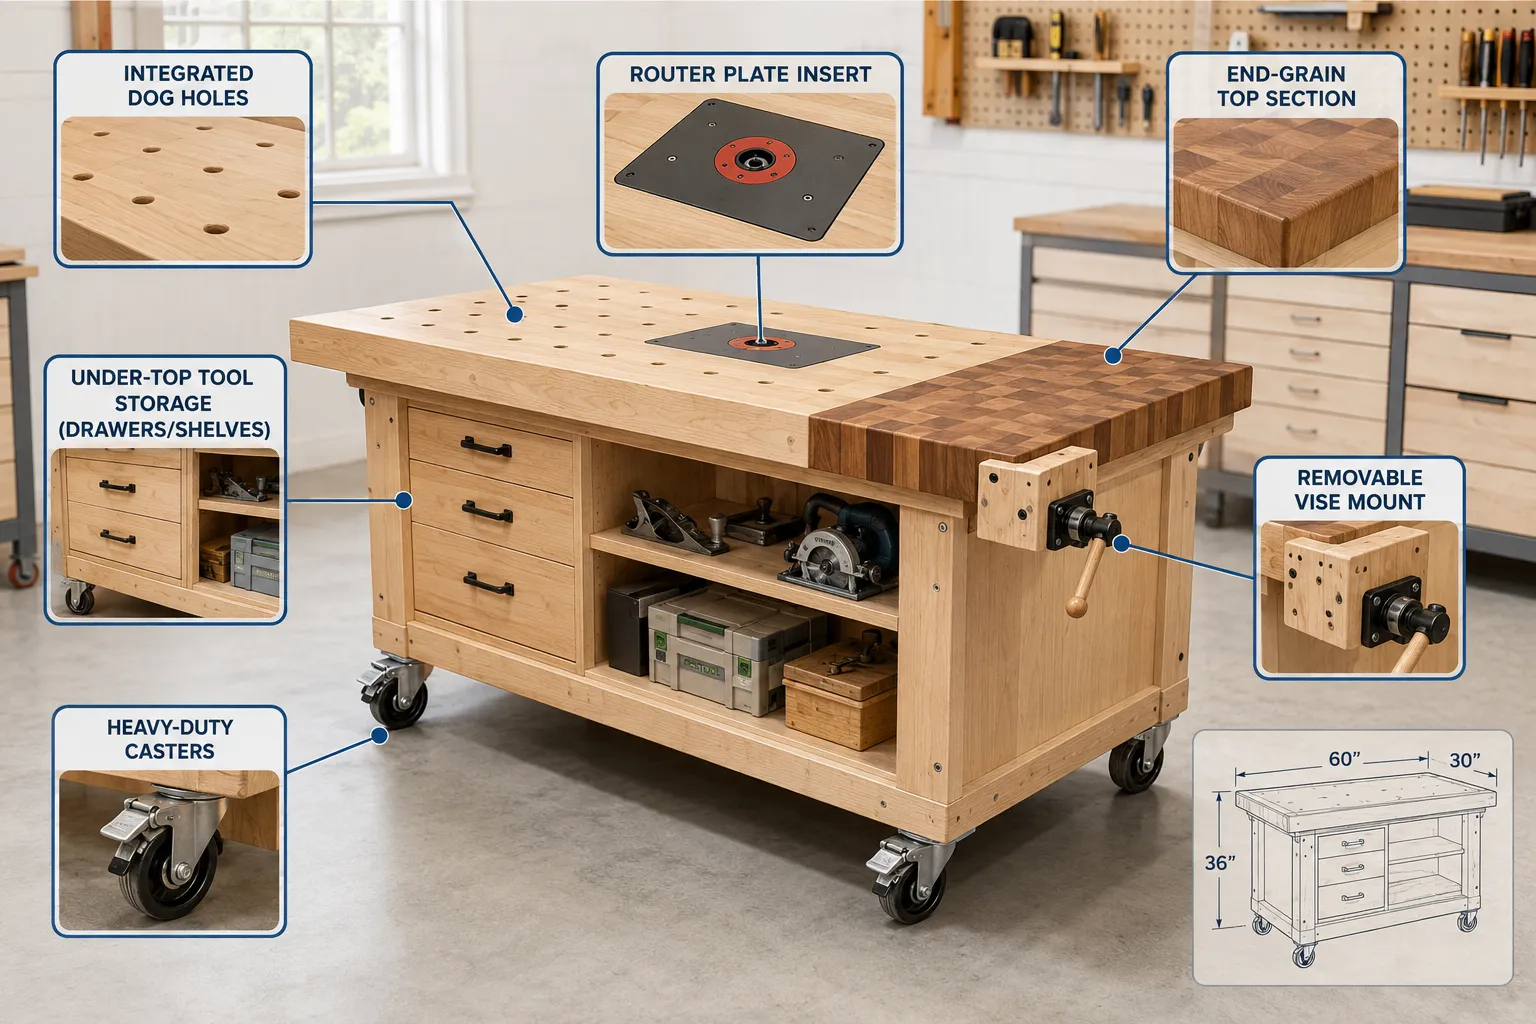
- Tool Integration: Plan for dedicated spaces or mounts for frequently used hand tools, power tools, or specialized jigs. This could include a recessed router plate, a dog hole pattern for clamps, or a sturdy vise.
By adhering to these principles, you ensure your mobile woodworking island workbench is not just a project, but a lasting, adaptable foundation for your woodworking journey.
Customizable Features and Modular Add-ons for Your Mobile Workbench
The true power of a mobile woodworking island workbench lies in its customizable nature. It’s not a static block of wood but a dynamic platform that can be tailored to your specific needs and evolve alongside your skills and projects. This section focuses on specific features and modular add-ons that transform a basic bench into a highly functional, multi-purpose workstation.
Work Surface Customization
The workbench top is your primary interface with your projects. It needs to be durable, flat, and adaptable.
- Dog Holes and Holdfasts: A grid of 3/4-inch or 20mm dog holes drilled into the workbench top allows for the use of holdfasts, bench dogs, and specialized clamping systems. This creates versatile work-holding options across the entire surface.
- T-Tracks: Recessed T-tracks can be integrated into the surface for quick clamping, router fence attachment, or creating custom jigs.
- Router Table Insert: For those without a dedicated router table, a portion of the workbench can be routed out to accept a removable router plate. This transforms a section of your bench into a fully functional router table when needed, saving floor space.
- Sacrificial Top: Consider a replaceable hardboard or MDF top layer that can be easily swapped out when damaged or excessively worn. This protects your primary workbench surface.
- Edge Treatments: A sturdy edge, perhaps with a slight overhang, can provide additional clamping surfaces.
Integrated Tool Storage
Efficient storage beneath the workbench is paramount in a small workshop.
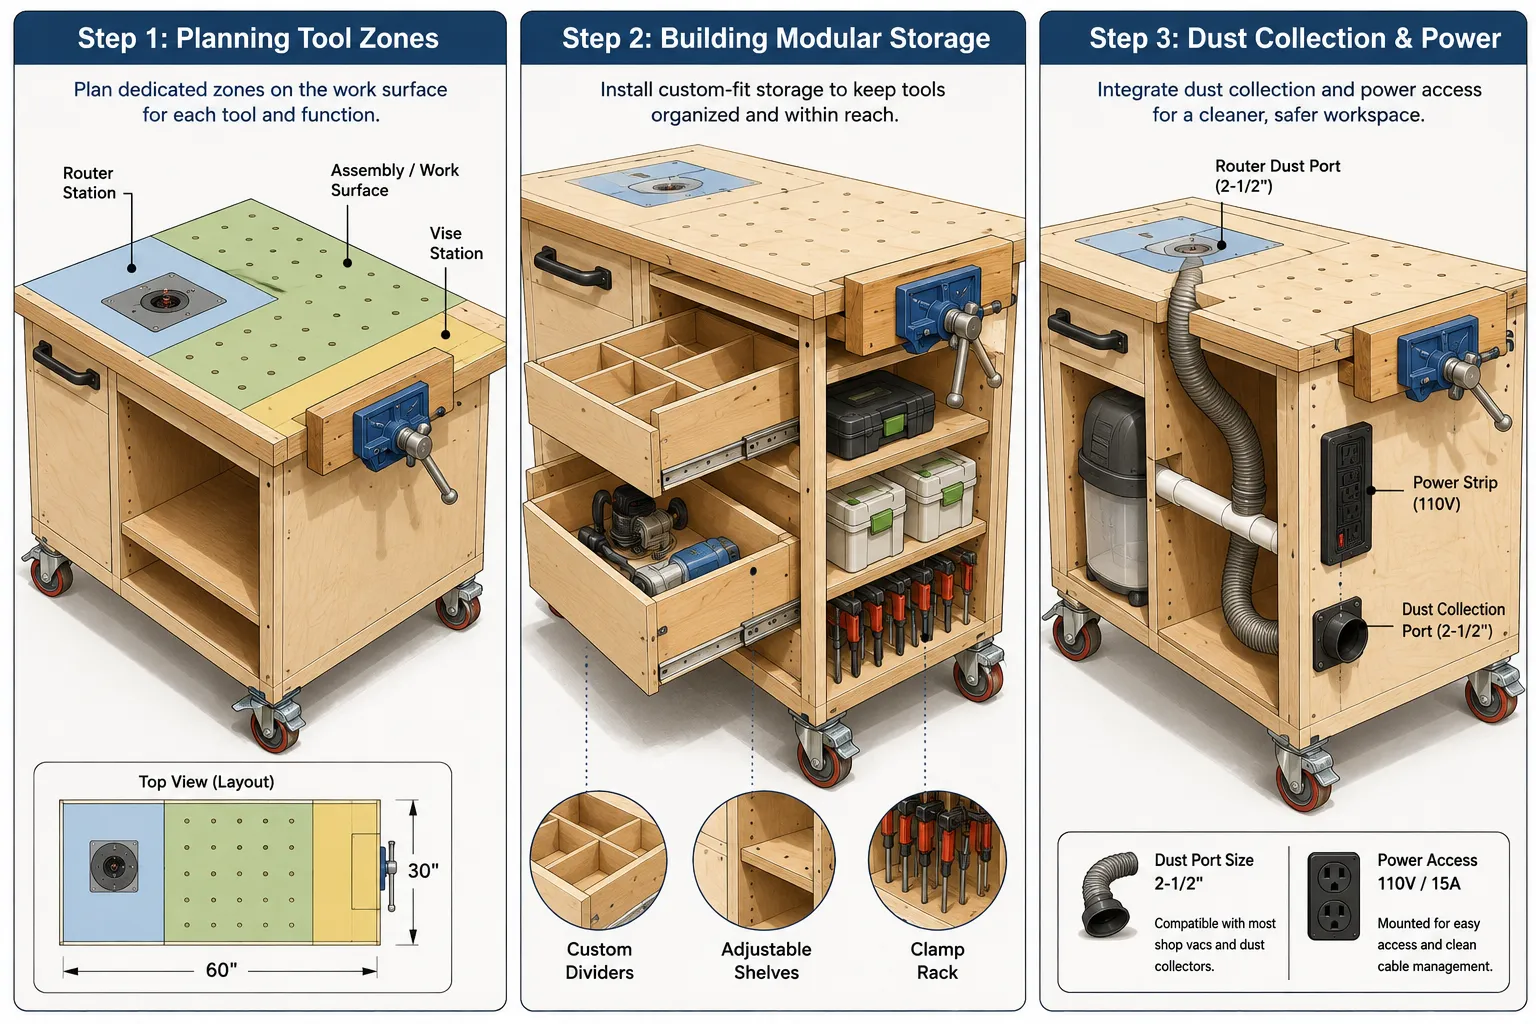
- Drawers and Cabinets: Custom-sized drawers can house hand tools, chisels, planes, and specialized jigs. Drawers should be full-extension for easy access and sturdy enough to hold weight. Cabinets with shelves can store larger items like sanders, clamps, or even a small vacuum. For more on optimizing tool storage, see Building a Compact Tool Cabinet: Vertical Storage Solutions and Modular Organization for Small Shops.
- Open Shelving: Simple open shelves provide quick access to frequently used items or project materials.
- French Cleat System: A section of the workbench base could incorporate a French cleat system, allowing for flexible attachment of tool holders, small cabinets, or specialized jigs. This leverages the benefits of wall-mounted cleat systems in a mobile format.
- Tool Racks: Side-mounted tool racks or pegboards can keep commonly used items like saws, rulers, or squares within arm’s reach.
Specialized Tool Integration
Beyond basic storage, consider how specific power tools can become part of your mobile workbench ecosystem.
- Vise Options: Integrate a sturdy woodworking vise, either permanently mounted or with a removable plate for versatility. Consider a face vise, end vise, or a wagon vise depending on your primary tasks.
- Miter Saw Station: Design a section of your workbench that allows for a miter saw to be permanently mounted or temporarily dropped in, with outfeed supports that match the bench height.
- Sanding Station: Dedicate a section of the workbench with a replaceable surface and integrate a small dust collection port for sanding tasks, minimizing airborne dust.
- Benchtop Tool Platforms: Create specific platforms or shelves that can temporarily host benchtop tools like a drill press, disc sander, or planer, moving them off a main workbench surface when not in use.
Integrating these customizable designs and modular add-ons allows your mobile woodworking island workbench to evolve from a simple flat surface into the nerve center of your small or evolving workshop. The beauty is that you don’t need to build every feature at once; you can add them as your needs dictate, making it a truly future-proof investment.
Building Your Mobile Woodworking Island Workbench: Step-by-Step Construction and Material Selection
Successfully building a mobile woodworking island workbench requires careful planning, appropriate material selection, and precise execution. This section outlines the general construction process and offers guidance on choosing the right materials for durability and functionality.
Material Selection for Durability and Performance
The choice of materials significantly impacts the workbench’s strength, stability, and longevity.
- Frame:
- Hardwood (Oak, Maple): Offers exceptional strength, durability, and resistance to denting. Ideal for a high-end, long-lasting workbench, but more expensive and harder to work with.
- Construction Lumber (Douglas Fir, Southern Yellow Pine): More economical and easier to find. Use select grade lumber, free of large knots and warps, for the frame. Laminating two pieces of 2×4 or 2×6 can create a very rigid and thick leg post.
- Plywood/MDF: Can be used for structural elements like stretchers and aprons, particularly for sheet goods construction, offering excellent stability.
- Workbench Top:
- Solid Hardwood (Maple, Birch): The gold standard for a woodworking benchtop, providing an incredibly durable, stable, and flat surface. A laminated construction (edge grain or end grain) is often preferred for ultimate durability.
- Baltic Birch Plywood: A premium plywood with many plies and no voids, offering excellent stability and flatness. Can be laminated to achieve desired thickness.
- MDF (Medium Density Fiberboard): Economical, very flat, and stable, but not as durable against impacts or moisture as solid wood or plywood. Often used as a substrate for a replaceable hardboard or laminate top layer.
- Casters: Crucial for mobility.
- Heavy-Duty Locking Casters: Look for casters rated for significantly more weight than your estimated workbench weight (e.g., 200-300 lbs per caster, totaling 800-1200 lbs capacity for a four-caster setup). Swivel casters provide better maneuverability. Ensure they have reliable locking mechanisms for both wheel rotation and swivel.
- Leveling Casters: Some premium casters offer a built-in leveling foot, allowing you to lift the workbench slightly off its wheels for ultimate stability during heavy use, then lower it back onto the casters for movement.
Step-by-Step Construction Guide
This guide provides a general overview. Always work from detailed plans or adapt existing designs to your specific needs.
Design and Planning:
- Determine the ideal dimensions (height, length, width) based on your height and workshop space.
- Sketch out your design, incorporating desired features like drawers, tool integration, and dog holes.
- Create a cut list for all components.
- Consider your small shop setup for table saw projects when planning dimensions and potential integration points.
Cut and Prepare Materials:
- Accurately cut all lumber and sheet goods according to your cut list.
- Dimension lumber for the legs, aprons, and stretchers.
- If building a laminated solid wood top, glue up the pieces and let them cure thoroughly.
Build the Base Frame:
- Assemble the leg assemblies (two legs, connected by top and bottom aprons/stretchers). Use strong joinery methods such as mortise and tenon, through-tenons, or robust half-lap joints reinforced with screws and glue. Pocket screws can also be used for strength, but ensure sufficient screw length and glue.
- Connect the two leg assemblies with side aprons/stretchers to form the main frame. Ensure the frame is square and plumb.
- Consider adding a bottom shelf or cabinet frame at this stage for added rigidity and future storage.
Install the Casters:
- Attach the heavy-duty locking casters to the bottom of each leg. Use lag screws or through-bolts for maximum security. Ensure the casters are aligned for smooth movement.
- If using leveling casters, install them according to the manufacturer’s instructions.
Construct and Attach the Workbench Top:
- If using a laminated solid wood top, flatten and plane it after glue-up.
- For plywood or MDF tops, cut to size and consider laminating multiple layers for thickness and rigidity.
- Drill any necessary dog holes or rout T-track grooves at this stage, before permanent attachment.
- Attach the top to the base frame. Use fasteners that allow for wood movement, such as screws driven through oversized holes, or specialized tabletop fasteners. Avoid glueing the entire top down directly to the frame, as this can lead to cracking due to seasonal expansion and contraction.
Add Custom Features and Storage:
- Build and install drawers, shelves, or cabinet doors beneath the workbench.
- Mount any vises, router plate inserts, or other dedicated tools.
- Install power strips, dust collection ports, or compressed air connections as needed.
- Consider options like woodworking jigs for batch production that could integrate with your workbench’s dog holes or T-tracks.
Finishing and Maintenance
- Seal the Wood: Apply several coats of a durable finish to protect the workbench from moisture, spills, and wear. Polyurethane, spar varnish, or a tung oil finish are good choices. Avoid finishes that leave a slick surface if you rely on friction for work holding.
- Wax the Top: A layer of paste wax on the workbench top reduces friction, making it easier to slide workpieces, and also provides additional protection.
- Regular Cleaning: Keep the workbench clean of sawdust and debris. Regularly check casters for smooth operation and ensure locking mechanisms are functioning correctly.
By carefully following these steps and selecting appropriate materials, you will create a mobile woodworking island workbench that is not only robust and highly functional but also perfectly tailored to the unique demands of your small and evolving workshop in 2026.
Conclusion
Building a mobile woodworking island workbench is arguably one of the most impactful projects a woodworker can undertake, especially for those operating within the confines of a small or evolving workshop. Its inherent versatility, derived from careful design and modular customization, transforms a static space into a dynamic, adaptable work environment. From providing an essential outfeed support for a table saw to becoming a dedicated assembly station or a mobile sanding booth with integrated dust collection, this type of workbench empowers woodworkers to maximize their efficiency and output, regardless of square footage limitations.
The true value lies not just in its initial construction, but in its capacity to grow and change with your skills, tools, and projects over time. By investing in quality materials, employing robust joinery, and thoughtfully integrating customizable features like dog holes, specialized storage, and tool mounts, you create a foundational piece of workshop furniture that will serve you reliably for years to come. In 2026, a workshop that can adapt is a workshop that thrives. Take the initiative to plan, build, and continually refine your mobile woodworking island workbench, and unlock the full potential of your creative space.
Next Steps:
- Assess Your Needs: Before cutting any wood, list the most frequent tasks you perform and the tools you use. This will guide your design choices for size, height, and integrated features.
- Sketch and Plan: Create detailed drawings, including dimensions and proposed modular add-ons. Consider building a scale model for complex designs.
- Gather Materials: Source high-quality lumber, plywood, and especially heavy-duty locking casters. Do not skimp on the casters; they are critical for the bench’s functionality and safety.
- Build in Stages: Focus on building a strong, stable base first. Then, gradually add the workbench top, storage solutions, and specialized tool integrations as your projects and needs dictate.
- Refine and Adapt: Don’t consider your workbench “finished.” Continuously look for ways to improve its functionality, add new features, or reconfigure existing ones to better suit your workflow.
SEO Meta Title: Build a Mobile Woodworking Island Workbench: Customizable Designs SEO Meta Description: Maximize your small workshop with a DIY mobile woodworking island workbench. Discover customizable designs, modular add-ons, and step-by-step construction for an evolving workspace in 2026.