
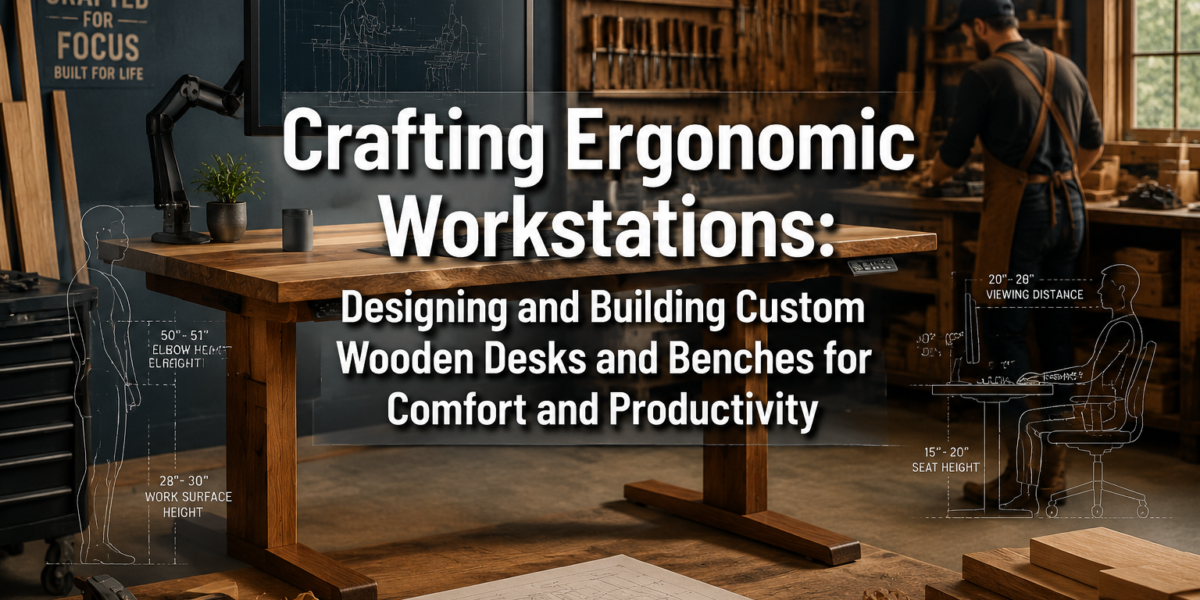

Over 80% of office workers experience back pain at some point in their lives, a staggering statistic that underscores the profound impact of poorly designed workspaces on health and productivity (National Institute of Neurological Disorders and Stroke, 2020). This isn’t just a corporate problem; it extends to home offices and workshops where countless hours are spent. The solution often lies not in generic, mass-produced furniture, but in intentionally designed spaces. This article delves into the principles of ergonomics applied to woodworking, guiding makers through Crafting Ergonomic Workstations: Designing and Building Custom Wooden Desks and Benches for Comfort and Productivity that enhance comfort, reduce fatigue, and boost efficiency, whether in a dedicated workshop or a bustling home office in 2026.
Key Takeaways
- Ergonomics is paramount: Understanding core ergonomic principles like adjustability, neutral posture, and proper dimensions is crucial for any custom workstation build.
- Customization is key: Generic furniture rarely fits perfectly; custom wooden desks and benches allow for precise tailoring to an individual’s unique body measurements and work needs.
- Material matters: Selecting the right wood species affects durability, aesthetics, and workability, impacting the longevity and appeal of the ergonomic piece.
- Design for functionality: Integrate features like cable management, adjustable components, and ample storage from the outset to enhance usability and reduce clutter.
- Safety first: Always prioritize safety in both the design process (e.g., stable construction) and the woodworking execution (e.g., proper tool use, finishes).
Understanding Ergonomic Principles for Custom Workstations
Ergonomics is the science of designing and arranging workplaces, products, and systems so that they fit the people who use them. When applied to custom wooden workstations, it means building furniture that supports the human body in a natural, comfortable, and efficient posture, thereby reducing strain, preventing injuries, and improving overall well-being and output.

At the heart of ergonomic design are several key principles:
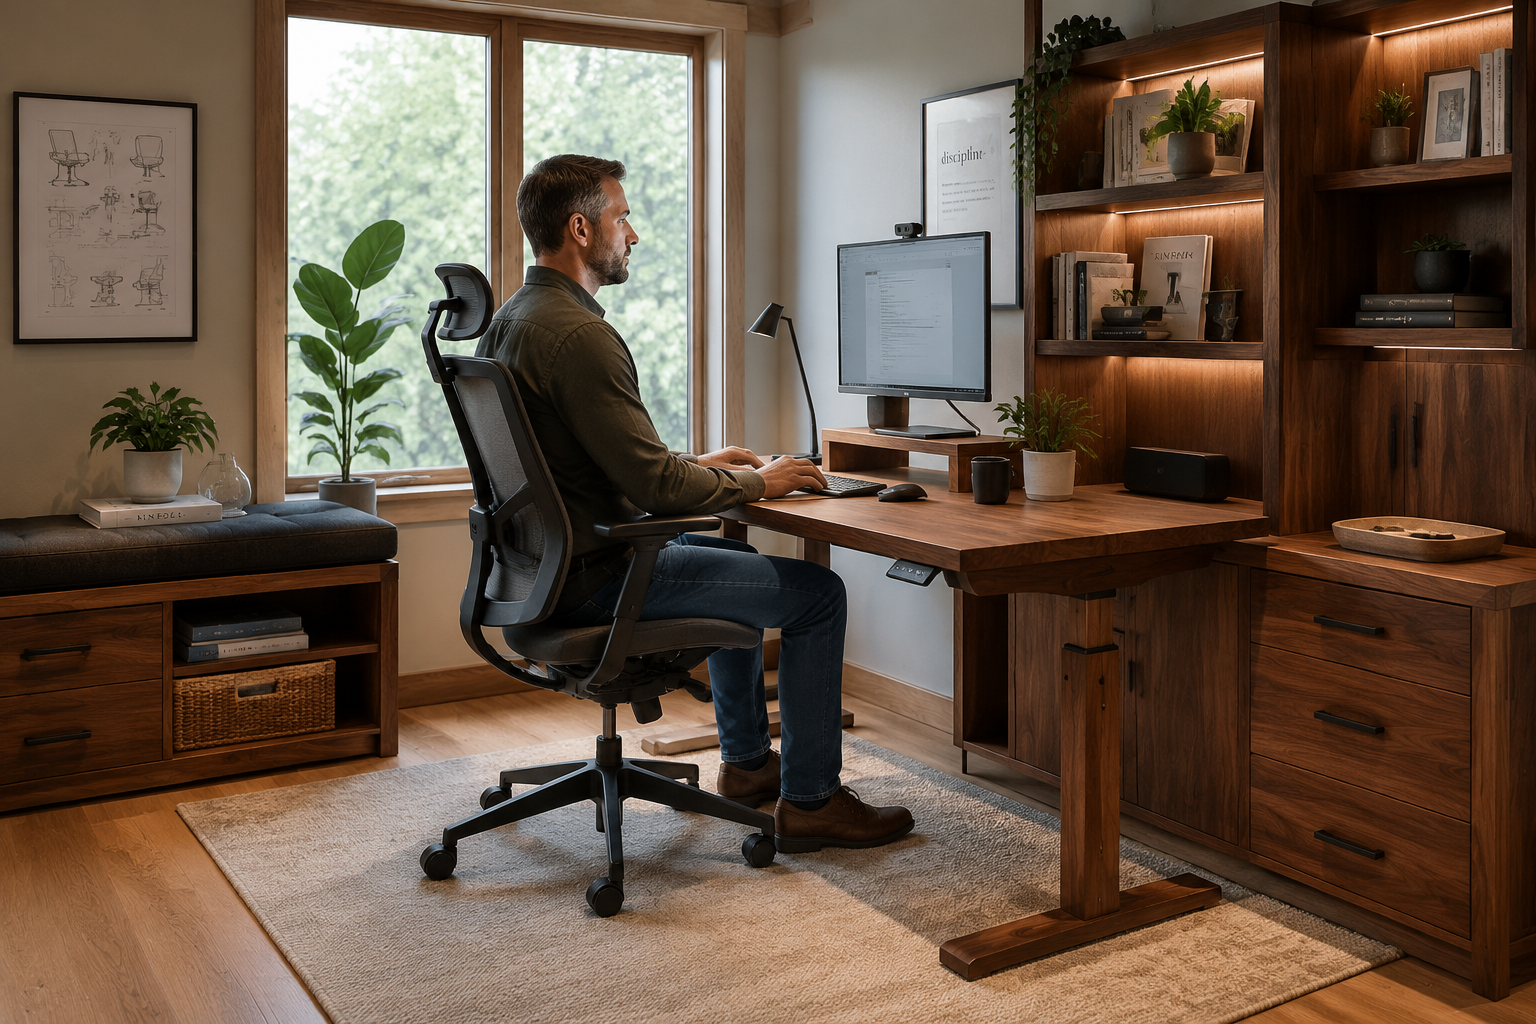
- Neutral Posture: The goal is to maintain the body in a neutral, relaxed position. For seated work, this means feet flat on the floor (or a footrest), knees at approximately a 90-degree angle, hips slightly higher than knees, back supported, shoulders relaxed, and elbows close to the body, also at a 90-degree angle. For standing work, it involves similar principles, with the standing surface height allowing relaxed shoulders and bent elbows.
- Adjustability: No two people are exactly alike. An ergonomic workstation should ideally be adjustable to accommodate different body types and preferences. This might include adjustable desk heights, monitor arms, keyboard trays, and seat heights.
- Clearance and Reach: Ensure there is adequate space under the desk for legs and feet, and that frequently used items are within an easy, comfortable reach to minimize awkward stretching.
- Visibility: Position screens and documents to minimize eye strain. Monitors should be at arm’s length, with the top of the screen at or slightly below eye level. Adequate, glare-free lighting is also essential.
- Support: Provide lumbar support for the lower back and ensure armrests, if present, allow shoulders to remain relaxed.
Essential Measurements for Ergonomic Design
Before cutting any wood, accurate measurements are paramount. These should be taken while the user is sitting or standing in their ideal working posture.
Table 1: Key Ergonomic Measurements for Desks and Benches
| Measurement Point | Seated Desk Height (inches) | Standing Desk Height (inches) | Workbench Height (inches) | Notes |
|---|---|---|---|---|
| Elbow Height | 24-29 (elbows at 90°) | 38-46 (elbows at 90°) | 34-40 (for fine work) | Critical for keyboard/mouse positioning. |
| Knee Clearance | 26-30 (under desk) | N/A | N/A | Ensure ample legroom. |
| Monitor Height | Top of screen at eye level | Top of screen at eye level | N/A | Prevents neck strain. |
| Bench Working Plane | N/A | N/A | 30-36 (general tasks) | Varies based on task (fine detail vs. heavy assembly). |
| Seat Height | 16-21 (feet flat) | N/A | N/A | For accompanying ergonomic bench/chair. |
Note: These are general ranges. Individual measurements are always preferred.
When planning your design, consider how these measurements translate to the chosen wood. Hardwoods like oak, maple, and cherry offer excellent durability and stability, crucial for a long-lasting ergonomic workstation. For inspiration on materials, exploring resources like Sustainable Wood Sourcing for the Modern Woodworker: Beyond Reclaimed can provide valuable insights into environmentally conscious choices.
Designing Your Custom Wooden Desk: Form Meets Function
Designing a custom wooden desk for ergonomic comfort and productivity is an exciting endeavor that blends woodworking craftsmanship with thoughtful functionality. The process for Crafting Ergonomic Workstations: Designing and Building Custom Wooden Desks and Benches for Comfort and Productivity involves careful consideration of user needs, material properties, and integrated features.
Desk Design Considerations:
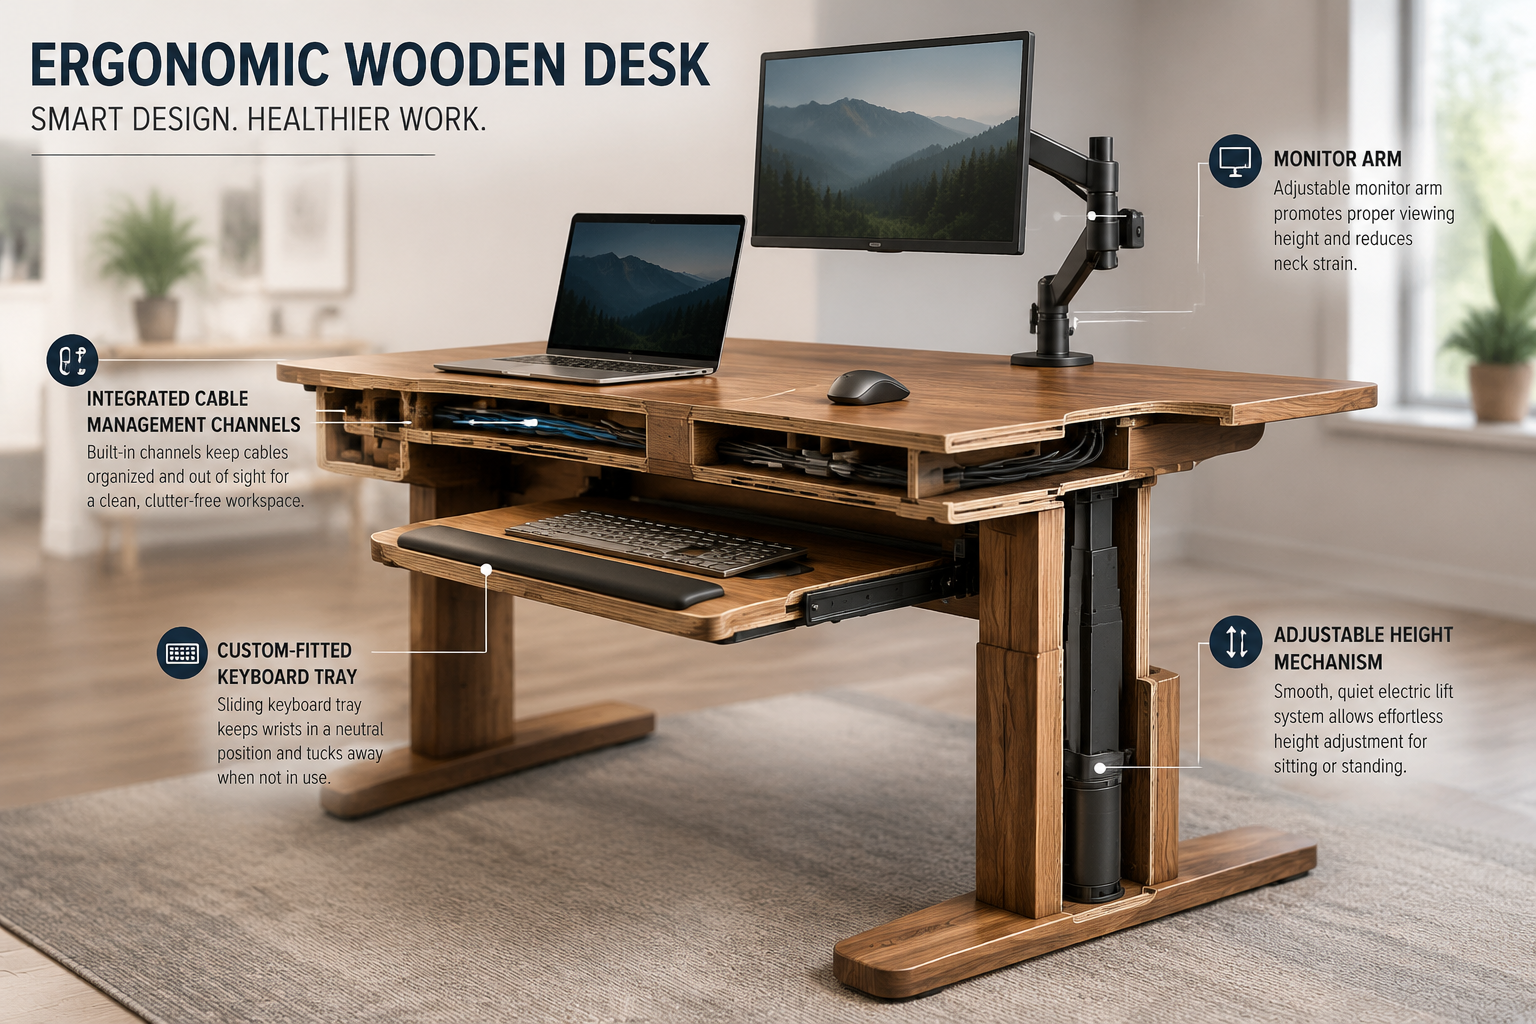
- Adjustable Height: This is arguably the most impactful ergonomic feature.
- Manual Mechanisms: Crank-based systems are simpler and more affordable but require physical effort.
- Electric Lift Systems: Offer effortless height adjustment with the push of a button, often with memory presets. These can be integrated seamlessly into a wooden frame.
- Fixed Height with Adjustable Elements: If a full adjustable desk is too complex, design a fixed desk at the user’s primary working height and incorporate adjustable monitor arms and keyboard trays.
- Desktop Dimensions:
- Depth: Aim for at least 24-30 inches to allow proper monitor distance and arm support.
- Width: Dependent on the user’s equipment and workflow, but generally 48-72 inches provides ample space.
- Cable Management: Integrate channels, grommets, or hidden compartments to keep wires tidy and out of the way. This prevents clutter and creates a cleaner, safer workspace. Check out our guide on Building a Modular Home Office Desk System: Customizable Designs for for more ideas on cable management.
- Storage Solutions: Drawers, shelves, or built-in cabinets can be incorporated to keep essential items within easy reach, reducing the need to twist or stretch.
- Material Selection:
- Hardwoods (Oak, Maple, Walnut, Cherry): Excellent for durability, aesthetic appeal, and stability. They can withstand heavy use and provide a beautiful, natural finish.
- Plywood (Baltic Birch, Cabinet Grade): A cost-effective and stable option for desktop surfaces or internal drawer boxes, often veneered for a premium look.
- Live Edge Slabs: For a unique, organic aesthetic, consider a live edge slab. Our article on Live Edge Slab Selection and Milling: From Raw Wood to Finis offers guidance.
Bench Design Considerations:
Ergonomic benches, especially for workshops, need to be sturdy and functional.
- Height: As mentioned in Table 1, workbench height is crucial. Consider a multi-height bench or a bench with adjustable risers if various tasks will be performed.
- Depth and Width: Ample surface area is important for spreading out projects and tools.
- Storage: Integrate drawers, cabinets, or tool holders directly into the bench design for easy access. Our guide to Building Modular Wood Storage Systems for Small Workshops: Maximizing offers excellent strategies for optimizing workshop storage.
- Workholding Features: Consider adding dog holes, a vise, or planning stops for securing workpieces.
- Lighting: Incorporate task lighting into the design to ensure adequate illumination over the work surface.
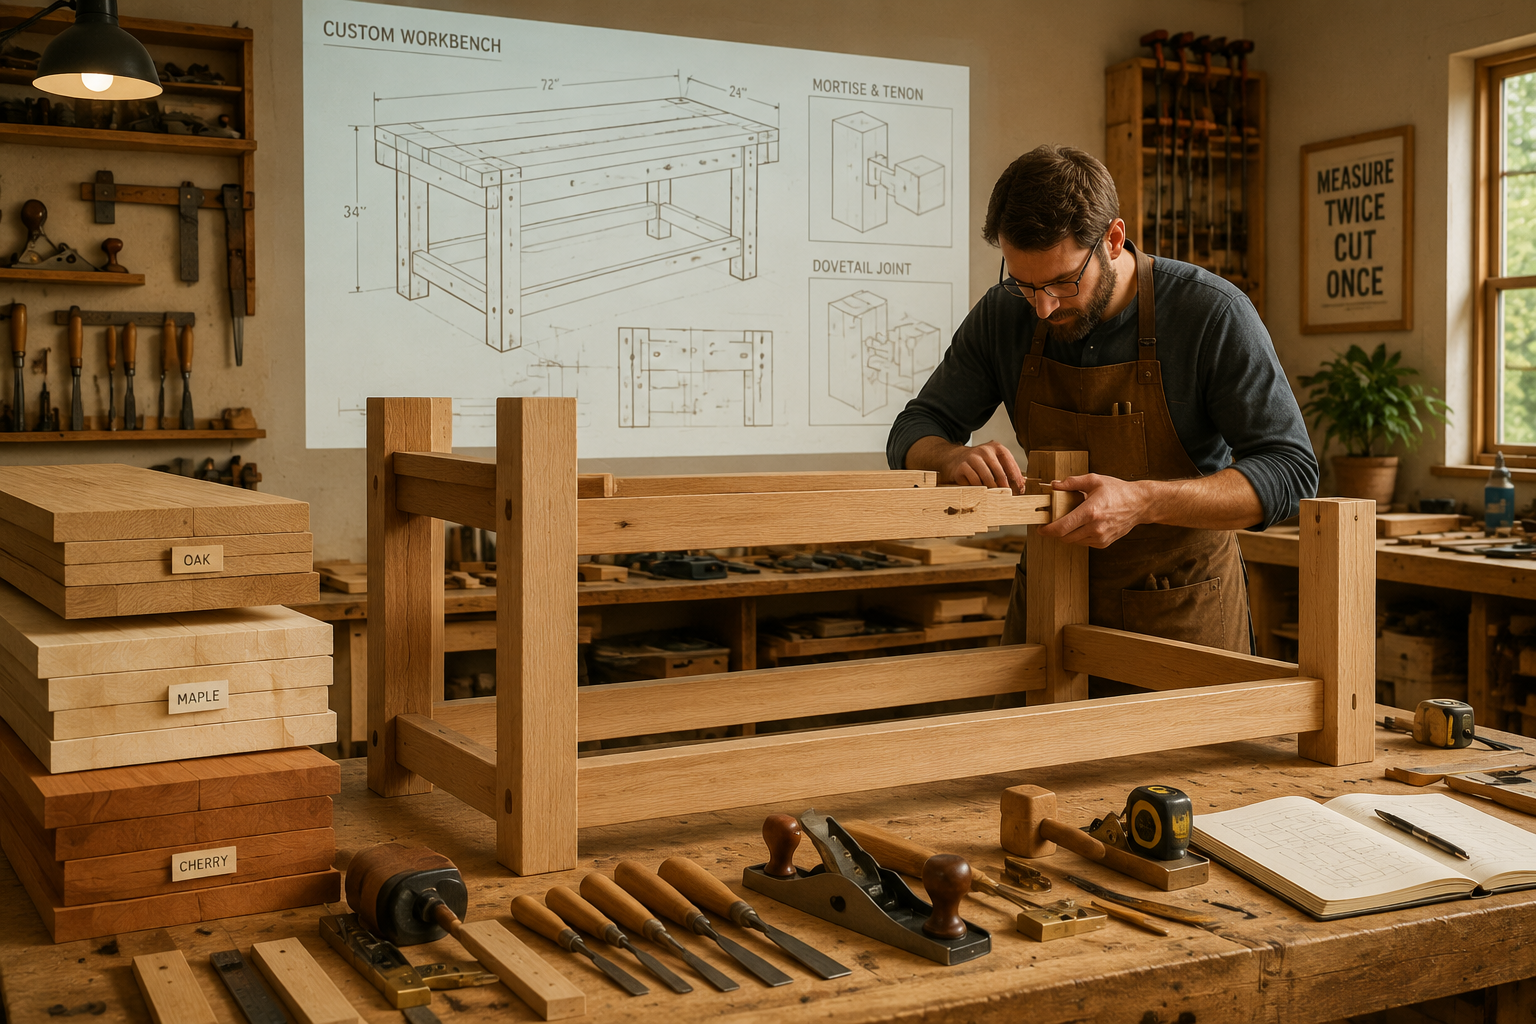
Joinery and Construction Techniques
For robust and durable workstations, strong joinery is essential.
- Mortise and Tenon: A classic, incredibly strong joint, ideal for table legs, aprons, and bench frames.
- Dovetail Joints: Excellent for drawers, providing exceptional strength and a beautiful aesthetic. For mastering these, see our Mastering Dovetail Joints with Hand Tools: A Step-by-Step Guide for.
- Domino or Dowel Joints: Offer good strength and precision, especially with the aid of jigs.
- Pocket Hole Joinery: A fast and effective method for certain applications, particularly for attaching tabletops to aprons, but often less aesthetically pleasing if visible.
The choice of wood glue is also critical for strong joints. Refer to The Ultimate Guide to Wood Glue: Choosing the Right Adhesive for for detailed advice.
Building and Finishing Your Ergonomic Wooden Workstation
With the design finalized, the next phase is bringing your custom ergonomic workstation to life. This requires precision, careful execution, and thoughtful finishing to ensure both functionality and longevity.
Precision Cutting and Assembly
- Measure Twice, Cut Once: This adage is especially true when building custom furniture where precise dimensions are critical for ergonomics. Use high-quality measuring tools.
- Tool Selection: Utilize appropriate power tools for efficiency and accuracy (e.g., table saw for ripping, miter saw for crosscuts, router for edge profiling). For detailed work, hand tools like chisels and planes are invaluable. Learn more about Hand Tool Mastery for Detail Work: Chisels, Hand Planes, and.
- Dry Fit: Always perform a dry fit of all components before applying glue. This allows for adjustments and ensures all joints align perfectly.
- Gluing and Clamping: Apply wood glue evenly and clamp the joints securely. Ensure the assembly is square and flat before the glue sets. Allow adequate drying time.
Sanding for a Smooth Finish
Sanding is crucial for preparing the wood for finishing.
- Gradual Grit Progression: Start with a coarser grit (e.g., 80-100 grit) to remove milling marks and imperfections, then progressively move to finer grits (150, 180, 220) for a smooth surface.
- Proper Technique: Sand with the grain to avoid scratches. Use a random orbital sander for large surfaces and hand sanding for intricate areas.
- Dust Removal: Thoroughly remove all sanding dust between grits using a vacuum or tack cloth to prevent marring the surface with trapped particles.
Applying a Durable Finish
The finish protects the wood, enhances its beauty, and contributes to the overall ergonomic experience by providing a smooth, pleasant surface.
- Clear Coats:
- Polyurethane (Oil-based or Water-based): Highly durable and resistant to scratches and moisture. Water-based polyurethanes dry faster and have less odor. Consider sprayable water-based polyurethane for a flawless application.
- Varnish: Offers excellent protection, especially spar varnish for high moisture environments.
- Lacquer: Dries quickly and builds a beautiful, deep finish, but requires careful application.
- Oils (Tung Oil, Linseed Oil, Danish Oil): Penetrate the wood, enhancing its natural grain and providing a more natural feel. They offer good protection but may require more frequent reapplication than clear coats.
- Stains: Can be applied before a clear coat to alter the wood’s color, matching existing decor or creating a desired aesthetic. Practice on scrap wood first.
- Application: Apply finishes in a well-ventilated area, following manufacturer instructions. Multiple thin coats are generally better than one thick coat, with light sanding between coats for optimal adhesion and smoothness.
Integrating Adjustable Hardware
For ergonomic desks, the integration of adjustable hardware requires careful planning.

- Electric Lift Legs: These typically come as pre-assembled units. Design your wooden frame to attach securely to these legs. Ensure adequate support for the desktop.
- Monitor Arms: These can clamp to the desktop or be drilled directly into the wood. Reinforce the attachment point if necessary.
- Keyboard Trays: Custom wooden trays can be built and attached to adjustable slides under the desk.
“Building a truly ergonomic workstation isn’t just about functionality; it’s about crafting a space that inspires and supports your best work.” — WoodcraftWiz Design Philosophy
When it comes to Crafting Ergonomic Workstations: Designing and Building Custom Wooden Desks and Benches for Comfort and Productivity, the finishing touches are what elevate a functional piece into a truly comfortable and productive environment. This attention to detail ensures your custom creation serves its purpose for years to come.
Conclusion
Crafting Ergonomic Workstations: Designing and Building Custom Wooden Desks and Benches for Comfort and Productivity is a rewarding project that combines the satisfaction of woodworking with the tangible benefits of improved health and efficiency. By meticulously applying ergonomic principles, selecting appropriate materials, employing robust joinery, and applying durable finishes, woodworkers can create personalized workspaces that perfectly support their unique needs in 2026. From the initial precise measurements to the final coat of finish, every step contributes to a workstation that minimizes strain, enhances focus, and fosters a more enjoyable and productive environment, whether for intricate crafts or demanding digital tasks. The investment in time and skill will undoubtedly yield a space that not only looks exceptional but profoundly improves daily well-being.
Actionable Next Steps
- Self-Assessment: Carefully measure your own body dimensions (elbow height, eye level, leg length) in both seated and standing positions to determine your ideal workstation parameters.
- Research & Inspiration: Explore different ergonomic desk and bench designs online and in woodworking magazines. Consider features like integrated power, smart storage, and adjustable components.
- Sketch & Plan: Create detailed drawings or 3D models of your proposed workstation, incorporating all ergonomic measurements and desired features.
- Material Sourcing: Select high-quality wood species that match your aesthetic and durability requirements. Source any necessary hardware like adjustable leg mechanisms or monitor arms.
- Build with Precision: Take your time, focus on accuracy, and enjoy the process of building a custom piece that will serve you well for years to come.
References
National Institute of Neurological Disorders and Stroke. (2020). Low Back Pain Fact Sheet. National Institutes of Health.
SEO Meta Title: Crafting Ergonomic Wooden Workstations: Desks & Benches
SEO Meta Description: Design & build custom ergonomic wooden desks and benches for comfort and productivity in 2026. Learn principles, designs, and techniques.
