
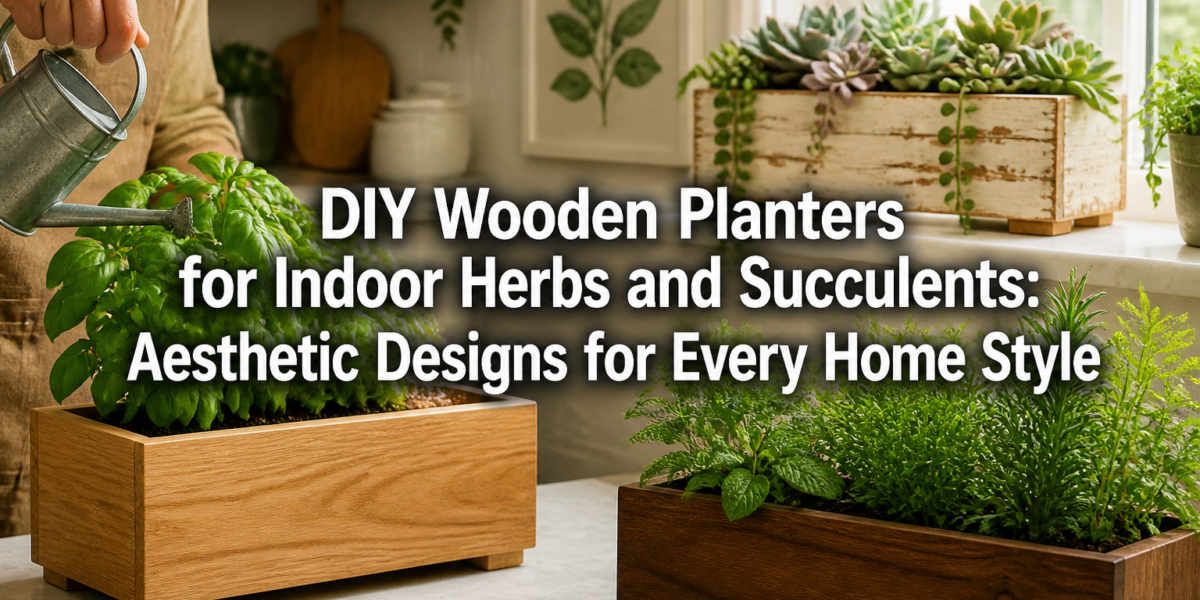

The average household in 2026 hosts at least three types of indoor plants, according to recent horticultural surveys. This growing trend underscores a universal desire to connect with nature, even within urban environments. For those seeking to elevate this connection with a personal touch and a unique aesthetic, the craft of creating DIY Wooden Planters for Indoor Herbs and Succulents: Aesthetic Designs for Every Home Style offers an unparalleled opportunity. These handmade pieces not only provide a nurturing home for your beloved greens but also become focal points that reflect your personal style and commitment to craftsmanship.
Key Takeaways
- Wood Selection is Crucial: Opt for moisture-resistant woods like cedar, redwood, cypress, or treated pine to ensure longevity and prevent rot in indoor environments.
- Drainage is Non-Negotiable: Proper drainage holes and optional gravel layers are essential to prevent root rot in herbs and succulents.
- Aesthetic Versatility: Wooden planters can be tailored to fit any home décor, from minimalist and modern to rustic and bohemian, through design choices and finishing techniques.
- Protection is Key: Applying waterproof sealants and liners extends the life of your planter, protecting both the wood and your interior surfaces.
- Simple Tools, Big Impact: Basic woodworking tools are often sufficient for creating beautiful and functional indoor planters.
Choosing the Right Wood and Essential Tools for DIY Wooden Planters for Indoor Herbs and Succulents
Creating beautiful and durable DIY Wooden Planters for Indoor Herbs and Succulents: Aesthetic Designs for Every Home Style begins with careful material selection. Not all wood is created equal, especially when it comes to holding moisture and supporting plant life indoors. The right wood choice ensures your planter lasts for years, while the appropriate tools make the building process enjoyable and efficient.

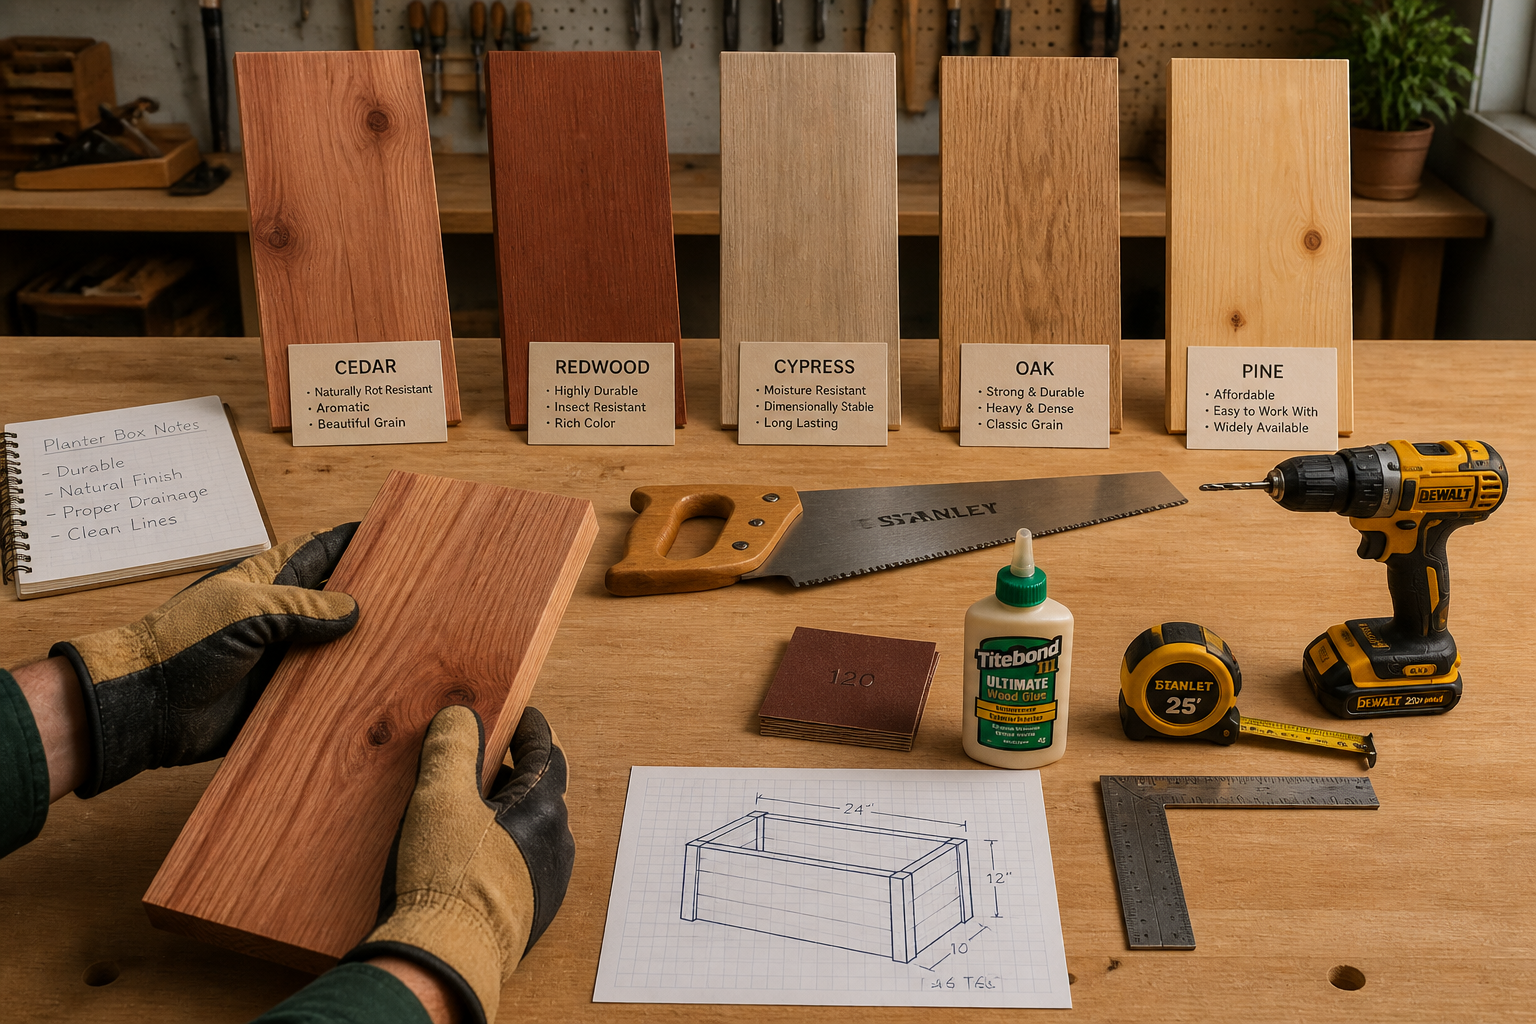
Wood Selection for Longevity and Style
When considering wood for indoor planters, moisture resistance is paramount. Here are some excellent choices:
- Cedar: Known for its natural resistance to rot and insects, cedar is an excellent choice. It has a beautiful, rich color and a pleasant aroma. It’s relatively soft, making it easy to work with.
- Redwood: Similar to cedar, redwood is naturally durable and resistant to decay. It offers a stunning reddish-brown hue that deepens with age.
- Cypress: This wood is highly resistant to water and decay, making it ideal for high-moisture environments. It’s lighter in color and has a distinct grain pattern.
- Treated Pine: While standard pine is less durable against moisture, pressure-treated pine can be an economical option for planters. However, ensure it’s specifically rated for interior or non-toxic applications, as some treatments can leach chemicals. For indoor use, it’s often best to line thoroughly.
- Oak (White Oak): White oak is more resistant to moisture than red oak due to its closed cell structure, making it a viable, albeit more expensive and harder to work with, option for a premium look.
- Reclaimed Wood: Using reclaimed wood, such as barnwood or old fence planks, adds character and a story to your planters. Just ensure it’s free of pests and rot, and consider its previous exposure to chemicals. For more on sourcing sustainable materials, explore Sustainable Wood Sourcing for the Modern Woodworker.
Choosing the wood also dictates the aesthetic. Light woods like cypress offer a bright, airy feel, while darker woods like redwood or stained cedar lend a more sophisticated or rustic vibe.
Essential Tools for Your Planter Project
You don’t need a full-blown workshop to craft beautiful wooden planters. Many designs can be achieved with a modest set of tools.
Hand Tools (Beginner-Friendly)
- Hand Saw: For cutting wood to size.
- Measuring Tape & Pencil: For accurate measurements and markings.
- Clamps: To hold pieces securely while gluing or screwing.
- Sanding Blocks & Sandpaper: For smoothing edges and surfaces (various grits).
- Wood Glue: Essential for strong joints.
- Hammer & Nails or Screwdriver & Screws: For fastening pieces together.
- Drill: For pilot holes and drainage holes.
- Chisel (Optional): For fine adjustments or decorative elements. Hand Tool Mastery for Detail Work offers insights into their use.
Power Tools (For Efficiency and Precision)
- Miter Saw or Circular Saw: For faster, more accurate cuts, especially for angled pieces.
- Orbital Sander: Significantly speeds up the sanding process.
- Drill/Driver: More powerful than a hand drill, great for driving screws.
- Jigsaw (Optional): For curved cuts or intricate designs.
- Router (Optional): For decorative edges or dado joints. Learn more about The Essential Guide to Router Bits.
Always prioritize safety when working with tools. Wear appropriate eye protection, hearing protection, and gloves. Ensure your workspace is clean and well-lit.
Aesthetic Designs for Every Home Style of DIY Wooden Planters for Indoor Herbs and Succulents
The beauty of creating DIY Wooden Planters for Indoor Herbs and Succulents: Aesthetic Designs for Every Home Style lies in their incredible versatility. With a few design tweaks, a wooden planter can seamlessly integrate into, or even define, the aesthetic of any room.
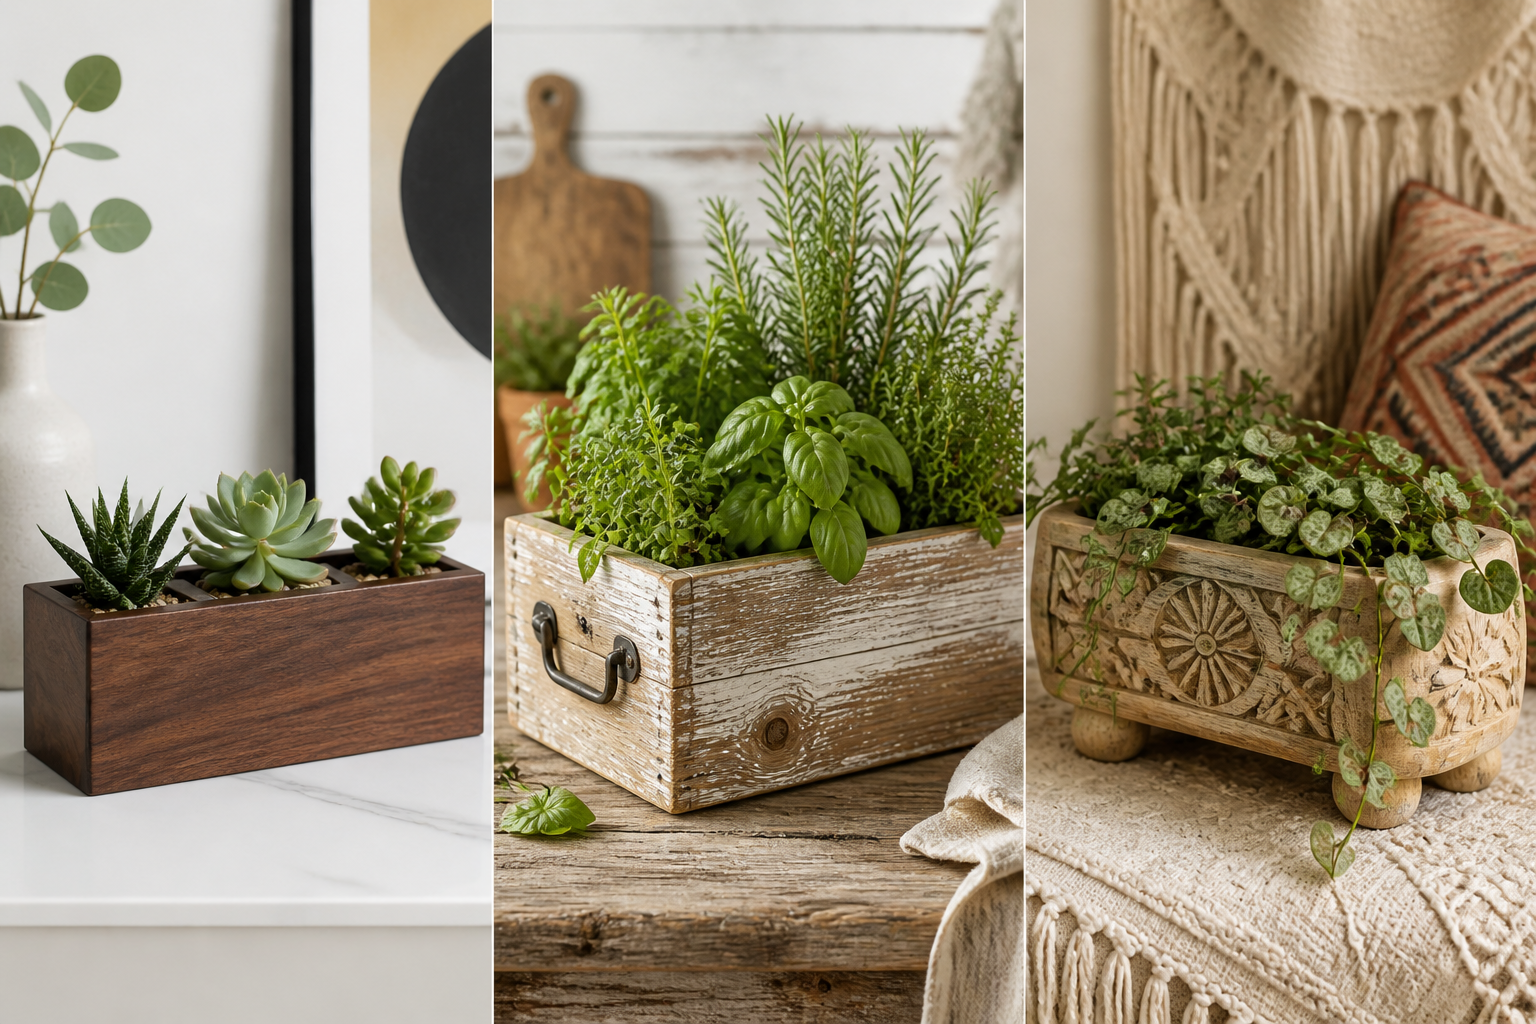
Modern Minimalist
- Design: Clean lines, geometric shapes, and a focus on functionality. Think simple rectangular or square boxes.
- Wood: Light-colored woods like maple or birch, or dark-stained walnut for a sophisticated contrast. Keep the grain subtle.
- Finish: Smooth, matte, or a very subtle sheen. Natural oils or clear sealants work well. Avoid ornate details.
- Features: Often elevated on slender legs or part of a multi-tiered stand. A single, well-placed succulent or a sparse arrangement of herbs.
- Example: A sleek, elongated trough planter made from a single piece of light wood, housing a row of small, uniform succulents. This approach aligns with Warm Minimalism in Woodworking.
Rustic Farmhouse
- Design: Emphasizes natural textures, distressed finishes, and a cozy, lived-in feel. Imperfections are often celebrated.
- Wood: Reclaimed barnwood, distressed pine, or rough-sawn cedar. Weathered appearances are a plus.
- Finish: Matte, natural, or a light stain that allows the wood grain to show through. Milk paint or chalk paint in muted tones can also work.
- Features: Often larger, robust boxes. May incorporate metal accents like corner brackets or handles. Perfect for abundant herb gardens like basil, mint, and rosemary.
- Example: A chunky, square planter made from salvaged pallet wood, with a slightly uneven finish and visible nail holes, housing a cluster of fragrant herbs.
Bohemian Eclectic
- Design: Free-spirited, artistic, and often incorporates global influences. Mixes textures, patterns, and colors.
- Wood: Varied, often lighter woods like pine or cypress, sometimes painted with intricate patterns or carvings. Consider combining different wood types.
- Finish: Natural, painted, or distressed. Can include decorative elements like wood burning or simple carvings.
- Features: Unique shapes (e.g., hexagonal, circular), hanging planters, or planters with attached macramé. Ideal for trailing plants or diverse succulent arrangements.
- Example: A multi-faceted hexagonal planter made from various wood scraps, some pieces painted with geometric patterns, others left natural, housing an array of colorful succulents.
Traditional/Classic
- Design: Elegant, symmetrical, and timeless. Focus on craftsmanship and refined details.
- Wood: Cherry, mahogany, or finely finished oak. Rich, deep tones are common.
- Finish: Polished, semi-gloss, or high-gloss finishes that highlight the wood’s natural beauty. Stains like mahogany wood finishing techniques can be very effective.
- Features: Often features raised panels, mitered corners, or subtle decorative moldings. Brass or bronze hardware can add a touch of sophistication.
- Example: A rectangular planter with subtly chamfered edges and small decorative feet, crafted from cherry wood with a smooth, semi-gloss finish, holding a neat row of herbs.
Industrial Urban
- Design: Raw, utilitarian, and blends natural wood with metal elements. Often features exposed fasteners.
- Wood: Rough-sawn lumber, dark-stained pine, or reclaimed wood with strong, visible grain.
- Finish: Matte, natural, or dark, almost black stains. Emphasis on the raw quality of the wood.
- Features: Incorporates metal piping, angle iron, or dark steel accents. Bolt heads and rivets might be part of the aesthetic. Can be part of a larger shelving unit.
- Example: A simple, sturdy box planter made from dark-stained construction lumber, with exposed metal corner brackets and large, visible screws, housing resilient herbs like rosemary or thyme.
By considering these stylistic elements, you can design a DIY wooden planter that not only houses your plants but also enhances your home’s unique character.
Construction Techniques, Drainage, and Finishing for Durability
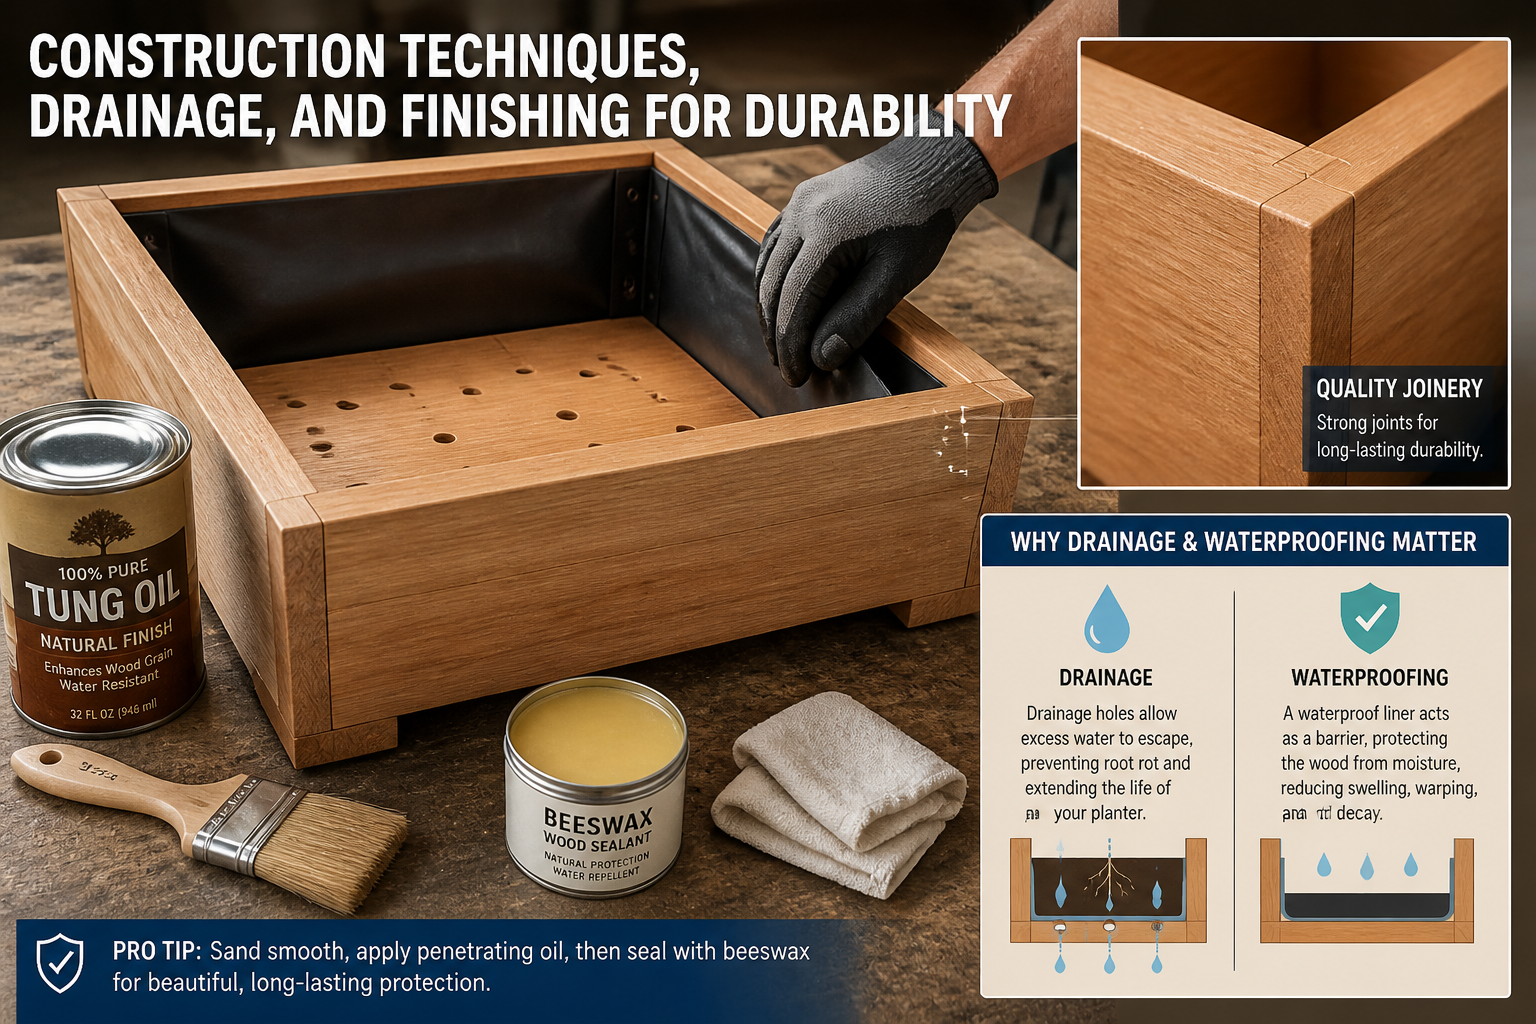
Successfully building DIY Wooden Planters for Indoor Herbs and Succulents: Aesthetic Designs for Every Home Style requires more than just aesthetic vision; it demands careful construction, intelligent drainage, and appropriate finishing to ensure durability and prevent issues like wood rot or water damage to your home.
Basic Construction Techniques
Most wooden planters are essentially boxes, making them excellent projects for beginners to practice fundamental woodworking joints.
- Cut Your Pieces: Accurately measure and cut your wood panels for the sides and bottom. For a rectangular planter, you’ll typically need two longer side pieces, two shorter end pieces, and a bottom piece.
- Joining the Sides:
- Butt Joints: The simplest method. Pieces are joined edge to face and secured with glue and screws/nails. Reinforce with corner blocks for added strength.
- Mitered Joints: For a cleaner, seamless look, cut the edges at 45-degree angles to form a 90-degree corner. These require precision and good clamping.
- Dado or Rabbet Joints: These involve cutting grooves or recesses into one piece of wood to accept another, providing more surface area for glue and a stronger joint. These are more advanced but highly durable, especially for the bottom panel. For more on various joinery methods, refer to Beginner’s Guide to Essential Woodworking Joints.
- Attach the Bottom: Ensure the bottom piece fits snugly. It can be glued and screwed/nailed to the lower edges of the side pieces or set into a dado groove for a stronger, more aesthetic finish.
Crucial Drainage Solutions
Proper drainage is the single most important factor for the health of your indoor plants and the longevity of your wooden planter. Without it, roots will rot, and the wood will quickly degrade.
- Drainage Holes: Drill several 1/4-inch to 1/2-inch holes in the bottom of the planter. For larger planters, aim for 3-5 holes per square foot.
- Gravel Layer (Optional but Recommended): A 1-2 inch layer of coarse gravel or pebbles at the bottom of the planter, beneath the soil, can help prevent soil from compacting the drainage holes and allows excess water a place to pool away from roots.
- Potting Liner: A non-toxic, waterproof liner is highly recommended, especially for woods less resistant to moisture or if you’re concerned about potential chemical leaching from treated wood. Heavy-duty pond liner, thick plastic sheeting (food-grade if possible), or even multiple layers of contractor-grade garbage bags can work. Ensure the liner extends up the sides and has small holes punched into it, aligning with your planter’s drainage holes.
- Elevated Base: Consider adding small feet or a slight elevation to the bottom of the planter to allow air circulation beneath it and prevent water from pooling directly on your floor or windowsill. This also protects surfaces from moisture rings.
Finishing for Protection and Aesthetics
The right finish protects the wood from moisture and enhances its appearance.
- Sanding: Thoroughly sand all surfaces, starting with a coarser grit (e.g., 80 or 100) and progressing to finer grits (180 or 220) for a smooth finish. This also prepares the wood for optimal stain/sealant absorption.
- Stain (Optional): If you want to change the wood’s color, apply a wood stain according to product directions. Allow it to dry completely.
- Sealing and Waterproofing: This is critical for indoor planters.
- Interior: Even with a liner, applying a non-toxic, waterproof sealant to the interior surfaces provides an extra layer of protection. Marine-grade spar varnish, epoxy resin, or even a few coats of a polyurethane sealant (once fully cured, usually 72 hours, these are generally food-safe and inert) are good options.
- Exterior: For the exterior, choose a finish that complements your home style and offers good moisture protection.
- Tung Oil or Linseed Oil: Natural, penetrating oils that enhance the wood’s grain and offer good water resistance. They provide a matte or satin finish. Reapply periodically.
- Polyurethane or Varnish: These form a protective film on the wood surface, offering excellent water resistance and durability. Available in various sheens from matte to high-gloss.
- Beeswax/Mineral Oil: A natural, non-toxic option, particularly good for planters holding edible herbs. Offers mild water resistance and a soft luster. Requires more frequent reapplication.
Always allow finishes to cure fully in a well-ventilated area before introducing plants or bringing the planter indoors. Proper finishing significantly extends the life of your DIY Wooden Planters for Indoor Herbs and Succulents: Aesthetic Designs for Every Home Style, keeping them beautiful for years to come.
Conclusion
The act of crafting DIY Wooden Planters for Indoor Herbs and Succulents: Aesthetic Designs for Every Home Style offers a deeply rewarding experience, blending the practicalities of plant care with the personal expression of woodworking. By carefully selecting moisture-resistant woods, implementing robust drainage systems, and applying protective finishes, you can create pieces that are not only beautiful but also built to last. Whether your home whispers minimalist calm or shouts bohemian vibrancy, there’s a wooden planter design waiting to be brought to life by your hands in 2026. These planters serve as more than just containers; they become integral parts of your living space, infusing natural charm and showcasing your unique flair.
Start your woodworking journey today. Begin with a simple design, experiment with different wood types, and gradually refine your techniques. The joy of nurturing your indoor greens in a planter you built yourself is an unparalleled satisfaction. Explore other Profitable Woodworking for Beginners to continue honing your craft and enriching your home.

SEO Meta Title: DIY Wooden Planters for Indoor Herbs & Succulents SEO Meta Description: Craft aesthetic DIY wooden planters for indoor herbs & succulents in 2026. Explore designs, wood choices, drainage, and finishing for every home style.
