
{“cover”:”Beginner’s Guide to ‘Carpentry’ Terminology and Core Skills: Laying the Foundation for Woodworking Success”}{“content”:[“Multi-panel labelled infographic showing common carpentry terminology in action. Panel 1: ‘Grain’ with an arrow pointing to wood grain texture. Panel 2: ‘Kerf’ showing a saw blade cutting through wood with a labeled kerf gap. Panel 3: ‘Miter’ with an illustration of two pieces of wood joined at a 45-degree angle. Panel 4: ‘Dado’ illustrating a rectangular groove cut into a piece of wood. Each panel has a short heading and 2-3 bullet point labels defining the term and its application, presented on a clean white background with a professional, educational aesthetic.”,”Step-by-step diagram illustrating core carpentry skills for beginners. Step 1: ‘Accurate Measuring’ showing a hand precisely marking wood with a tape measure and pencil. Step 2: ‘Precise Cutting’ with a hand guiding a handsaw along a marked line on a marked line on a piece of lumber. Step 3: ‘Square Jointing’ depicting two pieces of wood being joined at a perfect 90-degree angle, with a square tool ensuring accuracy. Step 4: ‘Sanding & Finishing’ showing a hand sanding a smooth wooden surface. Each step is clearly numbered with a concise caption and a small, illustrative icon on a light-colored background, using a friendly, instructional style.”,”Editorial photograph of a diverse group of novice woodworkers in a bright, modern workshop, engaged in different foundational carpentry tasks. One person is practicing accurate measuring with a tape measure, another is carefully using a hand plane to smooth an edge, and a third is assembling a simple box joint. The scene is collaborative and encouraging, emphasizing hands-on learning. Tools are safely and correctly used, and the atmosphere is one of focused learning and initial success, with natural light and a clean, organized setting.”]} The profound satisfaction of transforming raw timber into a functional or beautiful object is a unique reward, yet it often remains out of reach for many aspiring craftspeople due to the seemingly complex language and techniques involved. This article serves as a comprehensive “Beginner’s Guide to ‘Carpentry’ Terminology and Core Skills: Laying the Foundation for Woodworking Success,” aiming to demystify the craft and equip new enthusiasts with the fundamental knowledge needed to embark on their woodworking journey in 2026. Understanding the basic vocabulary and mastering essential hands-on skills are not merely prerequisites but are the bedrock upon which all future woodworking achievements will be built.
Key Takeaways
- Carpentry requires a foundational understanding of specific terminology for effective communication and execution.
- Mastering core skills like measuring, marking, cutting, and joining is essential for all woodworking projects.
- Safety in the workshop is paramount and must be practiced consistently with all tools.
- Consistent practice and patience are crucial for developing proficiency in carpentry.
- Starting with simple projects allows beginners to apply terminology and skills effectively.
Decoding the Language of the Workshop: Essential Carpentry Terminology
Every craft has its own language, and carpentry is no exception. Before you pick up your first saw or chisel, understanding the common terms used in the workshop will significantly enhance your learning process, improve your ability to follow instructions, and help you communicate more effectively with fellow woodworkers. This section of our “Beginner’s Guide to ‘Carpentry’ Terminology and Core Skills: Laying the Foundation for Woodworking Success” introduces you to some of the most frequently used terms.
Fundamental Wood Characteristics and Dimensions
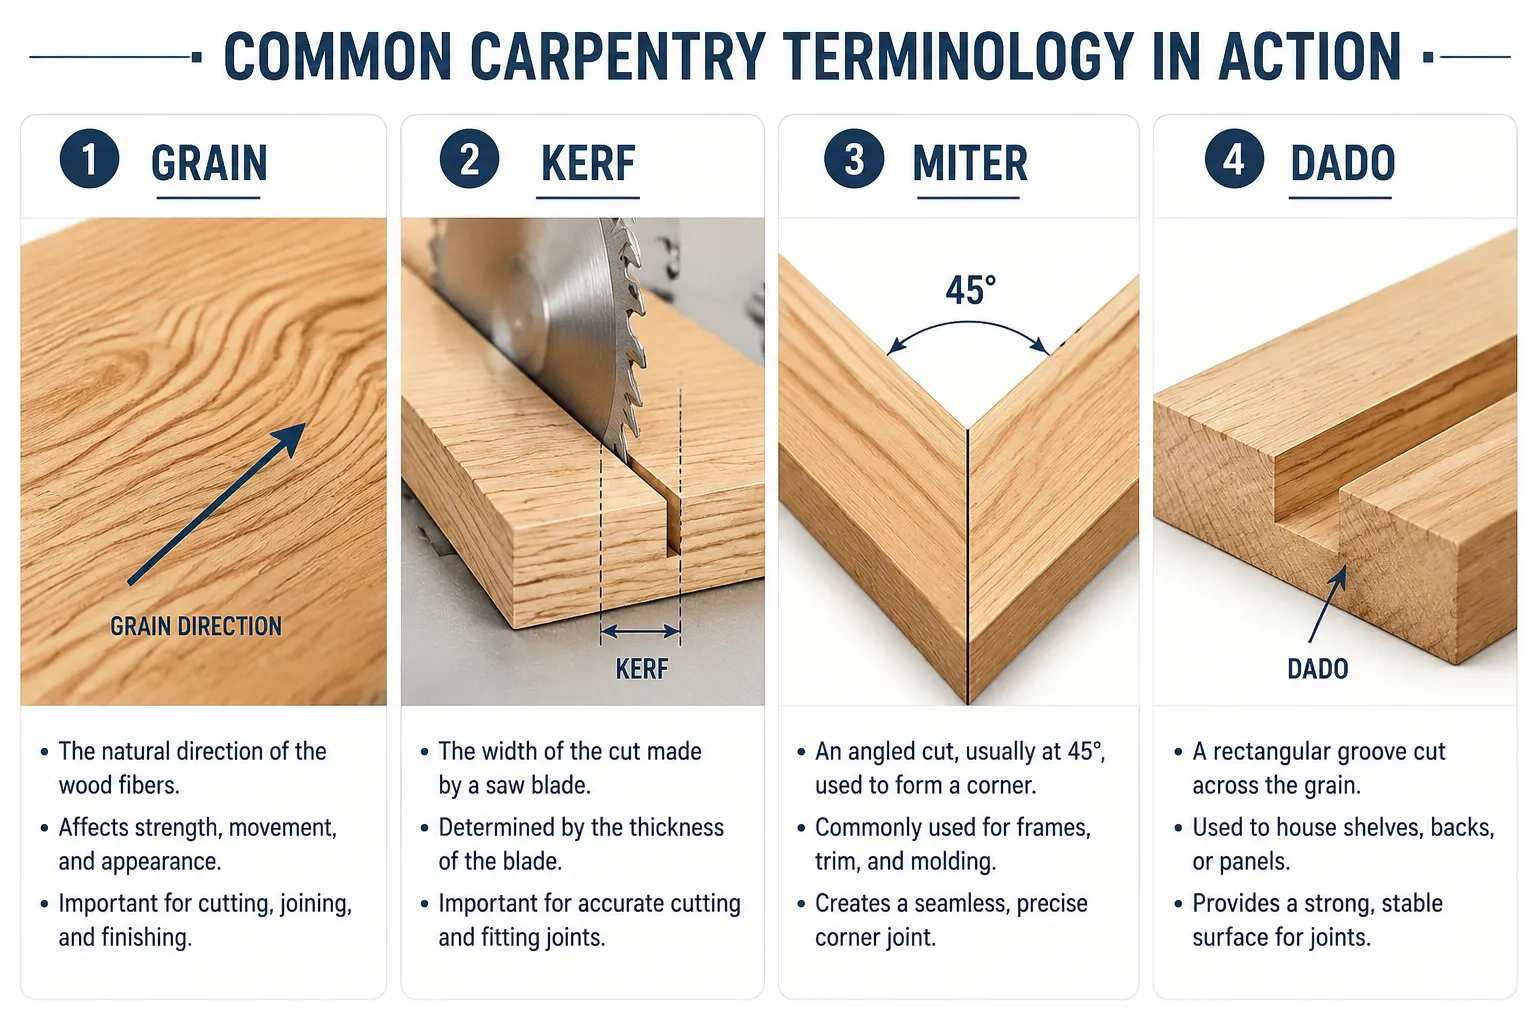
- Grain: The pattern of fibers visible in wood, typically running in the direction of tree growth. Understanding grain direction is critical for cutting, planing, and finishing.
- Board Foot: A unit of wood volume equal to 1 square foot that is 1 inch thick. This is a common measurement for lumber pricing.
- Nominal vs. Actual Size: The stated size of lumber (e.g., a “2×4”) is its nominal size before planing; its actual size (e.g., 1.5 inches x 3.5 inches) is smaller. This distinction is vital for accurate project planning.
- Hardwood vs. Softwood: Hardwoods (e.g., oak, maple) typically come from deciduous trees and are denser. Softwoods (e.g., pine, cedar) come from coniferous trees and are generally easier to work with.
Cutting and Shaping Terms
- Kerf: The width of the material removed by a saw blade. This must be accounted for when making precise cuts.
- Rip Cut: A cut made with the grain of the wood, typically used to narrow a board.
- Crosscut: A cut made against or across the grain of the wood, typically used to shorten a board.
- Miter Cut: An angled cut, usually at 45 degrees, made across the face of a board to form a corner (e.g., for picture frames).
- Bevel Cut: An angled cut made through the thickness of a board, often used for decorative edges or joinery.
- Planing: The process of smoothing or reducing the thickness of wood using a plane (hand or power tool).
- Jointing: The process of creating a perfectly flat and square edge or face on a board, often a prerequisite for gluing multiple boards together.
Joinery and Assembly Terms
Joinery is the art of connecting pieces of wood together, and mastering this aspect is a cornerstone of woodworking. For a deeper dive into techniques, consider exploring resources on mastering wood joinery techniques.
- Joint: The point or method where two or more pieces of wood are connected.
- Butt Joint: The simplest joint, where two pieces of wood are joined end-to-end or edge-to-edge. Often reinforced with fasteners or glue.
- Dado: A rectangular groove cut into a board, into which another board fits. Commonly used for shelves.
- Rabbet: A recess cut along the edge of a board, forming a shoulder. Often used for the backs of cabinets or drawer bottoms.
- Mortise and Tenon: A strong, traditional joint where a projecting tongue (tenon) fits snugly into a rectangular hole (mortise). Learn more about hand tool joinery.
- Dovetail: A strong, interlocking joint characterized by wedge-shaped pins and tails. Highly regarded for its strength and aesthetic appeal.
- Pocket Hole: A common method where screws are driven at an angle through a drilled pilot hole to join two pieces of wood.
- Clamping: Using clamps to hold pieces of wood together, especially during gluing, to ensure strong, tight joints.
- Glue-up: The process of assembling and clamping multiple pieces of wood, typically with wood glue, to form a larger panel or assembly. Selecting the right adhesive is crucial; refer to The Ultimate Guide To Wood Glue for more information.
Understanding these terms provides a crucial starting point for any beginner.
Laying the Foundation: Core Carpentry Skills for Success
With a grasp of the terminology, the next step in our “Beginner’s Guide to ‘Carpentry’ Terminology and Core Skills: Laying the Foundation for Woodworking Success” is to develop the practical skills. These foundational techniques are universal across all woodworking disciplines, from building simple shelves to crafting intricate furniture. Consistent practice is the key to proficiency.
1. Accurate Measuring and Marking
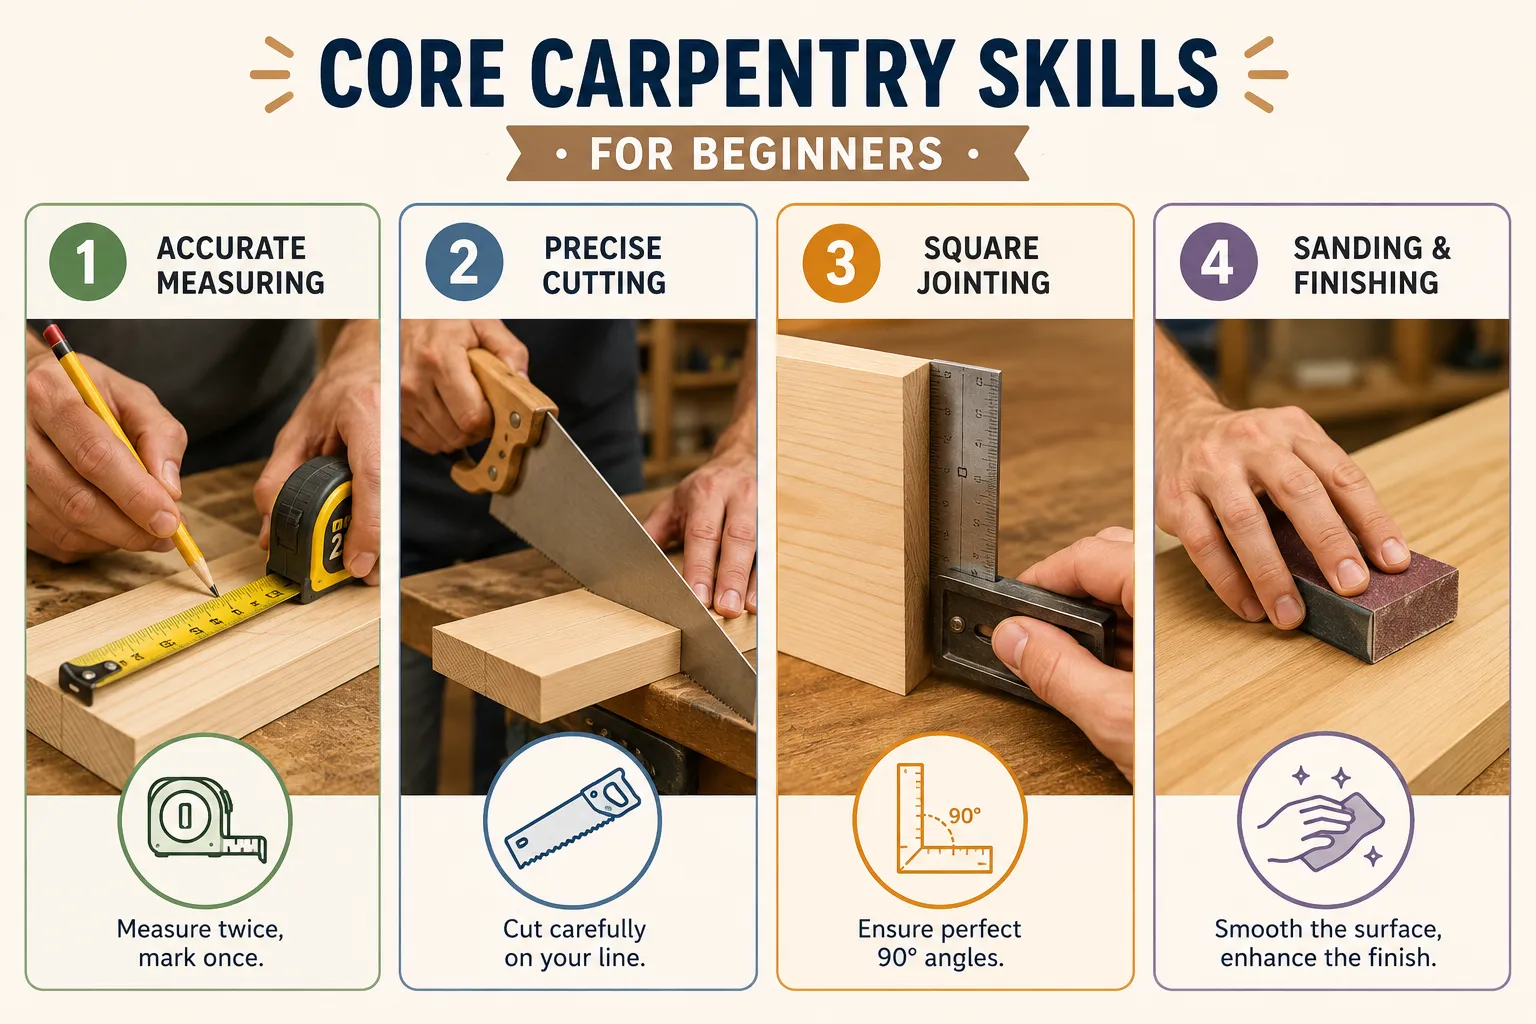
The old adage “measure twice, cut once” is the cardinal rule of woodworking. Precision in measuring and marking is the most critical skill to master.
- Tools: A good quality tape measure, a ruler, a marking knife or sharp pencil, a combination square, and a try square are essential.
- Technique:
- Always use the same measuring tool for consistent results.
- Hook the tape measure securely, or use a stop block for repetitive cuts.
- When marking, make fine, precise lines. A marking knife leaves a cleaner line than a pencil for fine joinery.
- Use squares to ensure lines are perfectly perpendicular or parallel to edges.
2. Precise Cutting
Once marked, wood needs to be cut accurately. This involves understanding different cutting tools and techniques.
- Hand Saws: Learning to use a handsaw effectively builds fundamental control. Practice starting the cut, maintaining a straight line, and finishing smoothly.
- Circular Saw: A versatile power tool for straight cuts across or along boards. Always use a guide or fence for accuracy.
- Miter Saw: Excellent for precise crosscuts and miter cuts. Crucial for framing and trim work.
- Jigs and Guides: For repetitive or highly accurate cuts, consider using jigs. Resources like Beginners Guide To Essential Woodworking Jigs can provide valuable insights.
3. Basic Joinery Techniques
Connecting pieces of wood securely is what makes a project functional and durable. Start with simple joints and gradually work your way up.
- Butt Joints: Practice joining two pieces squarely. While simple, achieving a tight, flush butt joint requires careful cutting and clamping.
- Pocket Hole Joinery: A popular and relatively easy method for strong joints, especially for beginners. It involves drilling angled holes for screws.
- Dadoes and Rabbets: Practice cutting these grooves and recesses accurately using a router or table saw. These are fundamental for cabinet construction and shelf installation.
- Fasteners: Understanding when to use screws, nails, or dowels for reinforcement is key.
4. Squaring and Flattening Stock
Working with wood that is square and flat is foundational to all other precise operations.
- Hand Planes: Learning to use a hand plane to remove thin shavings and flatten surfaces or square edges is a rewarding skill.
- Jointer and Planer: For larger stock or more efficient milling, these power tools create perfectly flat faces and consistent thicknesses.
- Checking for Square: Regularly use a try square or combination square to check edges and corners during construction.
5. Sanding and Finishing
The final steps in any project dramatically impact its appearance and longevity.
- Sanding: Proper sanding prepares the wood surface for finish. Start with a coarser grit and progressively move to finer grits until smooth. Always sand with the grain.
- Finishes: Applying a protective and aesthetic finish is essential. This could range from simple oils to varnishes or paints. Consider the wood type and intended use. For advanced options, look at Advanced Wood Finishing.
Safety First in the Workshop
No discussion of core skills is complete without emphasizing safety. Always wear appropriate personal protective equipment (PPE), including safety glasses, hearing protection, and dust masks. Understand how to properly use each tool, keeping hands clear of blades and moving parts. A clean and organized workshop also reduces hazards.
Building Confidence: Starting Your First Projects
Applying the knowledge from this “Beginner’s Guide to ‘Carpentry’ Terminology and Core Skills: Laying the Foundation for Woodworking Success” to actual projects is where real learning occurs. Starting with simple, achievable projects will help build confidence and reinforce the terminology and skills you’ve learned.

Recommended Beginner Projects
- Simple Shelves: Excellent for practicing measuring, cutting, and butt joints. Can be wall-mounted or freestanding.
- Small Storage Boxes: Great for learning precise crosscuts, dadoes, or pocket hole joinery.
- Cutting Boards: Perfect for practicing planing, sanding, and food-safe finishing techniques. See Building a Custom Cutting Board for inspiration.
- Workshop Organizers: A practical way to organize your tools while practicing various joints and assembly.
- Picture Frames: Introduce miter cuts and precise assembly for a professional finish.
These projects allow you to apply the foundational skills in a practical context. Don’t be afraid to make mistakes; they are valuable learning opportunities.
Tips for Success
- Start Small: Choose projects with few parts and straightforward joinery.
- Follow Plans: Beginners benefit greatly from detailed woodworking plans.
- Choose the Right Wood: Start with readily available and forgiving woods like pine or poplar.
- Invest in Good Tools (Gradually): You don’t need every tool at once. Begin with essential hand tools and add power tools as your skills and needs grow. For example, a reliable bench vise is invaluable for holding work securely; check out Best Budget-Friendly Bench Vises.
- Patience and Persistence: Woodworking takes time. Don’t rush, and embrace the process.
- Learn from Others: Join local woodworking clubs, watch online tutorials, or read books and articles from experienced woodworkers.
Embracing the journey of woodworking is about continuous learning and the satisfaction of creating something with your own hands. With a solid understanding of terminology and dedicated practice of core skills, you are well-prepared to build your woodworking success.
Conclusion
Embarking on the path of carpentry, armed with a comprehensive “Beginner’s Guide to ‘Carpentry’ Terminology and Core Skills: Laying the Foundation for Woodworking Success,” sets you up for a truly rewarding experience. From deciphering the precise language of the workshop to meticulously practicing fundamental techniques like accurate measuring, cutting, and joining, every step contributes to building a robust skill set. Remember, woodworking is a journey of continuous learning and refinement.
Your next steps should involve selecting a simple, achievable project to apply your newfound knowledge. Invest in essential safety gear and a few quality hand tools, and don’t hesitate to seek out beginner-friendly plans. Consistent practice, coupled with a commitment to safety and patience, will transform raw materials into cherished creations. The satisfaction of crafting something beautiful and functional with your own hands is an unparalleled reward, waiting for you to discover in 2026.