
Embarking on a challenging yet rewarding woodworking project by building your own custom pool table is an ambition many home improvement enthusiasts share. While purchasing a pre-made billiard table offers convenience, the satisfaction and customization potential of a DIY Pool Table Plan: Building a Custom Billiard Table for Your Home Game Room are unparalleled. This guide will walk you through the intricate process, ensuring robust construction and a professional finish for a centerpiece that elevates any game room in 2026.
Key Takeaways
- Building a custom pool table requires precision, patience, and a solid understanding of woodworking fundamentals.
- Selecting high-quality materials, especially for the frame and playing surface (slate), is crucial for durability and playability.
- Detailed plans are essential for accurate cuts, joinery, and assembly, leading to a professional-grade billiard table.
- Proper leveling and felt installation are critical steps that directly impact the table’s performance.
- Customizing design elements allows for a unique table that perfectly matches your home’s aesthetic.
Laying the Foundation: Design Considerations and Material Selection for Your Custom Billiard Table
Before any wood is cut, meticulous planning is paramount for a successful DIY pool table project. The primary consideration revolves around the size and style of your custom billiard table. Standard pool tables typically come in 7-foot (bar size), 8-foot (standard home), and 9-foot (regulation tournament size) lengths. Your available game room space will dictate the ideal dimensions, ensuring ample room for cue movement around all sides of the table (approximately 5 feet of clearance on each side is recommended).
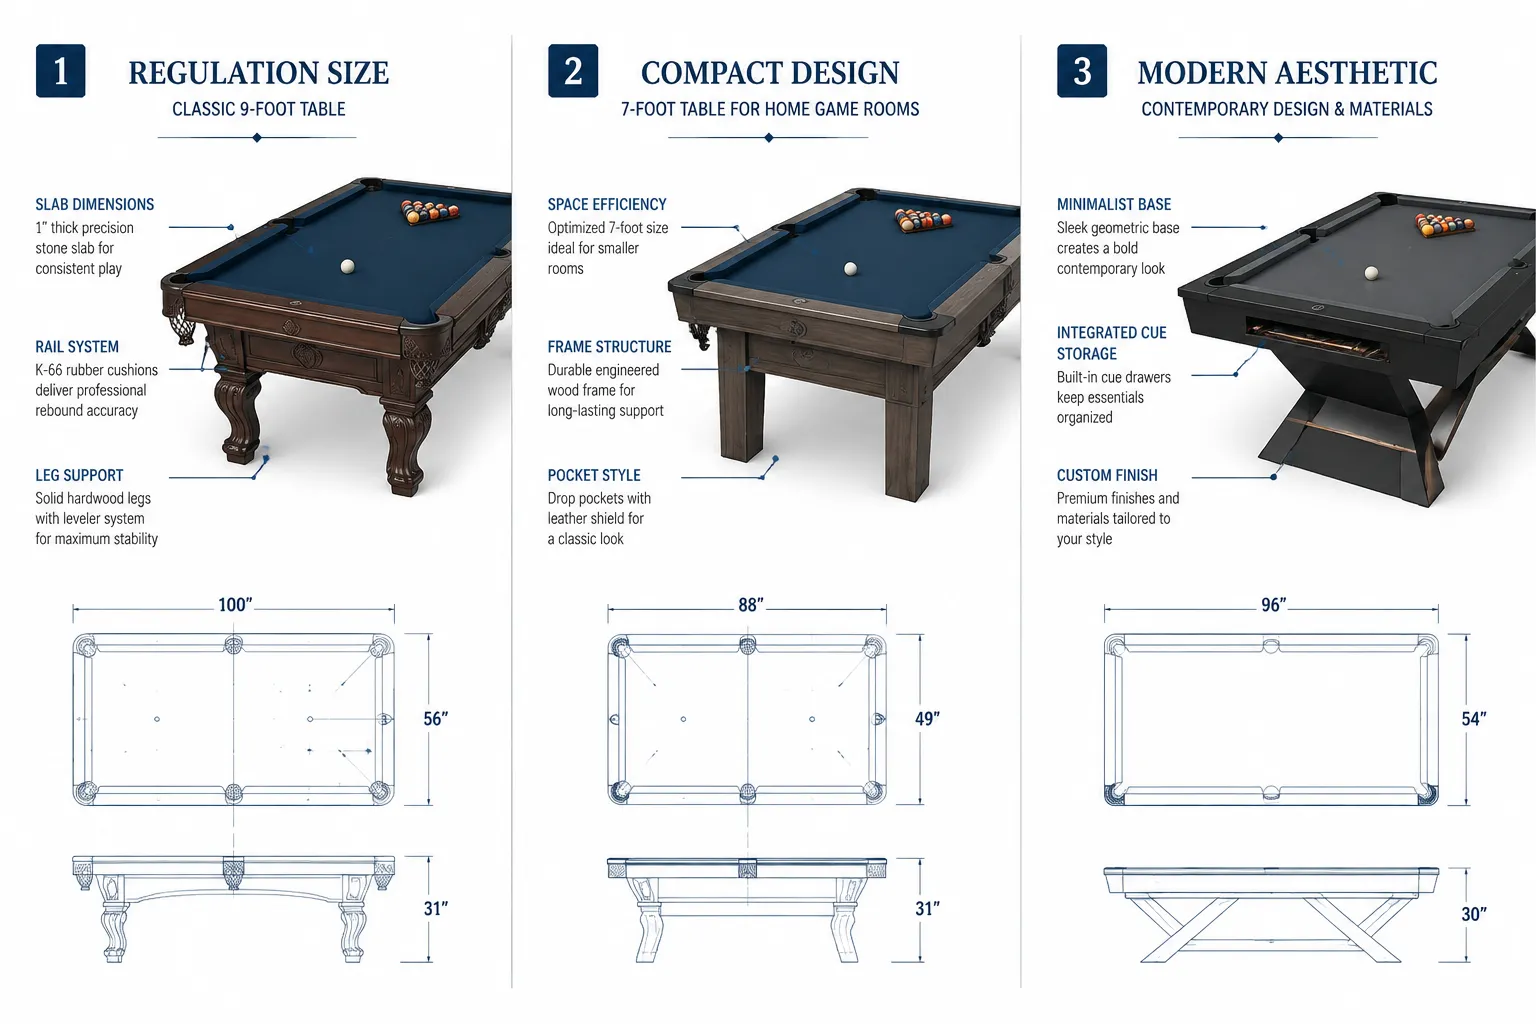
Beyond size, consider the aesthetic that best suits your home. Options range from classic, ornate designs to sleek, modern interpretations. This decision will influence your choice of wood, joinery techniques, and finishing materials.
Essential Materials for DIY Pool Table Plans: Building a Custom Billiard Table
The quality of your materials directly impacts the longevity and playability of your custom pool table.
- Wood for the Frame: Hardwoods like oak, maple, ash, or cherry are excellent choices due to their strength and stability. Plywood or MDF can be used for less critical structural components or decorative panels, but the main frame should be solid hardwood for rigidity.
- Playing Surface (Slate): This is the heart of a professional pool table. Most high-quality tables use three pieces of ¾-inch to 1-inch thick slate. While heavy and costly, slate provides the most consistent and level playing surface. Alternatives like MDF or composite materials exist for budget builds, but they lack the durability and precision of slate.
- Billiard Cloth (Felt): Worsted wool cloth is the professional standard, offering excellent ball roll and durability. Simonis is a well-regarded brand. Different colors are available to match your game room’s decor.
- Rubber Cushions (Bumpers): K-66 profile cushions are standard for most tables and provide consistent bounce. Quality rubber is essential for good play.
- Pockets: Leather drop pockets are traditional and durable, while plastic pockets are a more economical option. Consider how the balls will be collected.
- Hardware: Heavy-duty bolts, corner brackets, and leveling feet are crucial for a stable and true table.
- Adhesives and Finishes: Wood glue, screws, and your chosen stain, varnish, or paint will complete the project.
When sourcing materials, prioritize quality for components directly affecting playability, such as slate and felt. For those interested in woodworking projects for beginners, starting with a simpler design or exploring woodworking project plans for beginners: 12-month skill-building might be beneficial before tackling a pool table.
“A well-designed and solidly built frame is the bedrock of a high-performance pool table. Compromising on structural integrity will inevitably lead to an uneven playing surface and a short-lived investment.”
Construction Phases: From Frame to Finish for Your Custom Billiard Table
Building a custom pool table is a multi-stage process requiring careful execution at each step.
Step 1: Constructing the Main Frame and Legs
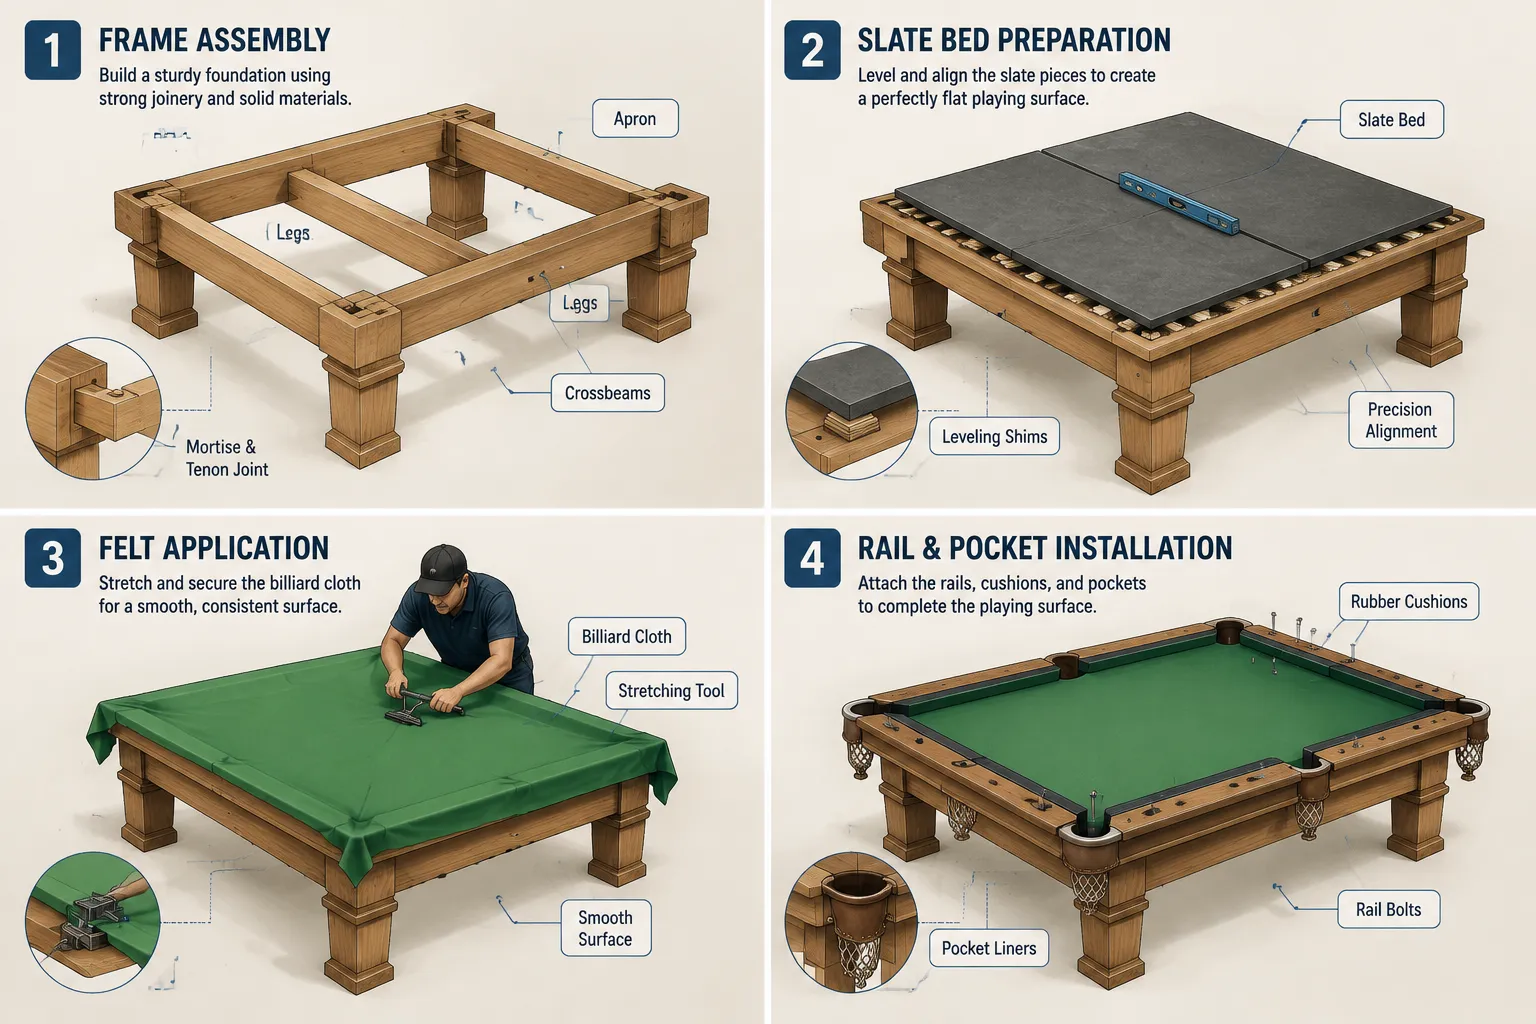
The table frame must be exceptionally sturdy and perfectly square. This typically involves building a robust sub-frame (often called the main frame or base) and attaching the legs. Strong joinery, such as mortise and tenon joints, is highly recommended for durability, though reinforced bolted joints can also work. Ensure all components are perfectly flush and square. When building furniture like this, skills gained from building DIY coffee table building guide: from design to finished centerpiece can be quite useful.
Frame Assembly Tips:
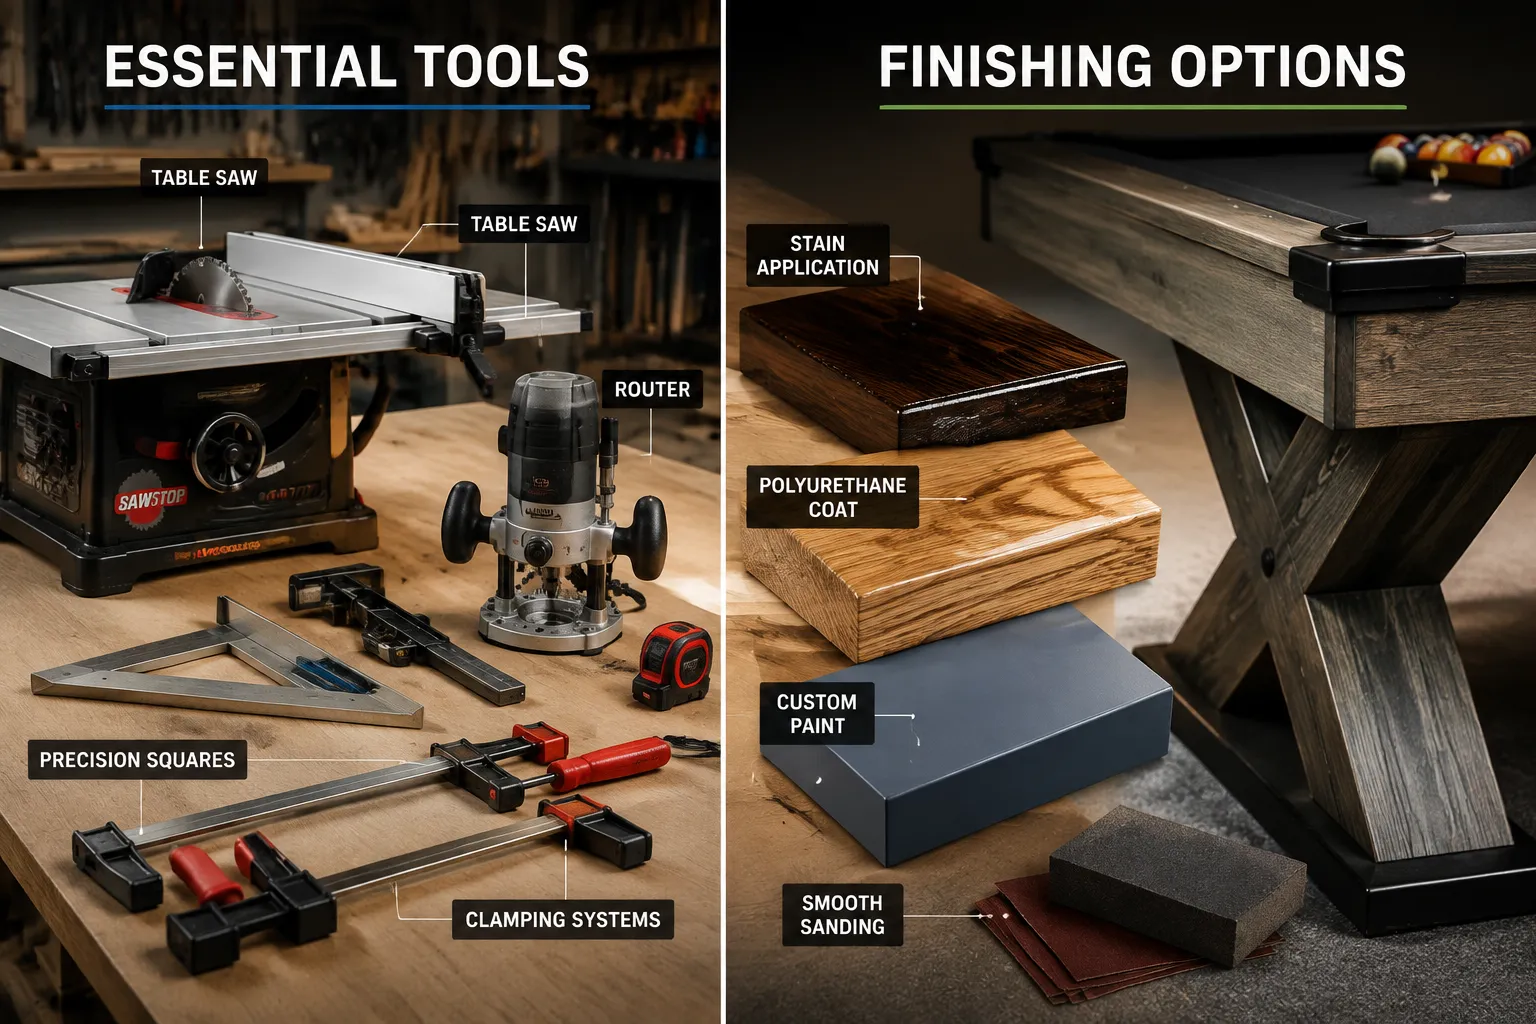
- Use a high-quality table saw for precise, straight cuts. Choosing the best table saw for your small workshop: features, brands, and safety essentials can help you select the right tool.
- Employ robust clamps during glue-up to ensure strong, tight joints.
- Verify squareness frequently with a large framing square.
Step 2: Preparing and Installing the Slate Bed
This is arguably the most critical step for playability. The slate pieces must be perfectly level and seamlessly joined.
- Support Structure: Create a strong plywood support deck on top of your main frame that will hold the slate. This deck needs to be perfectly flat and level.
- Positioning Slate: Carefully place the heavy slate pieces onto the support deck. The three pieces typically fit together with dowel pins or small metal plates.
- Leveling: This is where precision pays off. Use shims under the slate pieces to achieve absolute levelness across the entire playing surface. A high-quality spirit level or laser level is indispensable here.
- Seaming: Once leveled, use a mixture of beeswax and resin or a specialized slate filler to fill the seams between the slate pieces. Sand these seams perfectly smooth once dry to create a monolithic playing surface.
Further insights into this critical phase can be found in our beginner’s guide to building pool and billiard tables slate bed installation felt covering and pocket construction.
Step 3: Covering the Slate with Billiard Felt
Applying the felt requires careful stretching and adhesion to ensure a wrinkle-free, taut playing surface.
- Center and Secure: Center the felt over the slate, ensuring sufficient overhang on all sides. Begin by stapling or gluing the felt securely along one long side.
- Stretch and Fasten: Systematically stretch the felt tightly across the table to the opposite long side, securing it as you go. Repeat for the short sides. The goal is even tension across the entire surface.
- Pocket Cuts: Carefully cut out the pocket openings, ensuring clean edges that can be folded and secured underneath.
Step 4: Attaching the Rails and Pockets
The rails contain the rubber cushions and define the perimeter of the playing area.
- Cushion Installation: Secure the rubber cushions to the wooden rail sections. Ensure they are perfectly aligned and firmly attached.
- Pocket Liners: Install the plastic or leather pocket liners into the cutouts on the rails.
- Rail Assembly: Attach the rail sections to the main table frame, ensuring a snug, even fit. They are typically bolted through the frame from underneath, with precise alignment for accurate play.
- Drop Pockets: Secure the collection bags or ball return mechanisms to the underside of the pocket openings.
Step 5: Finishing Touches and Customization
With the main structure complete, focus on aesthetics and accessories.
- Wood Finishing: Sand all exposed wooden surfaces meticulously. Apply your chosen stain, varnish, or paint for a professional look. This stage is where your custom billiard table truly comes to life.
- Leg Levelers: Install heavy-duty leg levelers to make final micro-adjustments for perfect levelness.
- Accessories: Consider adding complementary elements like a custom cue rack and benches. Our guide on pool table benches and cue racks easy woodworking add ons to complete your game room offers great ideas for these additions.
Precision and Playability: Ensuring Your DIY Pool Table Performs Like a Pro
The difference between a good and a great pool table often lies in the meticulous attention to detail during the final assembly and setup. A beautifully crafted table that plays poorly is a source of frustration.
Critical Aspects for Optimal Playability
- Absolute Levelness: Reiterate the importance of a perfectly level playing surface. Even minor deviations can cause balls to drift. Use a high-quality carpenter’s level or a laser level across multiple points on the table, adjusting the leg levelers until perfect.
- Rail and Cushion Integrity: The rails must be firmly attached, and the rubber cushions must be consistent in their rebound. Inspect for any gaps, loose connections, or irregularities along the cushions that could affect ball trajectory.
- Felt Tension: The billiard felt needs to be evenly stretched and taut. Loose spots or wrinkles will slow down the balls and create an inconsistent roll.
- Pocket Alignment: Ensure pockets are properly aligned and free of obstructions, allowing balls to drop smoothly without snagging.
- Structural Rigidity: The entire table structure must be solid and free from wobble or flex. Any movement will compromise the level and integrity of the playing surface.
Maintenance for Longevity
Once your custom billiard table is built and playing perfectly, proper maintenance will ensure its longevity.
- Cleaning: Regularly brush the felt to remove chalk dust and debris. Periodically vacuum with a brush attachment.
- Protection: Use a pool table cover when not in use to protect the felt from dust, spills, and UV light.
- Temperature and Humidity Control: Extreme fluctuations in temperature and humidity can affect the wood and slate, potentially causing warping or felt shrinkage. Maintain a stable environment in your game room.
- Cue Care: Encourage players to use proper cue care techniques to avoid damaging the felt or rails.
Building your own custom pool table is a significant undertaking that offers immense satisfaction and a truly unique piece for your home game room in 2026. With careful planning, quality materials, and meticulous execution of each construction phase, you can achieve a professional-grade billiard table that will provide countless hours of enjoyment for years to come.
Conclusion
Building your own pool table is a challenging yet deeply rewarding endeavor that culminates in a custom billiard table perfectly tailored for your home game room. From the initial design considerations and careful material selection to the precise construction of the frame, the meticulous installation of the slate, and the flawless application of the felt, each step contributes to the ultimate playability and aesthetic appeal of your table. By adhering to best practices for structural integrity, achieving perfect levelness, and focusing on quality components, you can create a centerpiece that not only offers endless entertainment but also stands as a testament to your woodworking skill. Start planning your design, gather your high-quality materials, and embark on this impressive DIY journey to bring a professional-grade billiard experience into your home.
References
- Brunswick Billiards. (n.d.). Billiard Table Anatomy & Specifications. Retrieved from Brunswick Billiards: https://www.brunswickbilliards.com/ (Accessed February 10, 2026)
- Simon, M. (2018). The Billiard Table Book: A Complete Guide to Buying, Owning, and Maintaining a Pool Table. Skyhorse Publishing.
- Wood Magazine. (n.d.). Woodworking Project Plans. Retrieved from Wood Magazine: https://www.woodmagazine.com/ (Accessed February 10, 2026)
SEO Meta Title: DIY Pool Table Plans: Build a Custom Billiard Table SEO Meta Description: Explore DIY pool table plans to build a custom billiard table for your home game room in 2026. Learn about design, materials, and construction.